< Home

CLI: Example for Logging In to the CLI Using STelnet (RADIUS Authentication)

Networking Requirements

Figure 1 shows that the FW has a local administrator. The local administrator has some administrator permissions and can use STelnet to log in to the CLI only from a local PC for FW management and maintenance. RADIUS server authentication takes precedence over local authentication. The FW implements local authentication on administrators only when the RADIUS server does not respond.
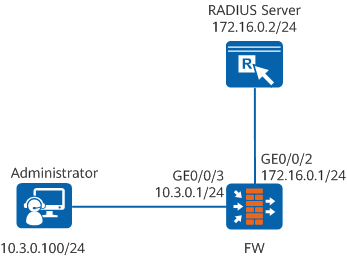
Figure 1 Networking diagram of using STelnet to log in to the CLI (RADIUS authentication)

Data Planning

Item

Data

FW

SSH account

sshadmin

Authentication mode

Password

Password

Mydevice@123

Service type

STelnet

Administrator PC

SSH client software: PuTTY software. The PuTTY software includes the PuTTY client for the STelnet service and the SFTP client PSFTP.

Configuration Roadmap

  1. Configure FW as the SSH server.
    • Configure interfaces and security policies.
    • Configure the VTY administrator interface.
    • Configure a RADIUS server template.
    • Create an SSH administrator account and specify the authentication type and service type.
    • Generate a local key pair.
    • Enable the STelnet service.
    • Configure the SSH service parameters.
  2. Configure the administrator PC as the SSH client.
    • Set an IP address for the administrator PC.
    • Install the PuTTY software.
    • Use PuTTY to log in to the FW through SSH.

The prerequisite is that IP addresses of the interface and administrator PC, security zone, route, and security policies have been configured. The following example introduces content related only to the administrator.

Procedure

  1. Configure the FW.
    1. Configure the interface IP address and SSH access function.

      <FW> system-view
      [FW] interface GigabitEthernet 0/0/3
      [FW-GigabitEthernet0/0/3] ip address 10.3.0.1 255.255.255.0
      [FW-GigabitEthernet0/0/3] service-manage enable
      [FW-GigabitEthernet0/0/3] service-manage ssh permit
      [FW-GigabitEthernet0/0/3] quit
      [FW] interface GigabitEthernet 0/0/2
      [FW-GigabitEthernet0/0/2] ip address 172.16.0.1 255.255.255.0
      [FW-GigabitEthernet0/0/2] quit

    2. Add interfaces to security zones.

      [FW] firewall zone trust
      [FW-zone-trust] add interface GigabitEthernet 0/0/3
      [FW-zone-trust] quit
      [FW] firewall zone dmz
      [FW-zone-dmz] add interface GigabitEthernet 0/0/2
      [FW-zone-dmz] quit

    3. Configure a security policy to allow the device to send authentication information to the RADIUS server.

      [FW] security-policy
      [FW-policy-security] rule name rule1
      [FW-policy-security-rule-rule1] source-zone local
      [FW-policy-security-rule-rule1] destination-zone dmz
      [FW-policy-security-rule-rule1] destination-address 172.16.0.2 32
      [FW-policy-security-rule-rule1] action permit
      [FW-policy-security-rule-rule1] quit
      [FW-policy-security] quit

    4. Configure VTY administrator interfaces that support AAA.

      [FW] user-interface vty 0 4
      [FW-ui-vty0-4] authentication-mode aaa
      [FW-ui-vty0-4] protocol inbound ssh
      [FW-ui-vty0-4] user privilege level 3
      [FW-ui-vty0-4] quit

    5. Configure a server template. In this example, a RADIUS server is used.

      [FW] radius-server template radius_server
      [FW-radius-radius_server] radius-server authentication 172.16.0.2 1812
      [FW-radius-radius_server] radius-server shared-key cipher Admin@1234
      [FW-radius-radius_server] test-aaa testname testpassword radius-template radius_server
      [FW-radius-radius_server] quit

    6. Configure an authentication scheme.

      [FW] aaa
      [FW-aaa] authentication-scheme radius
      [FW-aaa-authen-radius] authentication-mode radius local
      [FW-aaa-authen-radius] quit

    7. Create SSH administrator account sshadmin and set the authentication type and service type to Password and Stelnet. In this example, local authentication is used.

      [FW] aaa
      [FW-aaa] manager-user sshadmin
      [FW-aaa-manager-user-sshadmin] password
      Enter Password: 
      Confirm Password:   
      [FW-aaa-manager-user-sshadmin] service-type ssh
      [FW-aaa-manager-user-sshadmin] authentication-scheme radius
      [FW-aaa-manager-user-sshadmin] radius-server radius_server
      [FW-aaa-manager-user-sshadmin] quit
      [FW-aaa] bind manager-user sshadmin role system-admin
      [FW-aaa] quit

    8. Generate a local key pair.

      [FW] rsa local-key-pair create
      The key name will be: FW_Host
      The range of public key size is (2048 ~ 2048). 
      NOTES: If the key modulus is greater than 512, 
              it will take a few minutes.
      Input the bits in the modulus[default = 2048]:2048
      Generating keys...
      .+++++
      ........................++
      ....++++
      ...........++

    9. Enable the STelnet service.

      [FW] stelnet server enable

    10. Configure the administrator as an STelnet administrator.

      [FW] ssh user sshadmin
      [FW] ssh user sshadmin authentication-type password
      [FW] ssh user sshadmin service-type stelnet

    11. Optional: Set the SSH server parameters.

      # Set the listening port of the SSH server to 22, authentication timeout period 80 seconds, number of authentication retries to 4, update interval of the key pair to 1 hour, and enable the backward compatibility function.

      If the default SSH port number 22 is changed, the service-manage function does not take effect for the protocol. You need to configure a security policy to allow the protocol to access the device.

      [FW] ssh server port 22
      [FW] ssh server timeout 80
      [FW] ssh server authentication-retries 4
      [FW] ssh server rekey-interval 1
      [FW] ssh server compatible-ssh1x enable

  2. Configure the administrator PC as the SSH client.
    1. Set the IP address and subnet mask of the administrator PC to 10.3.0.100 and 255.255.255.0.
    2. Install the PuTTY software. Details are omitted.
    3. Use the PuTTY software to log in to the FW through STelnet. (The following example uses PuTTY0.60.)
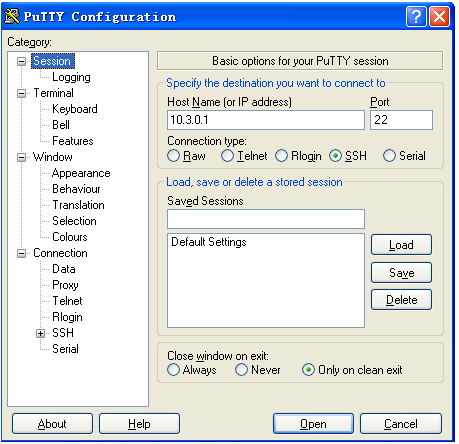
      1. Double-click PuTTY.exe. The interface shown in Figure 2 is displayed. Enter the IP address of the SSH server in the Host Name (or IP address) text box.
        Figure 2 Entering the IP address of the SSH server
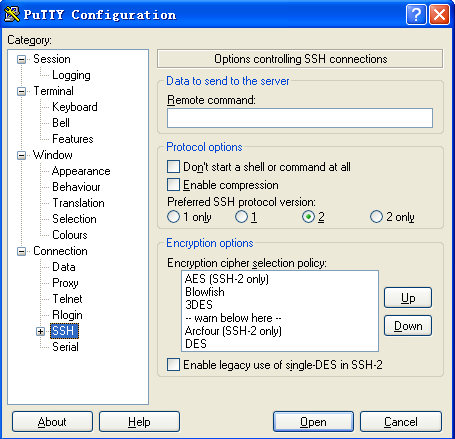
      2. Choose Connection > SSH in the left Category tree. The interface shown in Figure 3 is displayed. In Protocol options, set Preferred SSH protocol version to 2 and click Open.
        Figure 3 Setting SSH protocol version
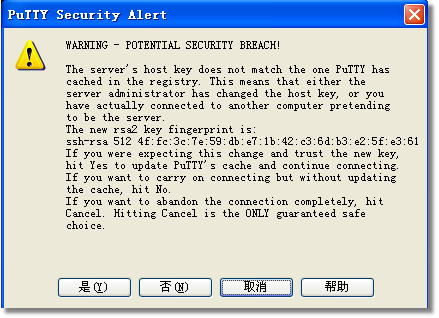
      3. Dialog box shown in Figure 4 is displayed upon the first login. Click Yes.
        Figure 4 PuTTY security alert
      4. In the login page that is displayed, enter SSH administrator account sshadmin and press Enter. Enter the password and press Enter again. You can log in to FW.

Configuration Scripts

#         
interface GigabitEthernet0/0/2                                                  
 ip address 172.16.0.1 255.255.255.0                                           
#
interface GigabitEthernet0/0/3                                                  
 ip address 10.3.0.1 255.255.255.0                                           
 service-manage enable
 service-manage ssh permit 
#
user-interface vty 0 4 
 authentication-mode aaa
 user privilege level 3
 protocol inbound ssh
#
radius-server template radius_server
 radius-server authentication 172.16.0.2 1812
 radius-server shared-key cipher %@%@*y:3*ZN}.%%qcL1cCyDwlB.|@XBVMDWq'6JF(iOz2D8>A\SN%@%@
#  
aaa
 authentication-scheme radius
  authentication-mode radius local
#  
manager-user sshadmin  
 password cipher %@%@fPXYG8r|>17U(MYaBLw0OE<3BRR/*~[B0>uW"^/){U_>wKB=%@%@
 service-type ssh 
 authentication-scheme radius
 radius-server radius_server
 level 15

bind manager-user sshadmin role system-admin
#
stelnet server enable
ssh user sshadmin                                                               
ssh user sshadmin authentication-type password                                  
ssh user sshadmin service-type stelnet                                          
ssh server port 22
ssh server timeout 80
ssh server authentication-retries 4
ssh server rekey-interval 1
ssh server compatible-ssh1x enable
#
firewall zone trust 
 set priority 85 
 add interface GigabitEthernet0/0/3
#
firewall zone dmz 
 set priority 50 
 add interface GigabitEthernet0/0/2
#                                                                              
security-policy                                                                 
 rule name rule1                                                                
  source-zone local                                                             
  destination-zone dmz                                                          
  destination-address 172.16.0.2 32                                             
  action permit                                                                 
#
return
Copyright © Huawei Technologies Co., Ltd.
< Previous topic Next topic >