Configuring HiSec Insight Interworking Using the Web UI
This section describes how to configure HiSec Insight interworking.
Prerequisites

HiSec Insight V100R003C30 and later versions support encrypted traffic analysis. Encrypted service traffic (such as HTTPS, POP3S, IMAPS, and SMTPS traffic encrypted based on SSL) can be directly mirrored to the HiSec Insight through the FW or switch. For versions earlier than HiSec Insight V100R003C30, you need to configure SSL encrypted traffic detection on the FW to decrypt the traffic and then mirror the traffic to the HiSec Insight through the FW. For configuration details, see Server Protection Through SSL-Encrypted Traffic Detection.
Procedure
- Create an API administrator. When the HiSec Insight system communicates with the FW, this administrator account shall be used for authentication.
Choose and click Add.
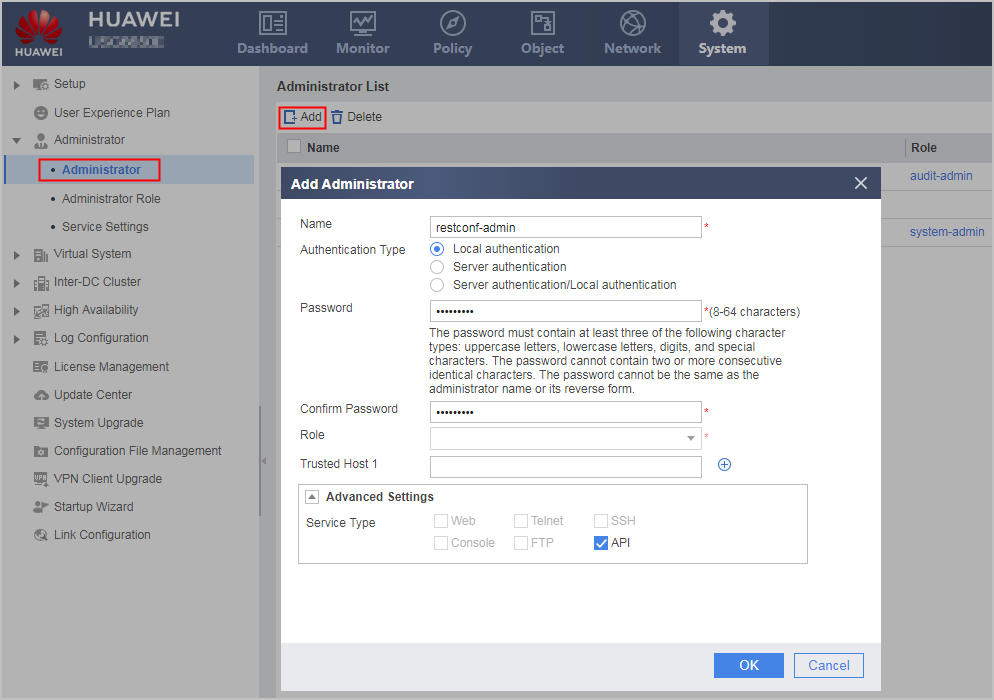
For configuration details, see Creating an Administrator Account.
- Choose to access the HiSec Insight interworking page.
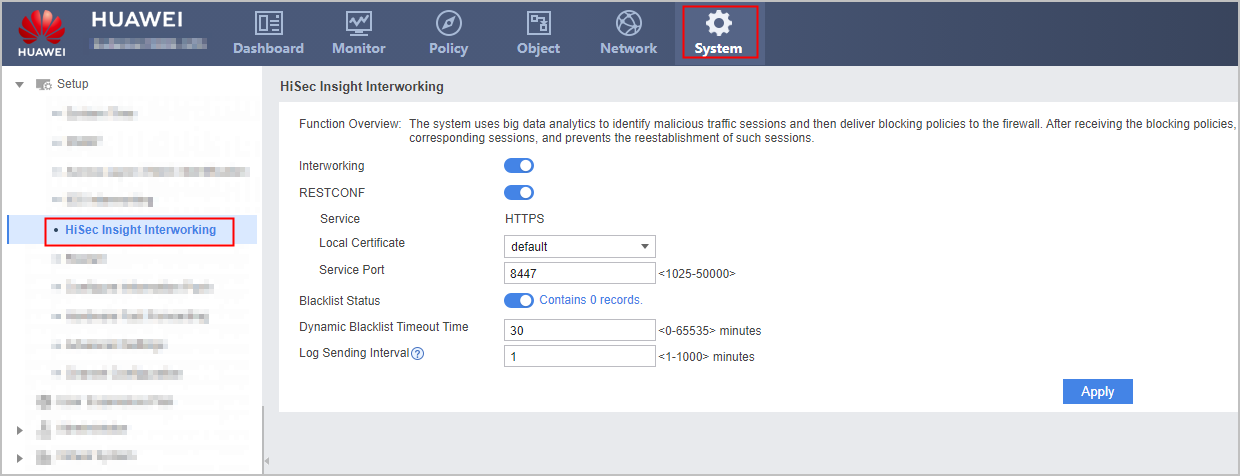
- On the HiSec Insight Interworking page, enable the HiSec Insight interworking function.
- Enable RESTCONF to configure a northbound RESTCONF interface. For detailed configuration, see Configure Northbound RESTCONF Interface in Configuring Device Services.
- Enable Blacklist Status to enable the blacklist function and view the blacklist.
- Set other parameters for HiSec Insight interworking.
Parameter
Description
Dynamic Blacklist Timeout Period
Enter the dynamic blacklist timeout period.
When the timeout period expires, the system automatically deletes the blacklist. The value 0 indicates that the database is not aged, that is, the database will never be automatically deleted by the system.
Log Sending Interval
Enter the interval at which the FW sends logs to the HiSec Insight.
Each log contains the source IP address, destination IP address, protocol, match count, slot ID, and CPU ID of a session that matches the blacklist.
- Click Apply.
Follow-up Procedure
- View the blacklist entries detected by HiSec Insight interworking.
Choose , select HiSec Insight-detection from the cause drop-down list, and click Search
The blacklist entries detected by HiSec Insight interworking are displayed.
- Change the dynamic blacklist entries detected by HiSec Insight interworking to static blacklist entries.
Dynamic blacklist entries detected by HiSec Insight interworking will be deleted after their timeout period expires. To make a dynamic blacklist entry permanently valid, you can change the timeout period of the blacklist entries whose cause is HiSec Insight-detection to Unlimited.
This operation changes the cause from HiSec Insight-detection to Manual. This change does not affect the function of blocking malicious traffic, but traffic matching such an entry will not be counted in threat logs. That is, the threat logs sent from the FW to the HiSec Insight do not contain information about such traffic.
- If the blacklist entry delivered by HiSec Insight interworking is reported falsely, add the IP address in the blacklist entry to a whitelist. Then the FW will not block the traffic with the source or destination address.