Configuring the Blacklist Using the Web UI
This section describes how to configure the blacklist using the web UI.
Prerequisites
Before you add a user blacklist entry, complete relevant user configurations. For details, see User and User Authentication.
Procedure
- Choose .
- Enable Blacklist Function on the Configure Blacklist page. Click Apply.
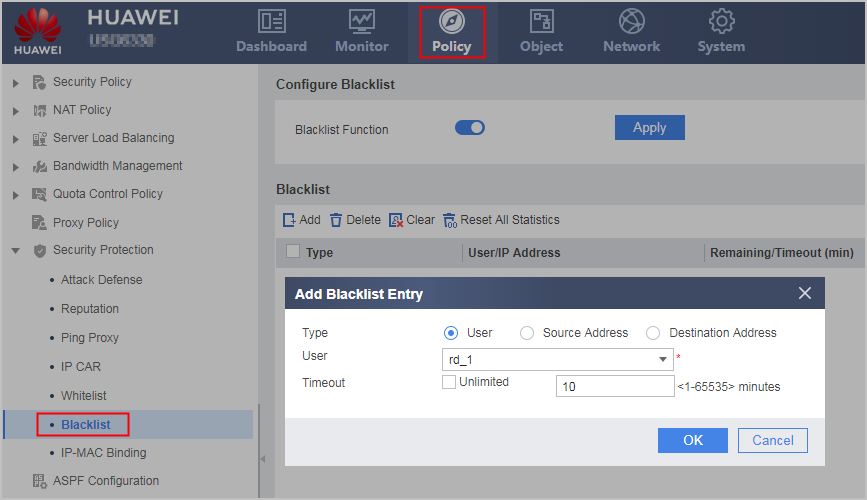
- Click Add on the Blacklist page.
- Add a blacklist entry.

The blacklist function on the FW cannot distinguish VLANs.
Blacklist a user.
Parameter
Description
Type
Select User.
User
You can select a user or enter the name of a user.
After a user is added to the blacklist, the FW discards all packets from or to the user.
Timeout
Enter a period or select Unlimited.
After the timeout period expires, the blacklist entry is automatically deleted. If Unlimited is selected, the blacklist entry is permanently valid.
Blacklist a source IP address.
Parameter
Description
Type
Select Source Address.
Source IP Address
Enter an IP address.
After a source IP address is added to the blacklist, the FW discards all packets from this IP address.
Protocol
Select a protocol or enter a protocol ID. The FW discards the packets that carry the specified protocol or carry the specified protocol and source port number but permits other packets from the same IP address. The FWpossible options are as follows:
- any (Specify a port if you select this item.)
- ICMP
- TCP (Specify a port if you select this item.)
- UDP (Specify a port if you select this item.)
- Manually enter a protocol number.
Timeout
Enter a period or select Unlimited.
After the timeout period expires, the blacklist entry is automatically deleted. If Unlimited is selected, the blacklist entry is permanently valid.
Blacklist a destination IP address.
Parameter
Description
Type
Select Destination Address.
Destination IP Address
Enter an IP address.
After a destination IP address is added to the blacklist, the FW discards all packets destined for this IP address.
Protocol
Select a protocol or enter a protocol ID. The FW discards the packets that carry the specified protocol or carry the specified protocol and destination port number but permits other packets destined for the same IP address.
- any (Specify a port if you select this item.)
- ICMP
- TCP (Specify a port if you select this item.)
- UDP (Specify a port if you select this item.)
- Manually enter a protocol number.
Timeout
Enter a period or select Unlimited.
After the timeout period expires, the blacklist entry is automatically deleted. If Unlimited is selected, the blacklist entry is permanently valid.
- Click OK.
Follow-up Procedure
You can clear all blacklist entries and packet-matching counts from the FW. This function can be used in locating faults or network debugging. To clFWear all blacklist entries, click Clear in Blacklist. To clFWear all packet-matching counts, click Reset all statistics in Blacklist. Then FWclick OK after either of the preceding operation.
On the FW with a hard disk, you can click View Blacklist Log in Blacklist to view blacklist logs by Virtual System, Start Time, End Time, or Administrator.