< Home

Configuring the LNS

This section describes the methods and precautions for configuring the LNS.

Context

Figure 1 shows the procedures for configuring L2TP VPN on the LNS and their referencing relationships, which helps you better understand and complete service configuration.

This figure provides only critical configuration procedures and their referencing relationships, not all procedures.
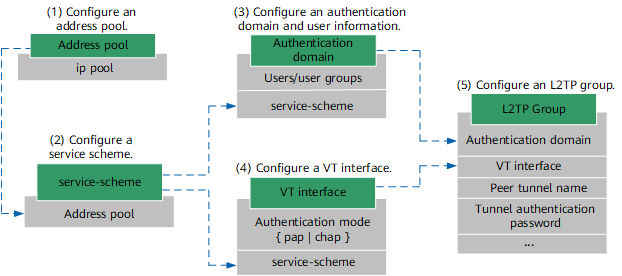
Figure 1 Flowchart for configuring L2TP VPN on the LNS

Procedure

  1. Configure an address pool.

    1. Create an address pool in the system view.

      ip pool ip-pool-name

    2. Configure an IP address segment in the address pool.

      section section-id start-address [ end-address ]

  2. Configure a service scheme.

    1. Access the AAA view from the system view.

      aaa

    2. Create a service scheme.

      service-scheme service-scheme-name

    3. Configure an address pool for the service scheme.

      ip-pool pool-name

      The address pool configured in 1 is referenced.

  3. Configure the authentication domain and user information.
    1. Create an authentication domain.

      1. Access the AAA view from the system view.

        aaa

      2. Create an authentication domain.

        domain domain-name

        service-type l2tp

        In this section, the authentication domain uses local authentication (the system uses local authentication by default). For information on the authentication domain that uses a third-party server for authentication, see the corresponding Configuring an L2TP VPN in a Virtual System.

      3. Optional: Configure a service scheme.

        service-scheme service-scheme-name

        The service scheme configured in 2 is referenced.

    2. Configure users and user groups.

      1. Create a user group in the system view and access the view of the user group.

        user-manage group group-name

      2. Create a user in the system view and access the view of the user.

        user-manage user user-name [ domain domain-name ]

        After an authentication domain is specified, users must enter their user names in the "login-name@authentication-domain-name" format for login. For example, user1@test indicates that user1 belongs to authentication domain test. If no authentication domain is specified, users belong to the default authentication domain.

        In this step a login name (account) is created, namely, the name used for authentication. The login name in domain must be unique.

      3. Configure a user password.

        password password

      4. Configure the user group to which the user belongs.

        parent-group parent-group-name

  4. Configure VT interfaces.
    1. Create a VT interface and access the view of the VT interface.

      interface virtual-template virtual-template-number

      When L2TP VPN is configured on a virtual system, the VT interface cannot be directly configured on the virtual system. The VT interface must be configured through resource binding. Specifically, after a VT interface is configured on the root system, the virtual system administrator uses the assign interface command to bind the configured VT interface to the virtual system.

    2. Configure an IP address for the VT interface.

      ip address ip-address mask

      The IP address of the VT interface cannot conflict with IP addresses in the user address pool or the addresses of other interfaces.

    3. Configure a user authentication mode.

      ppp authentication-mode { chap | eap | pap } *

      When the LAC establishes a PPP connection with the LNS, they will perform LCP negotiation. If multiple authentication modes are configured on the LNS, the LNS will prefer CHAP authentication. If the other party does not support CHAP authentication, the LNS will use PAP authentication. If the other party does not support the two authentication modes, the LCP negotiation fails.

      PAP is not a secure protocol. Therefore, CHAP is recommended. When an AD server is used to authenticate L2TP access users, only PAP authentication can be used.

    4. Configure an address pool for an access user.

      remote { address ip-address | service-scheme service-scheme }

      The LNS assigns addresses to users on the LAC in either of the following ways:

      • Assign an IP address to a single user.

        address ip-address is used only when there is only one L2TP access user and specifies the IP address to be assigned to the user.

      • Assign IP addresses to multiple users.

        service-scheme can be used to assign IP addresses in the address pool to multiple L2TP access users.

      If a user needs to use a fixed IP address, run the bind ipv4 ipv4-address and bind mode bidirectional commands in the user view to bind an IP address to the bidirectional binding user. Whether the user uses server authentication or local authentication, the user bound IP address here can not overlap the IP address in the address pool, so as to avoid conflicts when the IP address is allocated. When you bind an L2TP user to an IP address, if multiple IP addresses are configured for an L2TP user, the L2TP user uses the first IP address for access by default.

      The LNS uses the address pool configured in the service-scheme to assign intranet IP addresses to users. As shown in Figure 1, the LNS references service-scheme twice. That is, the LNS references service-scheme in the remote command on the VT interface and references service-scheme in the authentication domain. If the LNS references different service schemes in the remote command and authentication domain, the address assignment priority is affected. If an address pool is configured for the service scheme referenced by the VT interface, the address pool is used to assign an IP address to the remote device. If no address pool is configured for the service scheme referenced by the VT interface, the address pool of the service scheme referenced by the authentication domain is used to assign an IP address to the remote device.

      In addition, the LNS assigns a DNS server address to the remote device based on the following rule:
      • If the VT interface and authentication domain reference different service schemes, the DNS server address configured in the service scheme referenced by the VT interface is preferred.
      • In the service scheme view, you can configure a DNS server address or reference the DNS server address specified in the IP address pool. If a DNS server address is configured and the DNS server address specified in the IP address pool is referenced in the service scheme view, the DNS server address specified in the IP address pool is preferred.

        If no DNS server address is specified in the IP address pool of the service scheme referenced by the VT interface but a DNS server address is specified in the IP address pool of the service scheme referenced by the authentication domain, the DNS server address configured in the authentication domain will be used.

    5. Assign the VT interface to a security zone.

      firewall zone [ name ] zone-name

      add interface virtual-template virtual-template-number

      The VT interface can be assigned to any security zone. The security zone where the VT interface resides affect the security policy on the LNS. For details, see Security Policy.

  5. Configure an L2TP group.
    1. Enable L2TP in the system view.

      l2tp enable

    2. Create an L2TP group and access the view of the L2TP group.

      l2tp-group group-name

      An L2TP group is the basic unit for establishing an L2TP tunnel. The L2TP group defines parameters, such as the VT interfaces used for establishing a tunnel, tunnel name, and authorization domain for user identity authentication.

      By default, the system has an L2TP group named default-lns. The differences between L2TP group default-lns and manually created L2TP groups are as follows:
      • Peer Tunnel Name does not need to be specified for L2TP group default-lns but must be specified for manually created L2TP groups.

        During the L2TP VPN tunnel negotiation, the LNS verifies the tunnel name sent from the peer device. The devices of some third-party vendors do not provide any tunnel name. L2TP group default-lns can be used to establish tunnels with third-party devices that do not provide any tunnel name.

      • L2TP group default-lns can be modified but cannot be deleted. Manually created L2TP groups can be modified and deleted.
      You can use L2TP group default-lns or create an L2TP group to establish an L2TP VPN tunnel with the peer device.

    3. Specify the parameters for the L2TP group, such as the VT interfaces for establishing a tunnel, authentication domain, and peer tunnel name.

      allow l2tp virtual-template virtual-template-number [ remote remote-name ] [ domain domain-name ] [ vpn-instance vpn-instance-name ]

      virtual-template-number specifies the VT interface created in 4. remote-name specifies the peer tunnel name. domain domain-name specifies the authentication domain specified in 3.a.

      Both domain domain-name and vpn-instance vpn-instance-name must be configured in the following situations:
      • The inbound interface of the LNS (namely, external interface that establishes a tunnel with the LAC) is bound to a VPN instance.
      • L2TP and BGP/MPLS IP VPN are used together.
      In Windows 2000 Beta 2, if the local name of the VPN connection is NONE, the peer tunnel name received by the LNS is NONE. In case of a connection request initiated by an unknown device, use L2TP group default-lns.

    4. Optional: Enable the function of aging out idle L2TP tunnels.

      l2tp idle-timeout

      After the function is enabled, the LNS monitors the status of all L2TP tunnels. If no service packet (except keepalive packets) is forwarded over an L2TP tunnel within the specified aging time, the LNS disconnects the L2TP tunnel.

      • If the idle time of only one L2TP session among the L2TP sessions carried by an L2TP VPN tunnel exceeds the aging time of idle L2TP tunnels, the system will delete only the session and will not tear down the tunnel.
      • The function takes effect only when the device functions as an LNS.

    5. Optional: Configure the local tunnel name.

      tunnel name tunnel-name

      The tunnel name is a tunnel ID. It is used by the LAC to check the peer tunnel name after a tunnel is established. If tunnel-name is not set, RemoteName is displayed empty.

    6. Optional: Enable tunnel password authentication.

      tunnel authentication

      Enabling the function enhances the tunnel security. You are advised to enable the function. The function configurations on the two ends of the tunnel must be consistent. Otherwise, the tunnel fails to be established.

      To disable the function, run the undo tunnel authentication command.

    7. Optional: Configure a tunnel authentication password.

      tunnel password cipher password

      A tunnel authentication password needs to be configured only after the tunnel password authentication function is enabled.

      cipher indicates that the password is displayed in cipher text. password specifies a tunnel authentication password. The value is a string of case-sensitive characters, without command line-specific characters, such as spaces and question marks (?). The password can be 32-bit ciphertext password, such as _(TT8F] Y\5SQ=^Q`MAF4<1!! or an explicit-text password of 1 to 16 characters, such as Admin@123.

      The password must meet the minimum complexity requirement. That is, the password must contain at least three of the following, including upper-case letters (A to Z), lower-case letters (a to z), digits (0 to 9), and special characters (such as !, @, #, $, and %).

      To delete the configured tunnel authentication password, run the undo tunnel password command.

    8. Set the interval for sending tunnel Keepalive packets.

      tunnel timer hello interval

      Hello packets are sent to keep the tunnel alive.

    9. Optional: Enable the proxy ARP function.

      If the address pool addresses and headquarters addresses reside on the same network segment, you must enable the ARP proxy functions on the LNS interface connecting to the headquarters to ensure that the LNS can respond to the ARP requests from the servers at the headquarters.

      1. Access the interface connecting the LNS to the intranet.

        interface interface-type interface-number

        This interface must be an Ethernet or VLANIF interface.

      2. Enable the proxy ARP function.

        arp-proxy enable

        After being assigned an address from the address pool, a user accesses an intranet server at the LNS side. When the server replies to the access request, it finds that the destination address of the packet is in its network. Then, the server initiates an ARP request to the intranet. Proxy ARP is enabled on the interface connecting the LNS to the intranet. The interface replies to the ARP request initiated by the server. Then, the server learns the MAC address of the interface and sends a reply packet to this interface. After receiving this packet, the LNS sends it to the LAC.

Copyright © Huawei Technologies Co., Ltd.
Next topic >