Web: Example for Configuring SSL Uninstallation-based HTTPS Server Load Balancing
This example describes how to configure SSL uninstallation-based HTTP server load balancing.
Networking Requirements
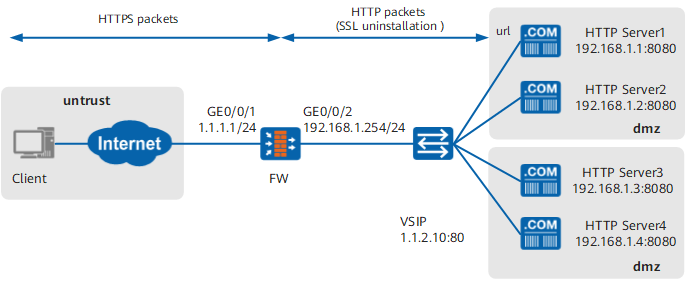
The intranet server provides the HTTPS service externally. The increasing service volume and consumption of computing resources of the server by SSL encryption computation lead to insufficient processing capability of the original server. After SSL uninstallation is enabled on the FW, the FW acts as an SSL proxy server for SSL data encryption and decryption. The restored HTTP traffic can be read directly by the intranet server to implement smooth transfer, greatly reducing the processing payload of the intranet server.
As shown in Figure 1, an enterprise has two web server groups: Servers1 and Servers2. Server group Servers1 contain two servers: Server1 and Server2. Server1 performance is twice of Server2 performance. Server group Servers2 contain two servers: Server3 and Server4. Server3 performance is the same as Server4 performance. Server groups Servers1 and Servers2 provide the HTTP service externally. Servers1 provides the unique URL service externally. In addition, the health check function is configured to monitor the work of the servers.
Configuration Roadmap
- Configure interface IP addresses, security zones, and security policies.
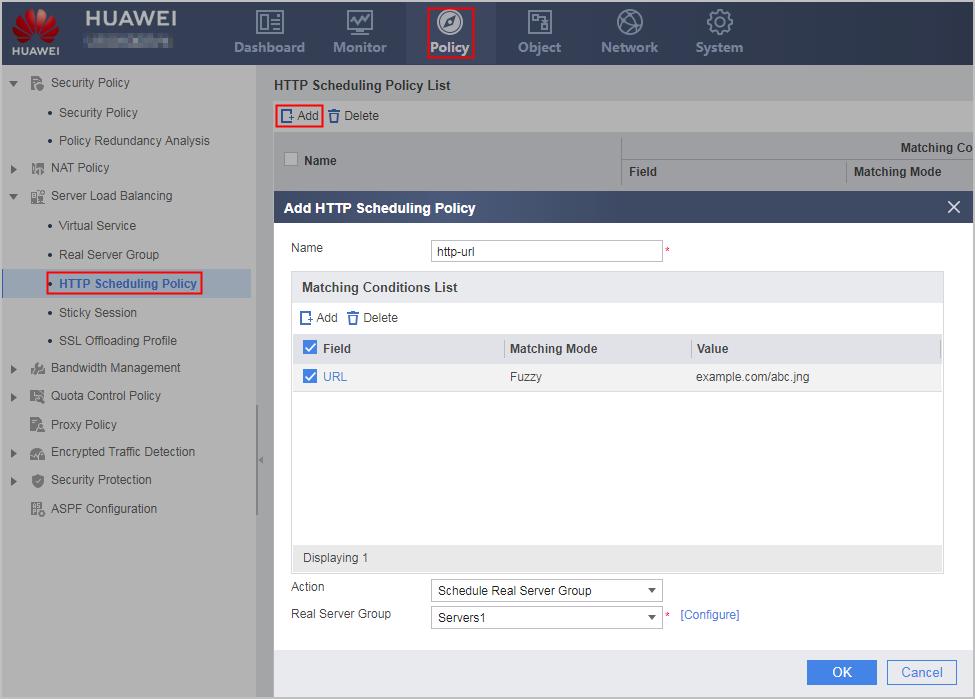
- Four servers have different functions and performance. The HTTP scheduling policies must be configured based on the functions. Select the URL field to configure an HTTP scheduling policy so that the FW allocates the traffic matching the HTTP scheduling policy to server group Server1. For load balancing of Server groups Servers1 and Servers2, the load balancing algorithm can be Weighted Least Connections.
- Configure the health check function on the FW to check server connectivity. In this example, the protocol type is set to ICMP for health check. You can also use HTTP. To allow the FWto send health check packets, configure a Local -> DMZ security policy (the servers reside in the DMZ).
- Configure the sticky session function on the FW because a client may need to establish multiple connections to a server for one task. In this manner, the connection request packets from the client can be allocated to the same server. As the servers provide HTTP services, the sticky session method can be set to HTTP Cookie-insert.
Procedure
- Choose to configure interface IP addresses and security zones.
Interface Name
GigabitEthernet 0/0/1
GigabitEthernet 0/0/2
Zone
untrust
DMZ
IP Address
1.1.1.1/24
192.168.1.254/24
- Choose to configure security policies.
Configure an Untrust -> DMZ security policy to allow Internet users to access web servers on the enterprise network. The destination IP address of the policy must be the IP address of the virtual server.
Source zone
untrust
Destination zone
dmz
Destination IP address/region
1.1.2.10/24
Configure a Local -> DMZ security policy to allow the FW to send health probe packets to the real servers.
Source zone
local
Destination zone
dmz
Destination IP address/region
192.168.1.1–192.168.1.4
- Choose to configure sticky session.
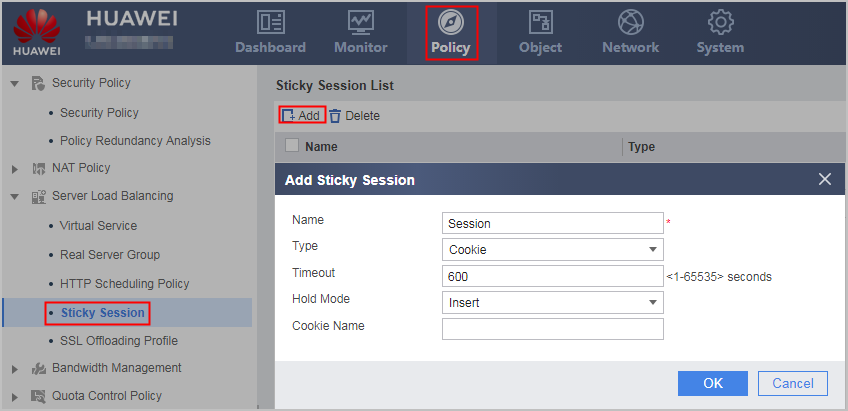
- Choose to configure real server groups Server1 and Servers2.
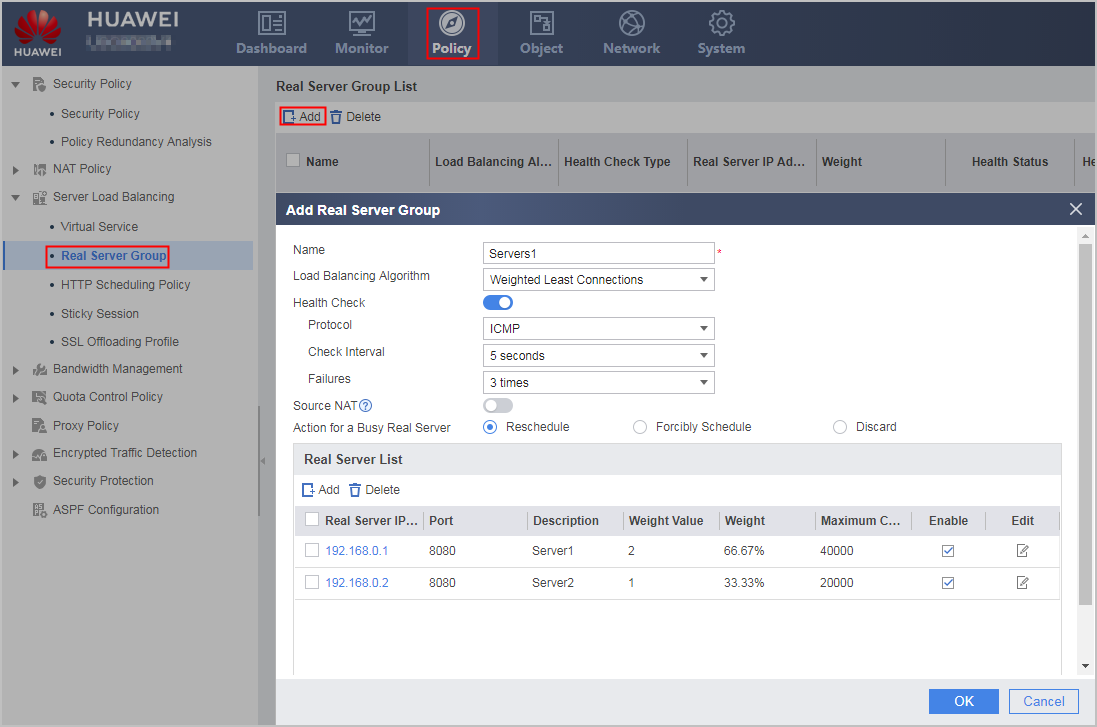
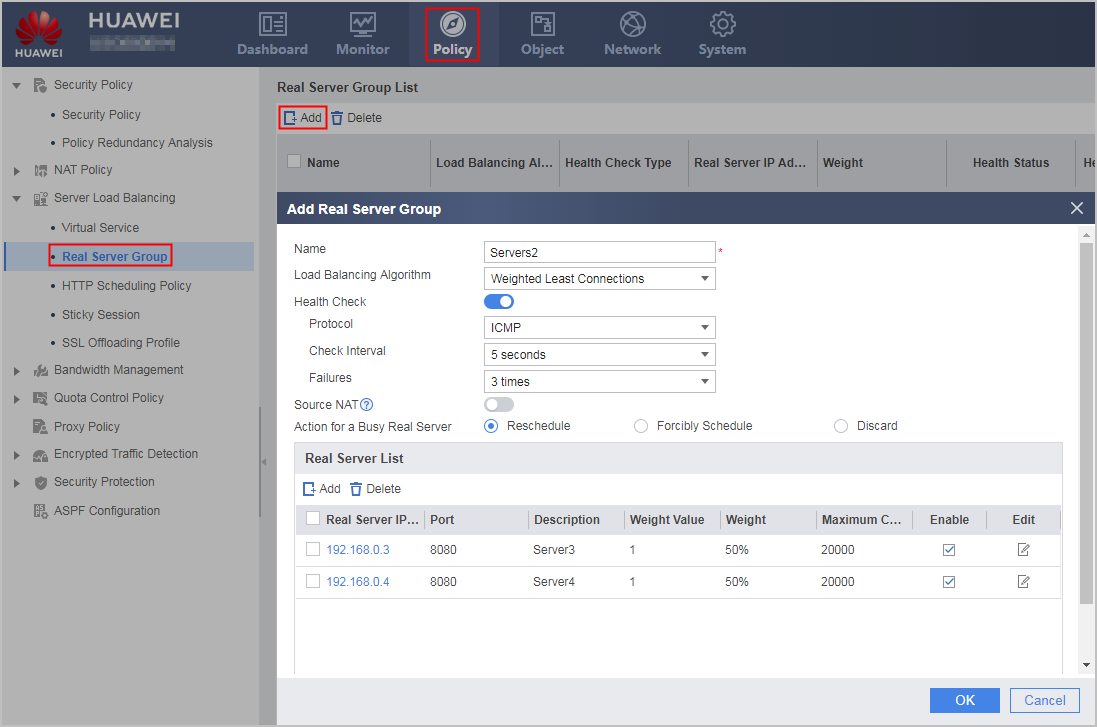
- Choose to configure an HTTP scheduling policy.
- Configure an SSL uninstallation profile.
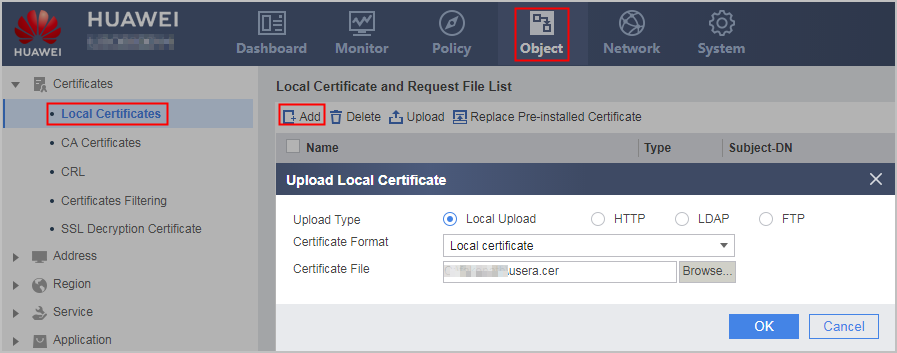
- Choose and click Upload to upload the local certificate.

The decryption password must be consistent with the certificate key, and can be obtained from the server administrator.
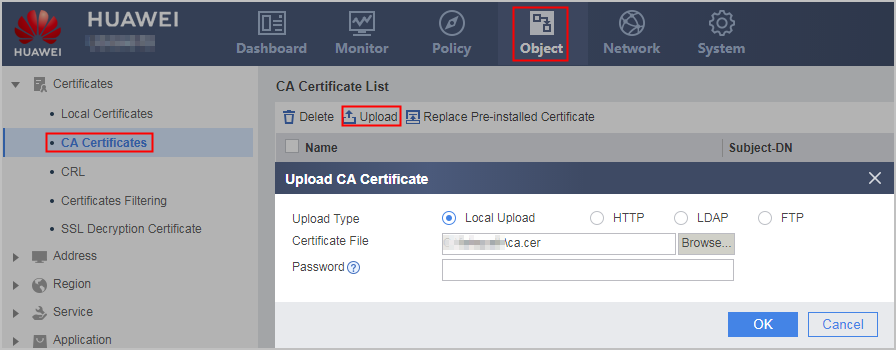
- Optional: If SSL offloading is performed on the firewall and the local certificate of the server is issued by a multi-level CA, you need to import both the local certificate and the multi-level CA certificate to the firewall. After the local certificate is referenced, the firewall sends the local certificate and CA certificate chain to the client. The client uses the complete CA certificate chain to verify the validity of the local certificate. Otherwise, a certificate security alarm or connection failure may occur during SSL handshake due to the lack of a complete certificate chain. Choose and click Upload to upload a CA certificate.
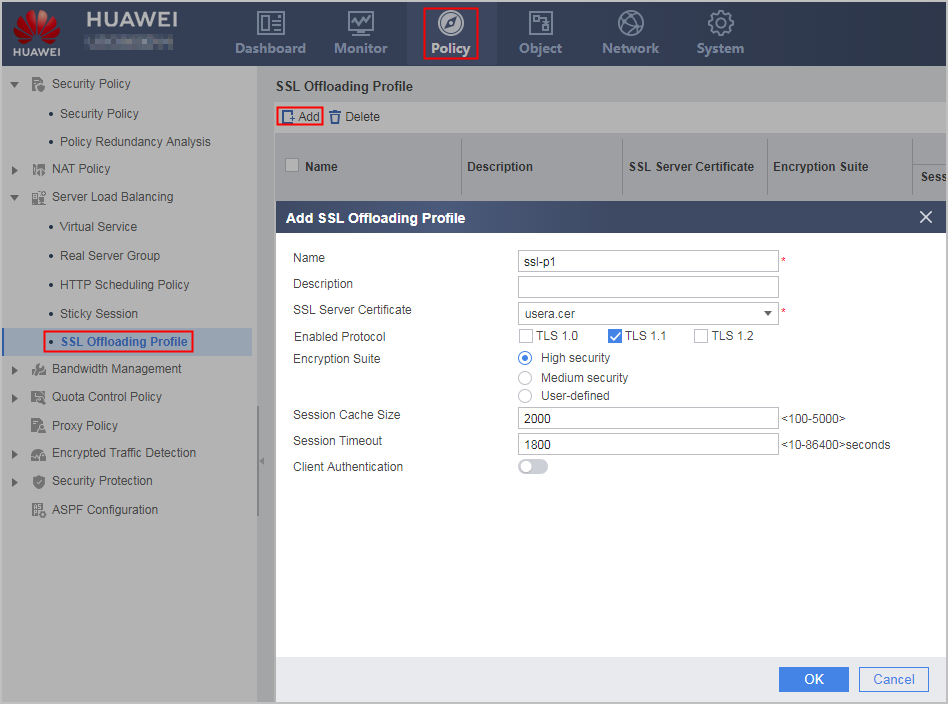
- Choose and click Add to configure an SSL uninstallation profile.
- Choose and click Upload to upload the local certificate.
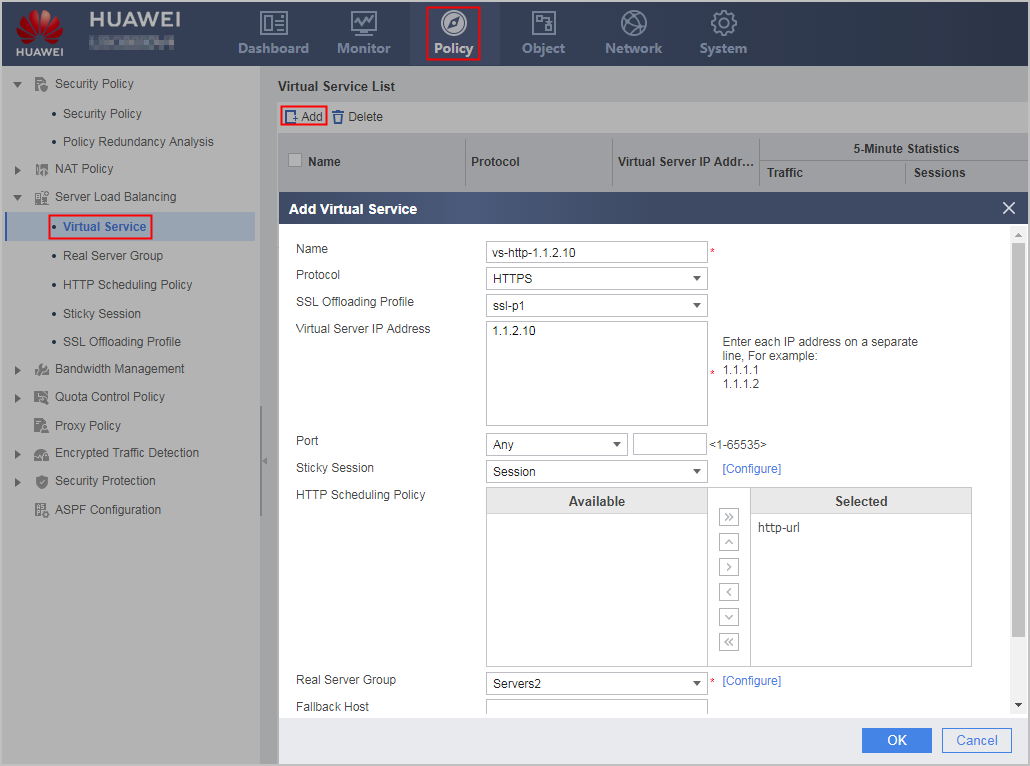
- Choose to configure a virtual service.
Configuration Scripts
#
interface GigabitEthernet 0/0/1
 ip address 1.1.1.1 24
#
interface GigabitEthernet 0/0/2
 ip address 192.168.1.254 24
#
firewall zone untrust
 add interface GigabitEthernet 0/0/1
#
firewall zone dmz
 add interface GigabitEthernet 0/0/2
#
security-policy
 rule name policy1
  source-zone untrust
  destination-zone dmz
  destination-address 1.1.2.10 24
  action permit
 rule name policy2
  source-zone local
  destination-zone dmz
  destination-address range 192.168.1.1 192.168.1.4
  action permit
#
pki import-certificate local usera.cer no-check-validate no-check-hash-alg
#
slb enable
#
slb
 persistence 0 Session
  type cookie-insert aging-time 600
 httpclass 0 http-url
  url example.com/abc.jng mode exact
  action group Servers1
 slb httpclass commit
 ssl-profile 0 ssl-p1
  server-certificate usera.cer
  ssl-version tls1.1
  ssl-algorithm medium
  session-cache number 500
  session-cache timeout 300
 group 0 Servers1
  metric weight-least-connection
  health-check type icmp tx-interval 5 times 3
  action optimize
  rserver 0 rip 192.168.1.1 max-connection 40000 port 8080 weight 2 description server1
  rserver 1 rip 192.168.1.2 max-connection 40000 port 8080 weight 1 description server2
 group 1 Servers2
  metric weight-least-connection
  health-check type icmp tx-interval 5 times 3
  action optimize
  rserver 2 rip 192.168.1.3 max-connection 20000 port 8080 weight 1 description server3
  rserver 3 rip 192.168.1.4 max-connection 20000 port 8080 weight 1 description server4
 vserver 1 vs-http-1.1.2.10
  vip 0 1.1.2.10
  protocol https
  persistence Session
  ssl-profile ssl-p1
  vport any
  httpclass http-url
  group Servers2