Creating Users and User Groups
This section describes how to create users and user groups and set their attributes on a FW.
Context
Users and user groups on a FW are management objects in the organizational structure of an enterprise. You can configure policies to reference the users and user groups to implement network behavior control and permission management.

Users are created, moved, and exported based on their authentication domains. Inter-domain operations are prohibited.
The following rules apply when you create users and user groups:
- The FW has a default authentication domain. You can create users or user groups as subordinates of the authentication domain. If other authentication domains are required, proceed to Create an Authentication Domain.
- A FW supports an organizational structure with a maximum of twenty layers, the authentication domain and users included. That is, the FW supports a maximum of eighteen layers between the authentication domain and users.
- A user group can contain multiple users and child user groups, but each user group can belong only to one parent group.
- Each user belongs to only one user group.
- Each user can belong to no parent security group or belong to a maximum of 40 parent security groups.
- Users and user groups can be referenced by policies. If a user group is referenced by a policy, all the users in this group inherit this policy.
Procedure
- Create a user group.
- Create a user.
You can select Add User to create one user at a time, or select Add Multiple Users to create users in batches. The users created in batches have the same attributes except login names. You cannot configure display names and bidirectional IP/MAC binding when creating users in batches.
When you need to create multiple users with similar attributes, first select Add Multiple Users to create users with the same attributes. Then modify specific attributes of each user to the desired value. This can reduce your configuration load.
- Set parameters for the user.
Parameter
Description
User Name
Login name used for authentication
Each login name (account) must be unique in its authentication domain.
Display Name
Display name of a user
A display name is a user identifier and cannot be used to initiate an authentication request. You are advised to use the employees' names as their display names for easy recognition and management. Users can share a display name.
This parameter is unavailable when you create users in batches.
Description
Description of a user
Describe users in a way that makes it easy to find and maintain users.
User Group
Parent group of a user
Click Select, select a group and click OK.
Each user belongs to only one user group.
Security Group
Parent security group of a user
Click Select. In Available, select the parent security group of the specified user, add it to Selected, and click OK.
Each user can belong to no parent security group or belong to a maximum of 40 parent security groups.
Authentication Type
Type of authentication on a user
If you select Local authentication, the FW implements authentication on the user. This mode requires that passwords be set on the FW.
If you select Server authentication, an authentication server implements authentication on the user. This mode does not require passwords to be set on a FW.
You need to set this parameter only when "users on the local device" and "users on the server" are both selected for User location in the authentication domain.
Password
User password
This parameter is required only when Authentication Type is set to Local Authentication.
Confirm Password
User password entered again for confirmation
This parameter is required only when Authentication Type is set to Local Authentication.
User Attribute
Expiration Time
- If you select Never, the user account never expires.
- If you select Specified Time, the user account expires after the specified expiration time. The expiration time cannot be earlier than the current system time of the FW.
An expired account cannot be used for login. However, the FW does not force online users offline whose accounts have expired.
To restore the user account to the active state, prolong the validity period or reset the expiration date to ensure that the user account never expires.
Enable account sharing
If you clear this parameter, the account can be used only on one PC (IP address) at a time. When detecting that an account is already online, the FW takes either of the following actions:- Forcibly log out the account. Authentication on the current IP address succeeds.
- Login failed. The account is used for the login at another IP address.
Choose . In Authentication Conflict Setting, you can view and modify the actions to take.
IP/MAC Binding
Mode in which a user is bound to an IP address and MAC address.
- No binding: Indicates that a user is not bound to any IP or MAC address. The user can log in to a PC using the account from any IP address that is within the IP address range specified by an authentication policy.
- Unidirectional binding: In unidirectional binding, a user must use the specified IP and MAC addresses to log in. The same IP and MAC addresses can also be used by other users.
- Bidirectional binding: In bidirectional binding, a user must use the specified IP and MAC addresses to log in. The same IP and MAC addresses cannot be used by other bidirectional binding users.
The Bidirectional binding parameter is unavailable when you create users in batches.
NOTE:The FW does not support the binding between users and IPv6 addresses.
IP/MAC bindings take effect only for Internet access users and L2TP access users. In L2TP access scenarios, an L2TP access user can be bound only to an IP address in the L2TP address pool. In this way, the bound IP address can be assigned to the user each time the user dials up through L2TP.
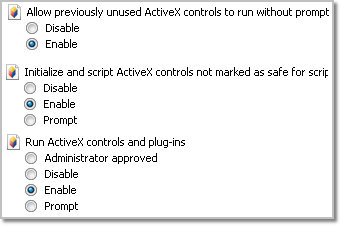
To implement unidirectional or bidirectional IP-MAC address binding, the portal authentication user must use the Internet Explorer and enable ActiveX.
IE8 is used as an example. Choose . On the Security tab, click Custom level. In ActiveX controls and plug-ins, enable the following items:
IP/MAC Address
IP address, MAC address, or IP/MAC address pair to be bound to a user
This parameter is available only when IP/MAC Binding is set to Unidirectional binding or Bidirectional binding.
A maximum of three entries can be bound to each user.
- Set parameters for the user.