< Home

Creating Users and User Groups

This section describes how to create users and user groups and set their attributes on a FW.

Context

Users and user groups on a FW are management objects in the organizational structure of an enterprise. You can configure policies to reference the users and user groups to implement network behavior control and permission management.

Users are created, moved, and exported based on their authentication domains. Inter-domain operations are prohibited.

The following rules apply when you create users and user groups:

  • A FW has a default authentication domain. You can create users or user groups as subordinates of the authentication domain. To plan the organizational structure of another authentication domain, proceed to Configuring an Authentication Domain.
  • A FW supports an organizational structure with a maximum of twenty layers, the authentication domain and users included. That is, the FW supports a maximum of eighteen layers between the authentication domain and users.
  • A user group can contain multiple users and child user groups, but each user group can belong only to one parent group.
  • Each user belongs to only one user group.
  • Each user can belong to no parent security group or belong to a maximum of 40 parent security groups.
  • Users and user groups can be referenced by policies. If a user group is referenced by a policy, all the users in this group inherit this policy.

Procedure

  • Create a user group.
    1. Create a user group in the system view and access the user group view.

      user-manage group group-name

      The name of a user group must contain the path where the user group resides and start with a slash (/). For example, the user group name of research created in the default authentication domain is /default/research.

      User groups can share the same name, and each user group must have a unique full path in the organizational structure. For example, /default/research/group1 and /default/marketing/group1 are two different user groups.

    2. Optional: Configure the description of the user group.

      description description

      The description must clearly indicate the function of the user group to make it easy to find and maintain.

    3. Optional: Add subgroups to the user group.

      add sub-group group-name

      You can run the add sub-group group-name command to configure this user group as the parent group of another user group.

      Each user group can belong only to one parent group.

    4. Optional: Allow user accounts of the user group to be used by multiple users.

      multi-ip online enable [ only-self ]

      If the parameter only-self is not specified, the multi-IP login setting takes effect on users of the user group and its sub-user groups. If this parameter is specified, the multi-IP login setting takes effect on new users of the user group, but for users in the user group and its subgroups, the setting does not take effect.

      Temporary users are not controlled by the multi-IP login attribute of the user group or security group to which they go online. The device always allows temporary users to log in using multiple IP addresses.

  • Create a user.
    1. Create a user in the system view and access the local user view.

      user-manage user user-name [ domain domain-name ]

      After an authentication domain is specified, users must enter their user names in the login-name@authentication-domain-name format for login. For example, user1 in the test authentication domain must enter user1@test for login. If no authentication domain is specified, users belong to the default authentication domain.

      This command creates a login name (account name) of a user. The login name is used for user authentication and must be unique in the same authentication domain.

    2. Optional: Configure the display name of the user.

      alias alias

      A display name is a user identifier and cannot be used to initiate an authentication request. You are advised to use the employees' names as their display names for easy recognition and management. Users can share a display name.

    3. Optional: Configure the user description.

      description description

      Describe users in a way that makes it easy to find and maintain users.

    4. Optional: Configure the parent group of the user.

      parent-group parent-group-name

      If no parent group is specified, the default parent group is the root group in the corresponding authentication domain. For example, the default parent group of users in the default authentication domain is /default.

    5. Optional: Configure the parent security group of the user.

      parent-security-group parent-security-group-name

      Each user can belong to no parent security group or belong to a maximum of 40 parent security groups.

      Users can belong to the security group in any authentication domain.

    6. Optional: Set the user password.

      password password

      If local authentication is used, you must configure the user password on the FW. If server authentication is used, you do not need to configure the user password on the FW.

      The password complexity depends on the level command. The configured password that does not meet the complexity requirement is valid.

    7. Optional: Configure the expiration time of the user account.

      expire-time expired-date [ expired-time ]

      The expiration time cannot be earlier than the system time of the FW. If you do not run this command, the user account is always valid.

      An expired account cannot be used for login. However, the FW does not force online users offline whose accounts have expired.

      To restore the user account to the active state, prolong the validity period or reset the expiration date to ensure that the user account never expires.

    8. Optional: Allow this account to be used by multiple users.

      multi-ip online enable

      By default, the FW allows an account to be used on multiple PCs (IP addresses) at a time. If an account is prohibited from being shared by multiple users at the same time and an account is detected already online, the FW takes either of the following actions:
      • Forces the online user to log out. Authentication on the current IP address succeeds.
      • Prompts the online user with a message that the account is being used at another IP address and does not log out the online user. Authentication on the current IP address fails.

      Run the display user-manage global-configuration command. You can view the Multi-IP Online-conflict Kick-out field to confirm the current action. To change the action, run the user-manage multi-ip online-conflict kick-out enable command.

      You can determine whether to allow an account to be used on multiple PCs (IP addresses) at a time for users, user groups, and security groups. The final setting is determined by the command that is executed last. You can run the display user-manage user verbose name user-name command to view the multi-IP login setting of a user.

    9. Optional: Configure the mode in which users are bound to IP and MAC addresses.

      bind mode { bidirectional | unidirectional }

      The FW supports unidirectional binding and bidirectional binding.

      • In unidirectional binding, a user must use the specified IP and MAC addresses to log in, but the same IP and MAC addresses can also be used by other users.
      • In bidirectional binding, a user must use the specified IP and MAC addresses to log in and the same IP and MAC addresses cannot be used by other bidirectional binding users.

      By default, unidirectional binding is applied.

      The FW does not support the binding between users and IPv6 addresses.

      IP/MAC bindings take effect only for Internet access users and L2TP access users. In L2TP access scenarios, an L2TP access user can be bound only to an IP address in the L2TP address pool. In this way, the bound IP address can be assigned to the user each time the user dials up through L2TP.

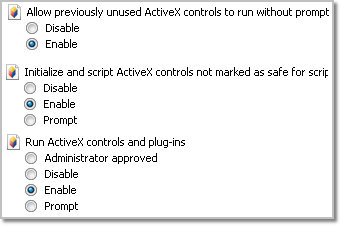
      To implement unidirectional or bidirectional IP-MAC address binding, the portal authentication user must use the Internet Explorer and enable ActiveX.

      IE8 is used as an example. Choose Tools > Internet Options. On the Security tab, click Custom level. In ActiveX controls and plug-ins, enable the following items:
    10. Optional: Configure the binding between the user and the IP and MAC addresses.

      bind { ipv4 ipv4-address | mac mac-address | ipv4 ipv4-address mac mac-address }

      A user can be bound to a maximum of three IP addresses, three MAC addresses, three pairs of IP and MAC addresses, or a flexible combination of the three types.

Follow-up Procedure

After creating user groups and users, you can perform the following operations to modify configurations:

  • Run the rename group-name command in the user group view to rename a user group.
  • Run the parent-group parent-group-name command in the user group view to change the parent group.

    Each user group can belong only to one parent group.

  • Run the rename user-name command in the local user view to rename a user.
  • Run the user-manage user-export from group group-name to csv-file command in the system view to export the users from a user group and the subgroups.

    If a user group contains no user, this group cannot be exported independently.

  • Run the user-manage user-export user user-name to csv-file command in the system view to export the specified users.
Copyright © Huawei Technologies Co., Ltd.
Next topic >