CLI: Example for Connecting to an Upstream Router (Service Traffic Diversion) and a Downstream Switch (VRRP Traffic Diversion)
This section provides an example for configuring a cluster in which devices connect to routers in upstream and switches in downstream.
Networking Requirements
As shown in Figure 1, OSPF runs between FWs and upstream routers.
Traffic of a DC should be preferentially carried on the FW in the DC. If a FW fails, traffic can be switched to other FWs.
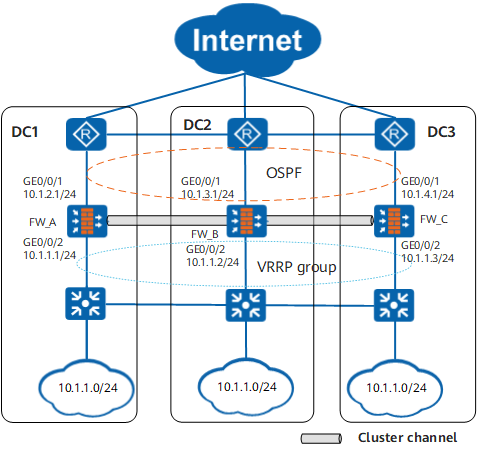
Data Planning
Item |
Data |
Description |
|---|---|---|
FW_A |
|
|
FW_B |
|
|
FW_C |
|
|
Procedure
- Complete basic network configurations. Configure interface
IP addresses, assign interfaces to security zones, and routes.
Perform the configuration on each cluster member. The following part is the configuration of FW_A. The configurations of FW_B and FW_C are similar.
# Assign IP addresses to interfaces.
<FW_A> system-view
[FW_A] interface GigabitEthernet 0/0/1
[FW_A-GigabitEthernet0/0/1] ip address 10.1.2.1 24
[FW_A-GigabitEthernet0/0/1] quit
[FW_A] interface GigabitEthernet 0/0/2
[FW_A-GigabitEthernet0/0/2] ip address 10.1.1.1 24
[FW_A-GigabitEthernet0/0/2] quit
[FW_A] interface Eth-Trunk 1
[FW_A-Eth-Trunk1] ip address 10.1.5.1 24
[FW_A-Eth-Trunk1] trunkport GigabitEthernet 0/0/3 to 0/0/4
[FW_A-Eth-Trunk1] quit
[FW_A] interface Eth-Trunk 2
[FW_A-Eth-Trunk2] ip address 10.1.6.1 24
[FW_A-Eth-Trunk2] trunkport GigabitEthernet 0/0/5 to 0/0/6
[FW_A-Eth-Trunk2] quit
[FW_A] interface Eth-Trunk 3
[FW_A-Eth-Trunk3] ip address 10.1.7.1 24
[FW_A-Eth-Trunk3] trunkport GigabitEthernet 0/0/7 to 0/0/8
[FW_A-Eth-Trunk3] quit
# Assign the interfaces to security zones.
[FW_A] firewall zone trust
[FW_A-zone-trust] add interface GigabitEthernet 0/0/2
[FW_A-zone-trust] quit
[FW_A] firewall zone dmz
[FW_A-zone-dmz] add interface Eth-Trunk 1
[FW_A-zone-dmz] add interface Eth-Trunk 2
[FW_A-zone-dmz] add interface Eth-Trunk 3
[FW_A-zone-dmz] quit
[FW_A] firewall zone untrust
[FW_A-zone-untrust] add interface GigabitEthernet 0/0/1
[FW_A-zone-untrust] quit
# Configure OSPF to ensure IP connectivity.
[FW_A] ospf 10
[FW_A-ospf-10] area 0
[FW_A-ospf-10-area-0.0.0.0] network 10.1.2.0 0.0.0.255
[FW_A-ospf-10-area-0.0.0.0] quit
[FW_A-ospf-10] quit
- Enable the cluster function.
Perform the configuration on each cluster member.
# Set cluster negotiation parameters.
[FW_A] cluster id 1000
[FW_A] cluster detect-interval 2
[FW_A] cluster timer holding-multiplier 4
[FW_A] cluster timer hello 2
[FW_A] cluster backup node-num 2
[FW_A] cluster preempt delay 70
[FW_A] cluster ip-list node 1 negotiation 10.1.5.1 backup 10.1.6.1 forward 10.1.7.1
[FW_A] cluster ip-list node 2 negotiation 10.1.5.2 backup 10.1.6.2 forward 10.1.7.2
[FW_A] cluster ip-list node 3 negotiation 10.1.5.3 backup 10.1.6.3 forward 10.1.7.3
[FW_A] cluster node bind 1
[FW_A] cluster standby config enable
[FW_A] cluster session fast-sync enable
[FW_A] cluster enable
- Configure business groups and add NAT address pools to
the UNR to be advertised.
Perform the following configuration on the management master device. The configuration will be automatically synchronized to other members in the cluster.
C_No1_M[FW_A] business-group 1
C_No1_M[FW_A-business-group-1] node 1 priority 100
C_No1_M[FW_A-business-group-1] node 2 priority 90
C_No1_M[FW_A-business-group-1] node 3 priority 80
C_No1_M[FW_A-business-group-1] ip-section 100.1.1.1 100.1.1.10
C_No1_M[FW_A-business-group-1] quit
C_No1_M[FW_A] business-group 2
C_No1_M[FW_A-business-group-2] node 1 priority 80
C_No1_M[FW_A-business-group-2] node 2 priority 100
C_No1_M[FW_A-business-group-2] node 3 priority 90
C_No1_M[FW_A-business-group-2] ip-section 100.1.1.11 100.1.1.20
C_No1_M[FW_A-business-group-2] quit
C_No1_M[FW_A] business-group 3
C_No1_M[FW_A-business-group-3] node 1 priority 90
C_No1_M[FW_A-business-group-3] node 2 priority 80
C_No1_M[FW_A-business-group-3] node 3 priority 100
C_No1_M[FW_A-business-group-3] ip-section 100.1.1.21 100.1.1.29
C_No1_M[FW_A-business-group-3] quit
- Configure traffic diversion.
Perform the configuration on each cluster member.
# Configure the cluster to track upstream interface.
C_No1_M[FW_A] cluster track interface GigabitEthernet 0/0/1
# Configure VRRP group 1 on the downstream service interface.
C_No1_M[FW_A] interface GigabitEthernet 0/0/2
C_No1_M[FW_A-GigabitEthernet0/0/2] vrrp vrid 1 virtual-ip 10.1.1.10 active
C_No1_M[FW_A-GigabitEthernet0/0/2] vrrp vrid 2 virtual-ip 10.1.1.11 active
C_No1_M[FW_A-GigabitEthernet0/0/2] vrrp vrid 3 virtual-ip 10.1.1.12 active
# Bind the VRRP group to business groups.
C_No1_M[FW_A-GigabitEthernet0/0/2] vrrp vrid 1 track business-group 1
C_No1_M[FW_A-GigabitEthernet0/0/2] vrrp vrid 2 track business-group 2
C_No1_M[FW_A-GigabitEthernet0/0/2] vrrp vrid 3 track business-group 3
C_No1_M[FW_A-GigabitEthernet0/0/2] quit
# Import the UNR to OSPF. The routing policy cluster_rt is automatically generated after the cluster function is enabled.
C_No1_M[FW_A] ospf 100
C_No1_M[FW_A] import-route unr route-policy cluster_rt
- Configure security policies.
Perform the following configuration on the management master device. The configuration will be automatically synchronized to other members in the cluster.
# Configure a security policy to allow intranet users to access the Internet.
C_No1_M[FW_A] security-policy
C_No1_M[FW_A-policy-security] rule name policy_sec1
C_No1_M[FW_A-policy-security-rule-policy_sec1] source-zone trust
C_No1_M[FW_A-policy-security-rule-policy_sec1] destination-zone untrust
C_No1_M[FW_A-policy-security-rule-policy_sec1] source-address 10.1.1.0 24
C_No1_M[FW_A-policy-security-rule-policy_sec1] action permit
C_No1_M[FW_A-policy-security-rule-policy_sec1] quit
# Configure a security policy to allow the FW and the upstream router (in the Untrust zone) to exchange OSPF packets.
C_No1_M[FW_A-policy-security] rule name policy_sec2
C_No1_M[FW_A-policy-security-rule-policy_sec2] source-zone local untrust
C_No1_M[FW_A-policy-security-rule-policy_sec2] destination-zone local untrust
C_No1_M[FW_A-policy-security-rule-policy_sec2] action permit
C_No1_M[FW_A-policy-security-rule-policy_sec2] quit
- Configure a NAT policy.
Perform the following configuration on the management master device. The configuration will be automatically synchronized to other members in the cluster.
# Configure a NAT address pool and enable PAT for reuse of public addresses.
C_No1_M[FW_A] nat address-group addressgroup1
C_No1_M[FW_A-address-group-addressgroup1] section 0 100.1.1.1 100.1.1.29
C_No1_M[FW_A-address-group-addressgroup1] quit
# Configure a Source NAT policy for Internet access from the specified private subnet.
C_No1_M[FW_A] nat-policy
C_No1_M[FW_A-policy-nat] rule name policy_nat1
C_No1_M[FW_A-policy-nat-rule-policy_nat1] source-zone trust
C_No1_M[FW_A-policy-nat-rule-policy_nat1] destination-zone untrust
C_No1_M[FW_A-policy-nat-rule-policy_nat1] source-address 10.1.1.0 24
C_No1_M[FW_A-policy-nat-rule-policy_nat1] action source-nat address-group addressgroup1
C_No1_M[FW_A-policy-nat-rule-policy_nat1] quit
C_No1_M[FW_A-policy-nat] quit
- Configure routers and switches.
# Configure OSPF on the routers to advertise routes. For configuration commands, refer to the related documents of the routers.
# Add the three interfaces of the switches to the same VLANs accordingly. For configuration commands, refer to related documents of the switches.
Verification
- Run the display cluster negotiation status command on the
cluster management master device to view the cluster negotiation status.
C_No1_M<FW_A> display cluster negotiation status

ID    status   health   version   join                 leave
------------------------------------------------------------
3     slave    10000    A         2018/02/20 16:56:14  NA
2     slave    10000    A         2018/02/20 16:56:17  NA
1*    master   10000    A         2018/02/20 16:55:32  NA
The preceding information shows that cluster 1000 has been established. The cluster has three members that use the same version and have the same health rating (10000).
Run the display business-group brief command on the management master device to view business group information.
C_No1_M<FW_A> display business-group brief
TotalBG:3   Master:1    Slave:2    Invalid:0   Init:0
BGID   State      TopThree         IP_num  Pre_Preempt  next_master
-------------------------------------------------------------------------------
  1   master      1 2 3               1        NO            -
  2   slave       2 3 1               1        NO            -
  3   slave       3 1 2               1        NO            -
The preceding information shows that FW_A serves as the master device in business group 1 and the backup device in business groups 2 and 3. The ranking of each business group meets the expectation.
Configuration Scripts
In this example, the configurations of cluster members are almost the same. The major differences are the interface IP addresses and cluster IDs of devices.
The following part is the configuration script of FW_A. The difference content is bold. Remember to modify such parts when configuring other devices.
#
cluster id 1000
cluster detect-interval 2
cluster timer holding-multiplier 4
cluster timer hello 2
cluster backup node-num 2
cluster preempt delay 70
cluster standby config enable
cluster preempt
cluster session fast-sync enable
cluster ip-list node 1 negotiation 10.1.5.1 backup 10.1.6.1 forward 10.1.7.1
cluster ip-list node 2 negotiation 10.1.5.2 backup 10.1.6.2 forward 10.1.7.2
cluster ip-list node 3 negotiation 10.1.5.3 backup 10.1.6.3 forward 10.1.7.3
cluster node bind 1
cluster enable
#
 business-group 1
  node 1 priority 100
  node 2 priority 90
  node 3 priority 80
  ip-section 100.1.1.1 100.1.1.10
 business-group 2
  node 1 priority 80
  node 2 priority 100
  node 3 priority 90
  ip-section 100.1.1.11 100.1.1.20
 business-group 3
  node 1 priority 90
  node 2 priority 80
  node 3 priority 100
  ip-section 100.1.1.21 100.1.1.29
#
 cluster track interface GigabitEthernet 0/0/1
#
ospf 10
 import-route unr route-policy cluster_rt
 area 0.0.0.0
  network 10.1.2.0 0.0.0.255
#
firewall zone trust
 set priority 85
 add interface GigabitEthernet 0/0/2
#
firewall zone untrust
 set priority 5
 add interface GigabitEthernet 0/0/1
#
firewall zone dmz
 set priority 50
 add interface Eth-Trunk1
 add interface Eth-Trunk2
 add interface Eth-Trunk3
#
interface GigabitEthernet 0/0/1
 ip address 10.1.2.1 255.255.255.0
#
interface GigabitEthernet 0/0/2
 ip address 10.1.1.1 255.255.255.0
 vrrp vrid 1 virtual-ip 10.1.1.10 active
 vrrp vrid 2 virtual-ip 10.1.1.11 active
 vrrp vrid 3 virtual-ip 10.1.1.12 active
 vrrp vrid 1 track business-group 1
 vrrp vrid 2 track business-group 2
 vrrp vrid 3 track business-group 3
#
interface GigabitEthernet 0/0/3
 eth-trunk 1
#
interface GigabitEthernet 0/0/4
 eth-trunk 1
#
interface GigabitEthernet 0/0/5
 eth-trunk 2
#
interface GigabitEthernet 0/0/6
 eth-trunk 2
#
interface GigabitEthernet 0/0/7
 eth-trunk 3
#
interface GigabitEthernet 0/0/8
 eth-trunk 3
#
interface Eth-Trunk1
 ip address 10.1.5.1 255.255.255.0
#
interface Eth-Trunk2
 ip address 10.1.6.1 255.255.255.0
#
interface Eth-Trunk3
 ip address 10.1.7.1 255.255.255.0
#
security-policy
 rule name policy_sec1
  source-zone trust
  destination-zone untrust
  source-address 10.1.1.0 24
  action permit
 rule name policy_sec2
  source-zone local
  source-zone untrust
  destination-zone local
  destination-zone untrust
  action permit
#
nat-policy
 rule name policy_nat1
  source-zone trust
  destination-zone untrust
  source-address 10.1.1.0 255.255.255.0
  action source-nat address-group addressgroup1
#