CLI: Example for Logging In to the Web UI Using HTTPS (Specified Certificate)
This section provides an example for configuring HTTPS (specified certificate) using the CLI and logging in to the web UI.
Networking Requirements
Figure 1 shows how to configure FW authentication administrator webadmin that can use HTTPS to log in to the web UI.
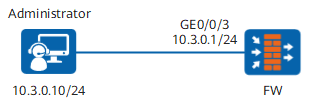
Data Planning
Item |
Data |
Description |
|---|---|---|
Administrator |
Account: webadmin Password: Myadmin@123 Level: 3 Service type: web Maximum number of online users: 10 |
- |
Role |
service-admin |
service-admin is a user-defined role and has permissions only on the network, policy, and object. |
Trusted host |
10.3.0.0/24 |
The administrator area is limited by IP address. |
Web service timeout period |
5 minutes |
- |
Configuration Roadmap
- Assign the administrator and device the certificates from one Certificate Authority (CA) for connection security.
- Create an administrator account and configure a trusted host for the administrator.
- Set an IP address for the administrator PC.
Procedure
- Configure the certificate.
- The FW generates a certificate request file. An administrator sends the file to the CA server through web, disks, or emails to apply for a certificate. The CA server generates a certificate. The administrator can use HTTP, LDAP, or other methods to download the local certificate from the server that stores the certificate to the FW memory and install the certificate. For detailed configuration process, see Certificate.

Local certificate cep_local.cer is used as example.
- Optional: Obtain the CA certificate and import it to the browser of the administrator PC (client). For details, refer to the help of the browser.
Although the client can still access the device through HTTPS even if the CA certificate is not imported to the browser, the client cannot verify the certificate and is prone to attacks.
- The FW generates a certificate request file. An administrator sends the file to the CA server through web, disks, or emails to apply for a certificate. The CA server generates a certificate. The administrator can use HTTP, LDAP, or other methods to download the local certificate from the server that stores the certificate to the FW memory and install the certificate. For detailed configuration process, see Certificate.
- Adjust web service parameters.
- Create an administrator.
- Create an administrator role.
Ignore this step if the default administrator role is used.
The default IP address of the management interface is 192.168.0.1. The interface has been assigned to the Trust zone. The administrator can log in to the device through HTTPS.
[FW] aaa
[FW-aaa] role service-admin
[FW-aaa-role-service-admin] description policy_object_network_readwrite_and_other_modules_none
[FW-aaa-role-service-admin] dashboard none
[FW-aaa-role-service-admin] monitor none
[FW-aaa-role-service-admin] system none
[FW-aaa-role-service-admin] network read-write
[FW-aaa-role-service-admin] object read-write
[FW-aaa-role-service-admin] policy read-write
[FW-aaa-role-service-admin] quit
- Create an administrator role.
- Log in to the FW on the administrator PC.
- Open a browser and enter https://10.3.0.1:8443.
- On the login UI, enter user name webadmin and password Myadmin@123 and click Login to access the web UI.
Configuration Scripts
The configuration script of the administrator and web service is as follows:
#
interface GigabitEthernet0/0/3
 ip address 10.3.0.1 255.255.255.0
 service-manage enable
 service-manage https permit
#
firewall zone trust
 set priority 85
 add interface GigabitEthernet0/0/3
#
acl number 2001
 rule 5 permit source 10.3.0.0 0.0.0.255
 rule 10 deny
#
 web-manager security enable
 web-manager security version tlsv1.2
 web-manager timeout 5
#
aaa
 authentication-scheme default
#
manager-user webadmin
 password cipher %@%@fPXYG8r|>17U(MYaBLw0OE<3BRR/*~[B0>uW"^/){U_>wKB=%@%@
 service-type web
 access-limit 10
 acl-number 2001
 #
 bind manager-user webadmin role service-admin
 role service-admin
  description policy_object_network_readwrite_and_other_modules_none
  dashboard none
  monitor none
  system none
  network read-write
  object read-write
  policy read-write
#
return