Web: Example for Configuring SIP Over TLS NAT ALG
This section provides an example for configuring SIP over TLS ALG.
Networking Requirements
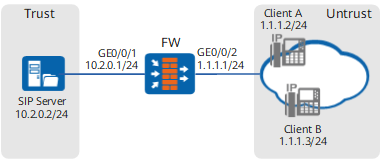
As shown in Figure 1, a SIP server is deployed on the enterprise intranet. When going online, each SIP client needs to send a register message to the SIP servers. The register messages are carried through SIP.
To enhance security, TLS is required on the SIP clients and SIP server to encrypt SIP messages. The FW is deployed between the SIP clients and SIP server to encrypt SIP messages and implement NAT ALG.
Configuration Roadmap
- Configure IP addresses for interfaces and assign the interfaces to security zones.
- Configure a security policy for communication between SIP clients and the SIP server.
- Import the server certificate and its private key to decrypt SSL-encrypted traffic and authenticate the server identity.
- Configure an inbound detection profile.
- Configure an SSL-encrypted traffic detection policy to decrypt TLS-encrypted SIP messages.
- Configure destination NAT so that the intranet SIP server can provide services externally (public address: 1.1.1.10).
- Configure ALG to properly forward SIP messages.
Procedure
- Assign IP addresses to interfaces, and add the interfaces to security zones.
- In Interface List, click
 for the GigabitEthernet 0/0/1.
Set parameters of GigabitEthernet 0/0/1 as follows. Keep default values for other parameters.
Zone
trust
Mode
Route
IPv4
Connection Type
Static IP
IP Address
10.2.0.1/255.255.255.0
- In Interface List, click
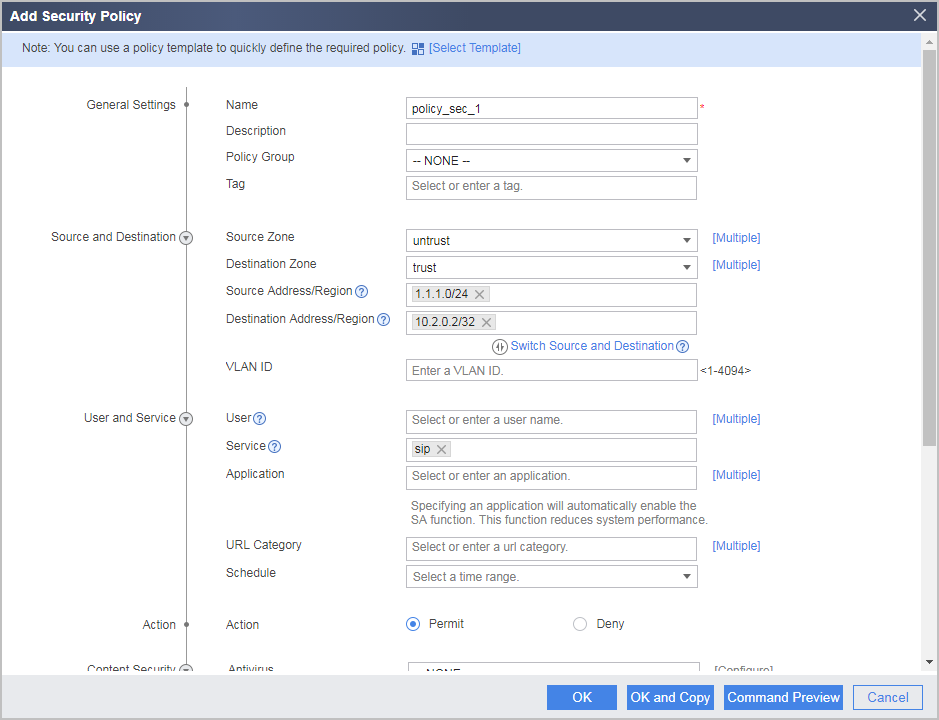
- Configure a security policy to allow SIP clients to send messages to the SIP server.
Choose , click Add Security Policy.
- Import the server certificate and its private key to decrypt SSL-encrypted traffic and authenticate the server identity.
Ensure that the server certificate imported by the FW is the same as the server certificate loaded by the SIP server. Contact the SIP server administrator to obtain the server certificate and its private key.
- Choose .
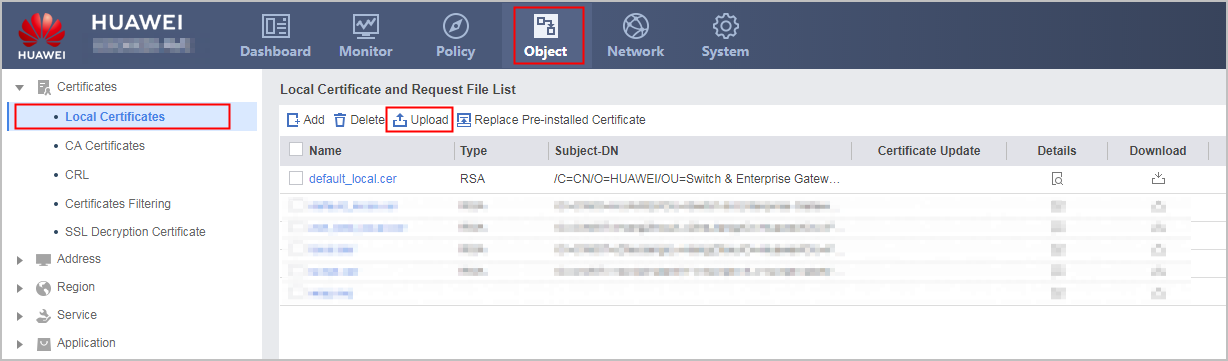
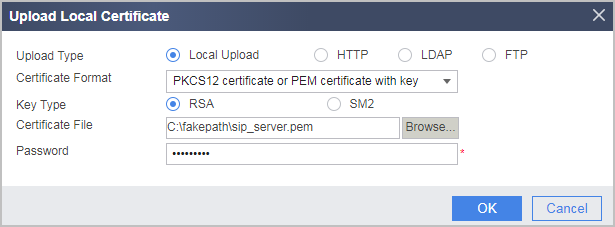
- Click Upload, and upload the server certificate and private key of the SIP Server.
The private key of the server certificate may be independent or included in the server certificate. If the private key of the server certificate is included in the server certificate, set the certificate format to PKCS12 Certificate/PEM Certificate with Key. If the private key of the server certificate is independent, set the certificate format to Certificate/PEM Certificate Without Key. The private key is a confidential file and a password is required when you export it. The password indicates the one used to encrypt the private key file.
- Choose .
- Specify the imported server certificate and private key as Internal Server Certificate.
- Choose .
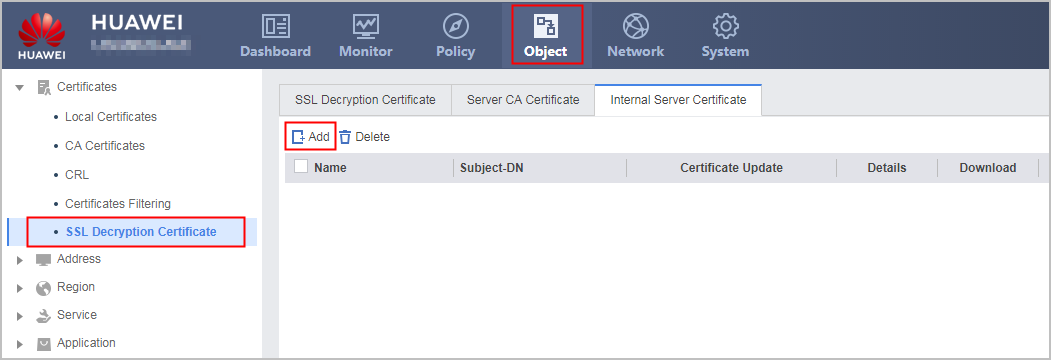
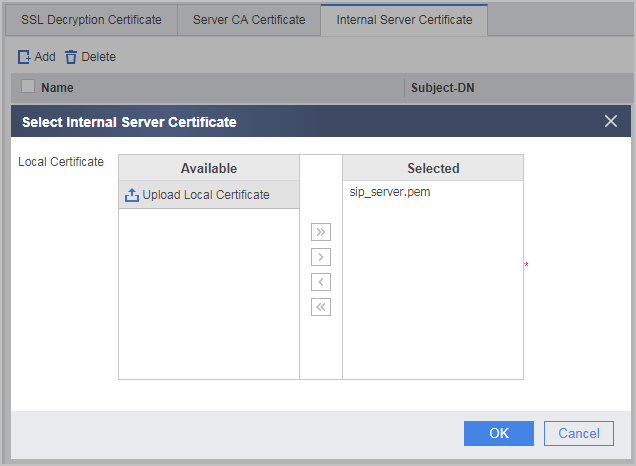
- Select the Internal Server Certificate tab and click Add.
Click the right arrowhead corresponding to the imported server certificate in the Available list box to move the server certificate to the Selected list box.
- Choose .
- Configure an inbound detection profile to protect the SIP server.
- Choose .
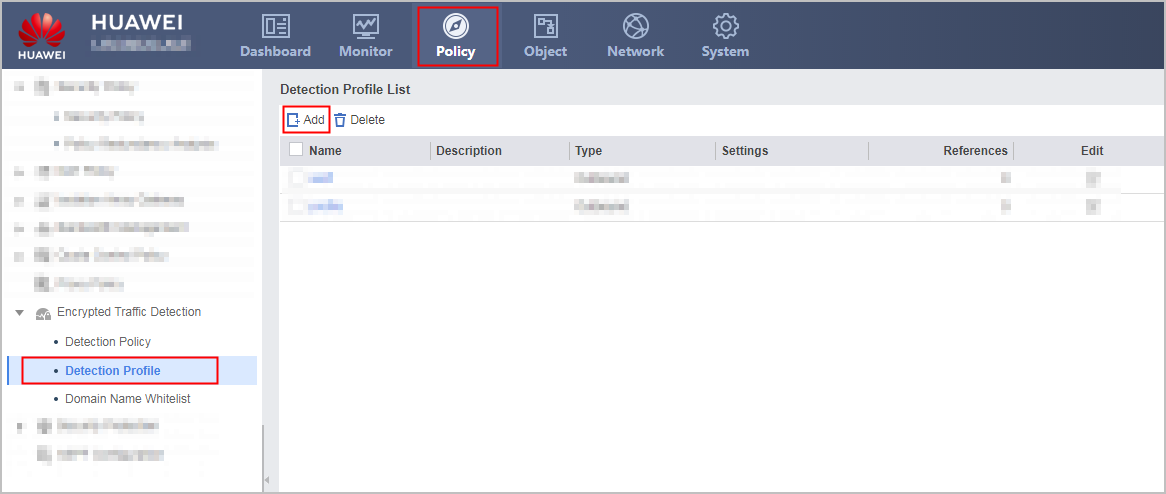
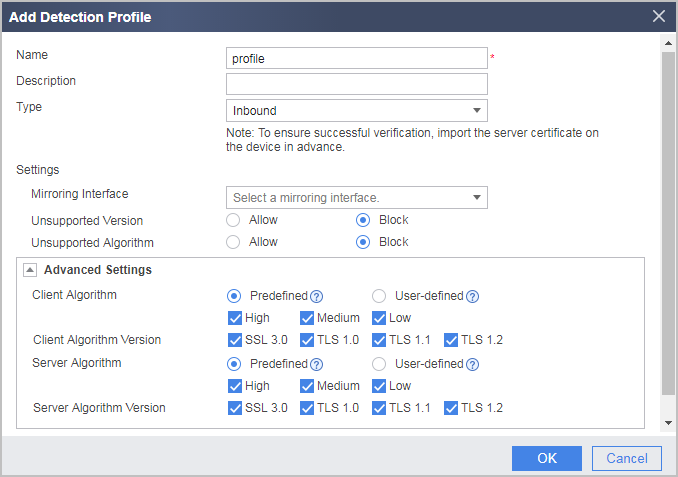
- Click Add, and configure detection profile parameters, as shown in the following figure.
- Choose .
- Configure an SSL-encrypted traffic detection policy to decrypt TLS-encrypted SIP messages.
- Choose .
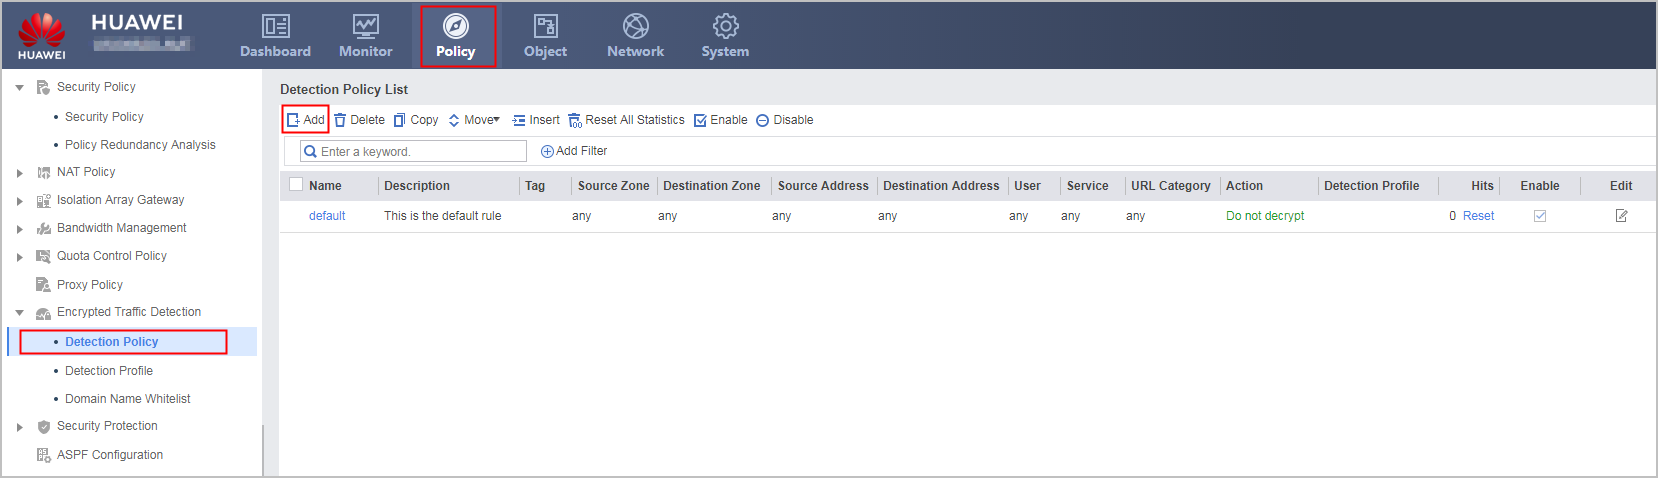
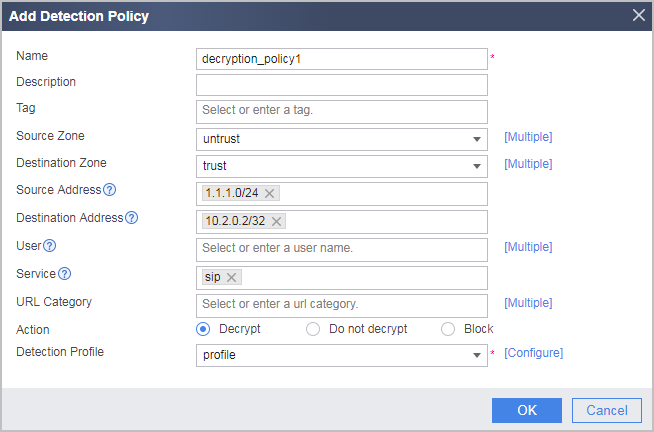
- Click Add, and set the SSL-encrypted traffic detection policy to reference the new detection profile.
- Choose .
- Configure destination NAT so that the intranet SIP server can provide services externally (public address: 1.1.1.10).
- Choose .
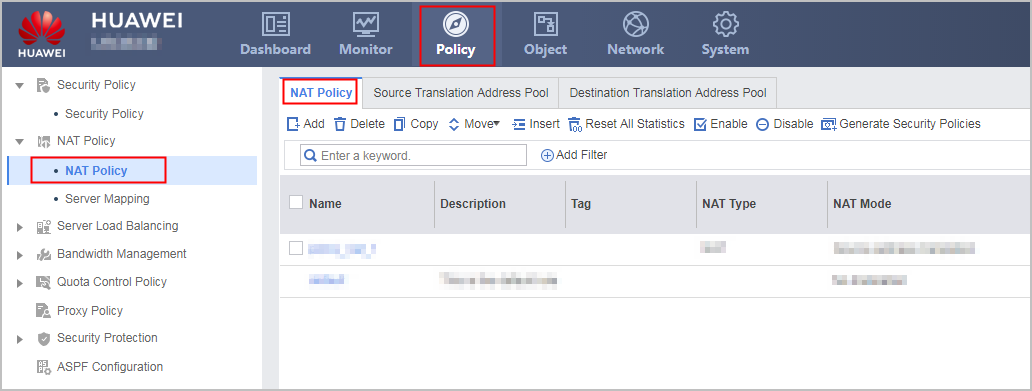
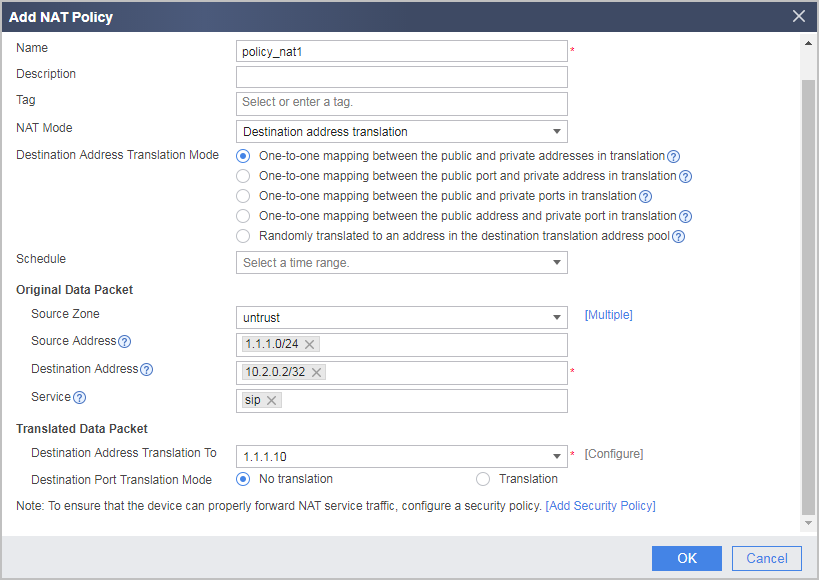
- In NAT Policy List, click Add and configure a NAT policy based on the following parameters.
- Choose .
- Configure ALG to properly forward SIP messages.
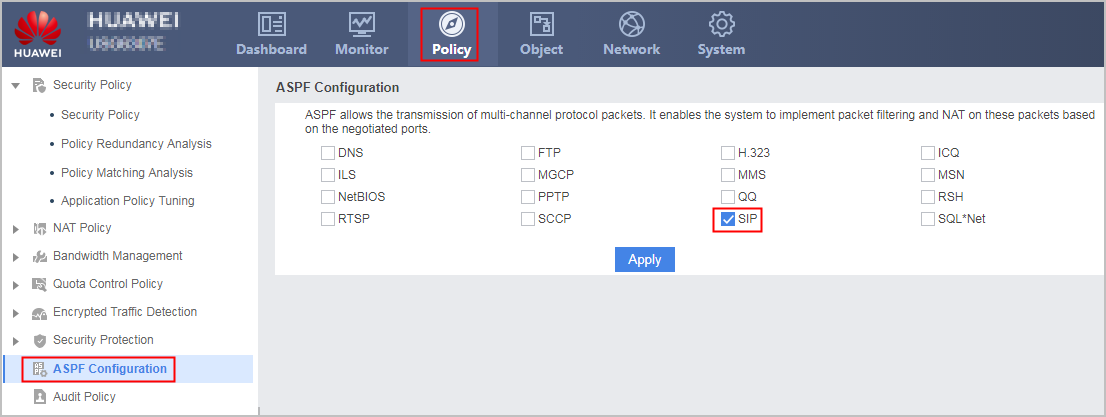
Configuration Scripts
The following lists the related script of this configuration example.
#
 sysname FW
#
app-proxy server certificate filename sip_server.pem
#
interface GigabitEthernet0/0/1
 ip address 10.2.0.1 255.255.255.0
#
interface GigabitEthernet0/0/2
 ip address 1.1.1.1 255.255.255.0
#
firewall zone trust
 set priority 85
 add interface GigabitEthernet0/0/1
#
 firewall zone untrust
 set priority 5
 add interface GigabitEthernet0/0/2
#
firewall interzone trust untrust
 detect sip
#
security-policy
 rule name policy_sec1
  source-zone untrust
  destination-zone trust
  source-address 1.1.1.0 mask 255.255.255.0
  destination-address 10.2.0.2 mask 255.255.255.0
  service sip
  action permit
#
profile type decryption name profile
  detect type inbound
  unsupport ssl-version block
  unsupport ssl-cipher block
#
decryption-policy
 rule name decrption_policy1
  source-zone untrust
  destination-zone trust
  destination-address 10.1.1.0 mask 255.255.255.0
  service sip
  action decrypt profile profile
#
nat-policy
  rule name policy_nat1
    source-zone untrust
    destination-address 1.1.1.10 mask 255.255.255.0
    service sip
    action destination-nat static address-to-address address 10.2.0.2 5061
#
return