CLI: Example for Configuring AD SSO for Internet Access Users (Install ADSSO_Setup.exe to receive messages from PCs)
This section provides an example for configuring AD Single Sign On (SSO) for Internet access users when a FW works as an egress gateway. In this example, the ADSSO_Setup.exe must be installed on the AD monitor (any computer in the AD domain, including the AD domain controller) and the login/logout scripts need to be set on the AD domain controller and delivered to PCs.
Networking Requirements
An enterprise has deployed a FW as the egress gateway to connect the intranet to the Internet, as shown in Figure 1.
- The AD identity authentication mechanism is enabled on the intranet, and information about users and user group is saved on an AD server.
- Internet access users on the intranet include R&D employees and marketing employees.
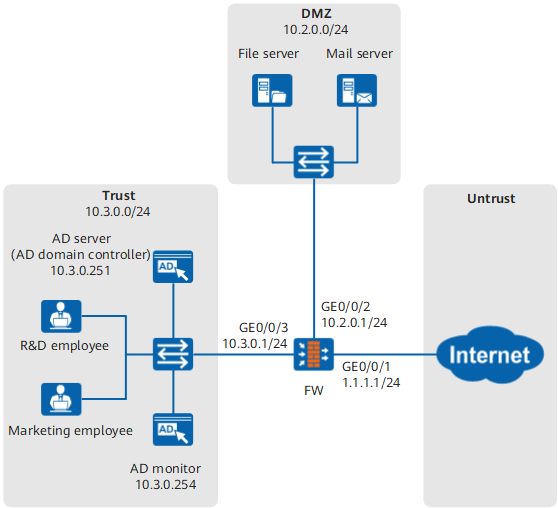
The user management and authentication mechanisms of the FW must identify IP addresses on the intranet as users to implement user-specific behavior control and permission assignment. Requirements are as follows:
- Information about users and departments is saved on the FW and can be referenced by policies.
- R&D and marketing employees use domain accounts to log in to AD domains and access network resources. R&D employees and marketing employees are identified by the user names they use to log in to AD domains.
- If the domain accounts of new employees have been created on an AD server but not stored on a FW, after being authenticated, these users go online as temporary users in the organization structure on the AD server.

ADSSO_Setup.exe has two working mode: the mode of receiving messages from PCs and the mode of querying security logs of the AD server. In the mode of querying security logs of the AD server, only user login messages can be obtained, but user logout messages cannot be obtained. In the mode of receiving messages from PCs, user logout messages can be obtained, ADSSO_Setup.exe needs to be installed, and login & logout scripts need to be deployed on the AD domain controller, and the login PCs can only be Windows systems. Set the working mode of ADSSO_Setup.exe as required.
Configuration Roadmap
- This example describes only how to configure user management and authentication.
- When AD SSO is enabled, install the AD SSO service program ADSSO_Setup.exe on the AD monitor (any computer in the AD domain, including the AD domain controller). The service program can obtain the relevant user information upon user login and logout and send the information to the FW. In this example, a PC in the domain is used as the AD monitor. If the AD monitor is the AD domain controller, install ADSSO_Setup.exe on the AD domain controller and configure the AD monitor address as the address of the AD domain controller.
- In the example, both users and user groups on the AD server are imported to the FW. If there are a large number of users on a live network, you can import only user groups and control user permissions by user groups.
The configuration roadmap is as follows:
- On a FW, set the parameters for communication with an AD server.
- Configure an authentication domain on the FW. The domain name must be the same as that on the AD server.
- Configure a policy to import user information from the AD server to the FW.
- Configure the new user option of the authentication domain. If an authenticated user does not exist on the FW, the user goes online as a temporary user in the organization structure on the AD server.
- Configure an authentication policy whose action is authentication exemption on the FW.
- Set SSO parameters for the FW to receive user login and logout messages sent from the AD monitor.
- To prevent repeated login to the domain for authentication because of frequent timeouts during the working hours (8 hours), you need to set the user online timeout duration to 480 minutes.
Enable the AD SSO service (by installing ADSSO_Setup.exe) on an AD monitor, configure the login and logout scripts on the AD domain controller, and deliver the scripts using group policies.
Data Planning
Item |
Data |
Description |
|---|---|---|
AD server |
On a FW, set the parameters for communication with an AD server. The parameter settings on the FW must be consistent with those on the AD server. |
|
User information import policy |
Import users from the AD server to the FW. |
|
AD SSO (FW) |
Set SSO parameters on the FW and configure the FW to receive the user login and logout information from the AD monitor. |
|
AD SSO service (ADSSO_Setup.exe program, installed on the AD monitor) |
AD Server Parameter |
Set the parameters of the AD server on the AD monitor for the AD monitor to connect to the AD server for checking user information after receiving user login/logout messages from the client computer. |
FW Gateway Parameter |
Enable the AD SSO service on the AD monitor, configure the AD monitor to listen to information about user login and logout, and send the information to the FW. The parameters must be the same as those on the FW. |
|
Client Communication Parameter |
|
|
AD domain controller (the login and logout scripts) |
Run the login and logout scripts on an AD domain controller. If a group policy is used to control the user login and logout, run the login and logout scripts respectively and send the login and logout information to the AD SSO service. The parameters must be the same as those on the ADSSO_Setup.exe. |
Procedure
- Set IP addresses for interfaces and assign the interfaces to security zones. The following example describes how to configure interface GigabitEthernet 0/0/3. You can configure other interfaces based on the networking diagram.
<FW> system-view
[FW] interface GigabitEthernet 0/0/3
[FW-GigabitEthernet0/0/3] ip address 10.3.0.1 24
[FW-GigabitEthernet0/0/3] quit
[FW] firewall zone trust
[FW-zone-trust] add interface GigabitEthernet 0/0/3
[FW-zone-trust] quit
- Configure security policies.
- On a FW, set the parameters for communication with an AD server.
The parameter settings on the FW must be consistent with those on the AD server.
[FW] ad-server template auth_server_ad
[FW-ad-auth_server_ad] ad-server authentication 10.3.0.251 88 no-ssl
[FW-ad-auth_server_ad] ad-server authentication base-dn dc=cce,dc=com
[FW-ad-auth_server_ad] ad-server authentication manager cn=administrator,cn=users Admin@123
[FW-ad-auth_server_ad] ad-server authentication host-name ad.cce.com
[FW-ad-auth_server_ad] ad-server authentication ldap-port 389
[FW-ad-auth_server_ad] ad-server user-filter sAMAccountName
[FW-ad-auth_server_ad] ad-server group-filter ou
If you are unfamiliar with the AD server and cannot provide the server name or Base DN values, you can use the AD Explorer software downloaded from Internet to connect to the AD server to query the attribute values. The mappings between the server attributes and parameters on the FW are as follows.
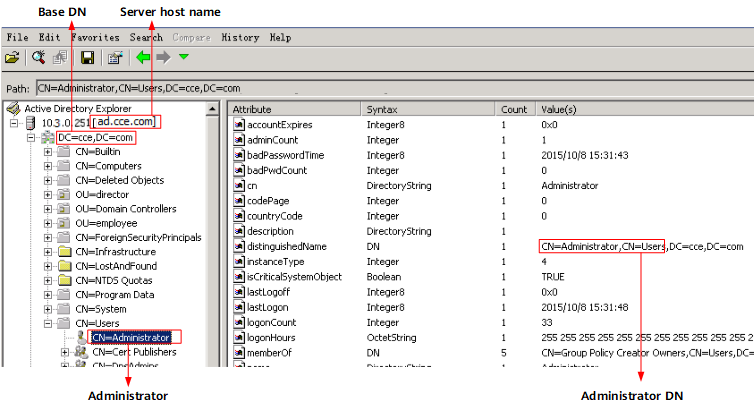
Use the user name and password that are configured on the AD server to check the connectivity to the AD server.
[FW-ad-auth_server_ad] test-aaa testname testpassword ad-template auth_server_ad
[FW-ad-auth_server_ad] quit
- Configure an authentication domain.
[FW] aaa
[FW-aaa] domain cce.com
[FW-aaa-domain-cce.com] service-type internetaccess
[FW-aaa-domain-cce.com] quit
[FW-aaa] quit
- Configure a policy to import user information from the AD server to the FW.
[FW] user-manage import-policy policy_import from ad
[FW-import-policy_import] server template auth_server_ad
[FW-import-policy_import] server basedn dc=cce,dc=com
[FW-import-policy_import] server searchdn ou=marketing,dc=cce,dc=com
[FW-import-policy_import] server searchdn ou=research,dc=cce,dc=com
[FW-import-policy_import] destination-group /cce.com
[FW-import-policy_import] import-type user-group
[FW-import-policy_import] import-override enable
[FW-import-policy_import] sync-mode incremental schedule interval 120
[FW-import-policy_import] quit
If the server has many users or user groups, some users or user groups under the basedn may not be imported to the FW because the number of users or user groups exceeds the FW's specification. Therefore, you are advised to run the command server searchdn to select an import range.
In this example, users and user groups are imported to the FW. The user and user group filtering conditions in this example use the default values (&(|(objectclass=person)(objectclass=organizationalPerson))(cn=*)(!(objectclass=computer))) and (|(objectclass=organizationalUnit)(ou=*)). To change them, run the user-filter and group-filter commands.
- Execute the import policy to import users to the FW.
[FW] execute user-manage import-policy policy_import - Set the new user option for the authentication domain on the FW.
[FW] aaa
[FW-aaa] domain cce.com
[FW-aaa-domain-cce.com] new-user add-temporary group /cce.com auto-import policy_import
[FW-aaa-domain-cce.com] quit
[FW-aaa] quit
- Configure an authentication policy.
[FW] auth-policy
[FW-policy-auth] rule name auth_policy_service
[FW-policy-auth-rule-auth_policy_service] source-zone trust
[FW-policy-auth-rule-auth_policy_service] source-address 10.3.0.0 24
[FW-policy-auth-rule-auth_policy_service] action exempt-auth
[FW-policy-auth-rule-auth_policy_service] quit
[FW-policy-auth] quit
If the action of the authentication policy is set to authentication exemption, the FW obtains user information through SSO and permits the traffic when user information fails to be obtained during SSO authentication. If the network has high security requirements, set the action of the authentication policy to portal authentication. Then the FW will implement portal authentication on the users failing the SSO authentication.
If the packets exchanged between the user and the AD server, between the user and the AD monitor, and between the AD monitor and the AD server pass through the FW, ensure that the authentication policy on the FW does not authenticate these packets and the security policy allows them through. You can run the display auth-policy command to check the authentication policy.
- Set AD SSO parameters on the FW.
[FW] user-manage single-sign-on ad
[FW-sso-ad] plug-in enhanced shared-key Admin@234
[FW-sso-ad] mode plug-in
[FW-sso-ad] enable
[FW-sso-ad] quit
- Set the online user timeout duration to 480 minutes.
[FW] user-manage online-user aging-time 480 - Visit Huawei technical support website, download the AD SSO program to your PC, decompress the program package, and copy ADSSO_Setup.exe to the AD monitor.
- Deploy the AD SSO service on the AD monitor.
You must use an account that belongs to the Administrators group to log in to the AD monitor.
- Configure AD SSO parameters.
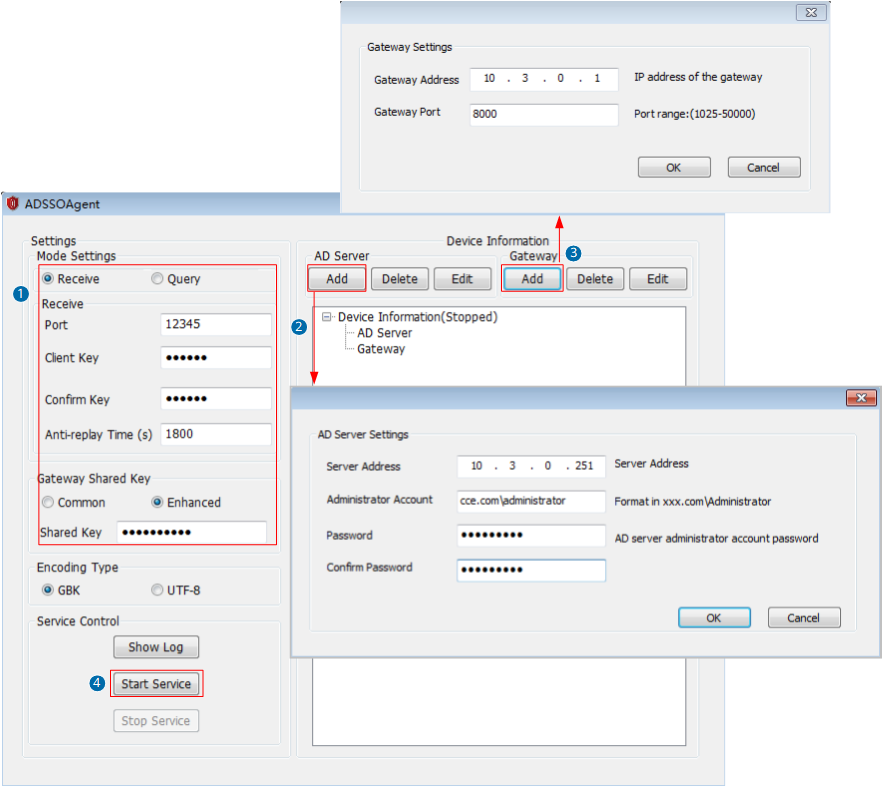
Configure the parameters for the AD SSO program to receive messages from PCs and the shared key used by the AD SSO program to communicate with the FW.
When an AD SSO service program monitors login messages of multiple AD servers, set Anti-replay Time to 0 and disable the anti-replay function. The anti-replay function detects the difference between the time at which the AD SSO service program receives a user login message and the time at which the user actually logs in to the AD server. If the time difference exceeds the anti-replay time, the user is prohibited from logging in to the FW. In a scenario where multiple AD servers exist, different users are authenticated by various AD servers. The AD SSO program will connect to multiple AD servers in turn to obtain user login time. This causes the time difference to exceed Anti-replay Time. Therefore, you shall disable the anti-replay function.
Make sure that the port (port 12345 in this example) you intend to use is not occupied by other services. Choose on the AD domain controller, enter cmd, and run netstat -ano|findstr 12345. If no information is returned, port 12345 is not occupied by other services. Otherwise, the system displays a message indicating the process ID of the service occupying the port. You are advised to release this port or specify another idle port for the AD SSO service.
-
The AD SSO program supports a maximum of 16 AD servers. It can connect to multiple AD servers to query login user information until it queries required information.
-
The SSO program supports a maximum of five FWs and sends user login/logout messages to the FWs.
When the FWs work in hot standby scenarios, you need to set Device Address to the virtual IP address of the VRRP group where the interfaces reside, so that the SSO service can send user login messages to the standby device during an active/standby FW switchover.
-
You can right-click the AD SSO icon in the system tray on your desktop to start or stop the AD SSO service. Alternatively, click Show Log on the home page to view program operating logs and SSO service logs.
You can also set the encoding style of the AD SSO program on the web UI. Ensure that the AD SSO program and the FW have the same encoding style. The default encoding style of the FW is GBK. If you have switched the encoding style to UTF-8, set the encoding style to UTF-8 here. Otherwise, keep the default setting.
- Configure AD SSO parameters.
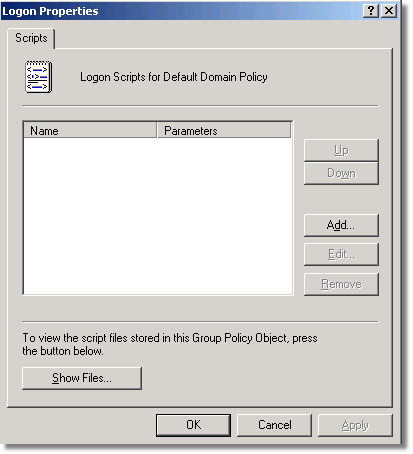
- On the AD domain controller, add script ReportLogin.exe to the logon script (Logon.exe) and logoff script (Logoff.exe) respectively, and set the parameters of the logon and logoff scripts so that the AD SSO service can monitor the logon and logoff operations of domain users. You can obtain script file ReportLogin.exe from the Script folder in the installation directory of the AD SSO on the AD monitor.
You must use an account that belongs to the Administrators group to log in to the AD domain controller. In this example, the Windows Server 2003 and Windows Server 2008 are used as an AD domain controller.
- After the configuration is complete, you can configure security policies, PBR policies, bandwidth policies, quota control policies, proxy policies, and audit policies that reference the user and user group objects.
Verification
- Run the display user-manage user and display user-manage group commands on the FW to display information about users and user groups.
Verify that the following conditions are true:
- R&D employees use domain accounts to log in to AD domains and access network resources through the FW. They can access network resources only after successful logins.
- Marketing employees use domain accounts to log in to AD domains and access network resources through the FW. They can access network resources only after successful logins.
- Run the display user-manage online-user command on the FW to display information about online users.
<FW> display user-manage online-user verbose
 Current Total Number: 1
--------------------------------------------------------------------------------
 IP Address: 10.3.0.2
 Login Time: 2015-01-21 14:58:36  Online Time: 00:00:49
 State: Active  TTL: 00:30:00  Left Time: 00:29:59
 Access Type: local
 Authentication Mode: Single Sign-on
 Access Device Type: unknown
 <--packets: 0 bytes: 0  -->packets: 0 bytes: 0
 Build ID: 0
 User Name: user_0001@cce.com Parent User Group: /cce.com/research
--------------------------------------------------------------------------------
Configuration Scripts
#
 sysname FW
#
 user-manage online-user aging-time 480
 user-manage single-sign-on ad
  enable
  plug-in enhanced shared-key %$%$B2N*$eJ0;'Nn'#ATC]t+Rri`%$%$
#
ad-server template auth_server_ad
 ad-server authentication 10.3.0.251 88 no-ssl
 ad-server authentication base-dn dc=cce,dc=com
 ad-server authentication manager cn=administrator,cn=users %$%$M#._~J4QrR[kJu7PUMtHUqh_%$%$
 ad-server authentication host-name ad.cce.com
 ad-server authentication ldap-port 389
 ad-server user-filter sAMAccountName
 ad-server group-filter ou
#
security-policy
 rule name local_policy_ad_01
  source-zone local
  destination-zone trust
  destination-address 10.3.0.251 32
  destination-address 10.3.0.254 32
  action permit
 rule name local_policy_ad_02
  source-zone trust
  destination-zone local
  source-address 10.3.0.251 32
  source-address 10.3.0.254 32
  action permit
 rule name policy_sec_02
  source-zone trust
  source-address 10.3.0.0 24
  destination-zone untrust
  action permit
 rule name policy_sec_03
  source-zone trust
  source-address 10.3.0.0 24
  destination-zone dmz
  action permit
#
auth-policy
 rule name auth_policy_service
  source-zone trust
  source-address 10.3.0.0 24
  action exempt-auth
#
interface GigabitEthernet0/0/1
 ip address 1.1.1.1 255.255.255.0
#
interface GigabitEthernet0/0/2
 ip address 10.2.0.1 255.255.255.0
#
interface GigabitEthernet0/0/3
 ip address 10.3.0.1 255.255.255.0
#
firewall zone trust
 add interface GigabitEthernet0/0/3
#
firewall zone untrust
 add interface GigabitEthernet0/0/1
#
firewall zone dmz
 add interface GigabitEthernet0/0/2
#
 user-manage import-policy policy_import from ad
 server template auth_server_ad
 server basedn dc=cce,dc=com
 server searchdn ou=marketing,dc=cce,dc=com
 server searchdn ou=research,dc=cce,dc=com
 destination-group /cce.com
 user-attribute sAMAccountName
 user-filter (&(|(objectclass=person)(objectclass=organizationalPerson))(cn=*)(!(objectclass=computer)))
 group-filter (|(objectclass=organizationalUnit)(ou=*))
 import-type user-group
 import-override enable
 sync-mode incremental schedule interval 120
#
aaa
 domain cce.com
  service-type internetaccess
  new-user add-temporary group /cce.com auto-import policy_import

# The following configuration is used to perform a one-time operation and not stored in the configuration profile.
 execute user-manage import-policy policy_import
 test-aaa testname testpassword ad-template auth_server_ad