Web: Example for Enabling Remote Users to Access the Headquarters through SSL VPN (AD Authentication + AD Authorization)
Networking Requirements
As shown in Figure 1, mobile employees need to access resources at the Headquarters using SSL VPN. An AD server is used to authenticate users.
Requirements are as follows:
- Executives need to remotely obtain IP addresses and access the intranet smoothly and securely. They also need to remotely access the Webmail and ERP systems on web UIs.
- Employees need to remotely access the Webmail and ERP systems on web UIs.
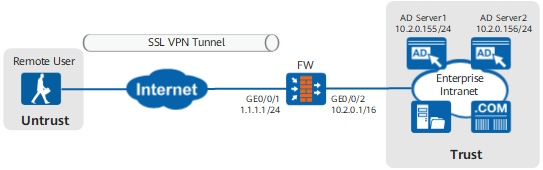
Data Planning
Item |
Data |
|---|---|
Interface |
Interface number: GigabitEthernet 0/0/1 IP address: 1.1.1.1/24 Security zone: Untrust |
Interface number: GigabitEthernet 0/0/2 IP address: 10.2.0.1/16 Security zone: Trust |
|
Remote user account |
Executive User name: user_0001 Group: /cce.com/director |
Common employee User name: user_0002 Group: /cce.com/employee |
|
Virtual gateway |
Name: example Interface: GigabitEthernet 0/0/1 Domain name: example.huawei.com Maximum number of users: 150 Maximum number of concurrent users: 100 |
AD server |
Primary server IP address: 10.2.0.155 Secondary server IP address: 10.2.0.156 |
Web proxy resource |
Name: Webmail; Link: http://10.2.0.10 Name: ERP; Link: http://10.2.0.11 |
Network extension |
Network extension address pool: 172.16.1.1-172.16.1.100 Routing mode: manual Intranet subnet accessible to network extension users: 10.2.0.0/16 |
Procedure
- Configure interfaces.
- Choose .
- Click
 of GE0/0/1 and set the parameters as follows.
Zone
untrust
IPv4
IP address
1.1.1.1/24
Default Gateway
1.1.1.2
- Click OK.
- Repeat the preceding steps to set the parameters for GE0/0/2.
Zone
trust
IPv4
IP address
10.2.0.1/16
- Configure security policies.
- Choose .
- Click Add.
- Configure security policy policy_sslvpn_1 as follows to allow users to access the SSL VPN login page.
Name
policy_sslvpn_1
Source Zone
untrust
Destination Zone
local
Destination Address/Region
1.1.1.1/32
Service
https
Action
Permit
- Click OK.
- Repeat the preceding steps to configure security policy policy_sslvpn_2 to allow users to access web servers.
Name
policy_sslvpn_2
Source Zone
local
Destination Zone
trust
Destination Address/Region
10.2.0.10/32,10.2.0.11/32,
Action
Permit
- Repeat the preceding steps to configure security policy policy_sslvpn_3 to allow users to access intranet servers.
Name
policy_sslvpn_3
Source Address/Region
172.16.1.1-172.16.1.100
Destination Address/Region
10.2.0.0/16
Action
Permit
- Repeat the preceding steps to configure security policy policy_ad_server to allow users to access the AD server.
Name
policy_ad_server
Source Zone
local
Destination Zone
trust
Destination Address/Region
10.2.0.155/32,10.2.0.156/32
Action
Permit
- Choose and set parameters for the FW to connect to the AD server.
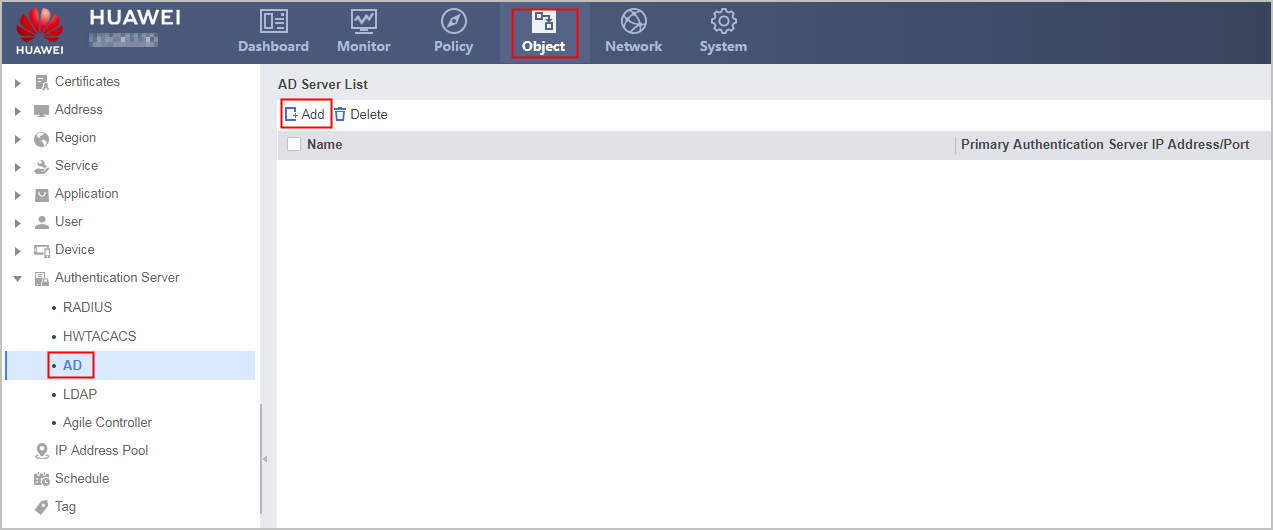
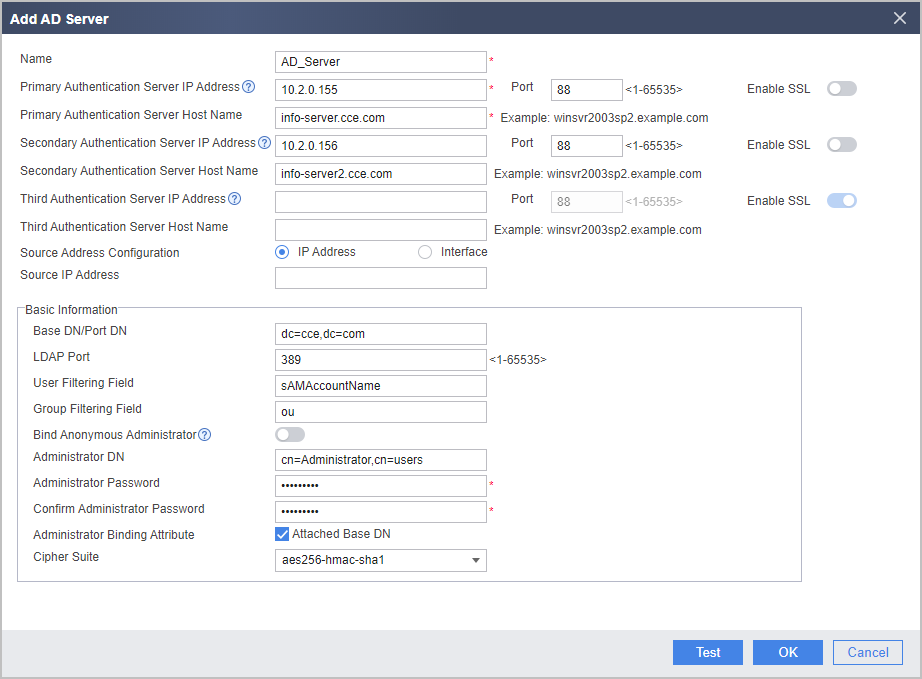

For the V600R007C20 version, whether to enable SSL for AD authentication cannot be configured on the web UI. When you configure the AD server on the web UI, SSL (ldap-over-ssl) is enabled by default. In this mode, LDAP over SSL must also be enabled on the AD server. For details, see the operating system guide of the AD server. To disable SSL (no-ssl), click CLI Console in the lower right corner of the web page. On the CLI configuration page that is displayed, run the ad-server authentication 10.2.0.155 88 no-ssl command in the corresponding AD server template view. From V600R007C20SPC100, you can configure whether to enable SSL for AD authentication on the Web UI. The following uses no-ssl as an example.
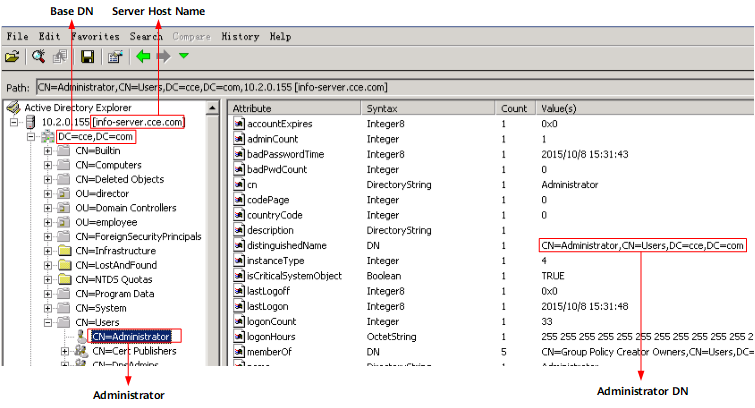
If you are unfamiliar with the AD server and cannot provide the server name, Base DN, or filter field values, you can use the AD Explorer or AD Browser software to connect to the AD server to query the attribute values. The AD Explorer is used as an example. The AD server attributes and mappings between the server attributes and parameters on the FW are as follows.
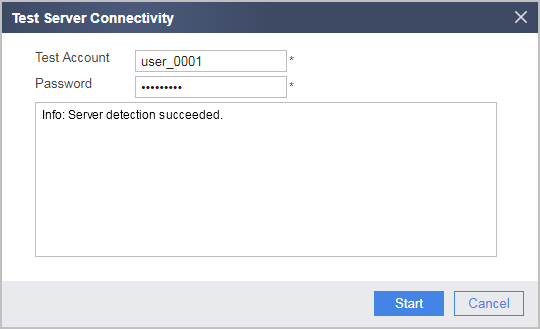
Click Test. In the dialog box that is displayed, click OK and enter the test account and password. Click Start to check the connectivity to the AD server.
The user name and password used for the test must be the same as those on the AD server.
- Choose and click Add to create an authentication domain.
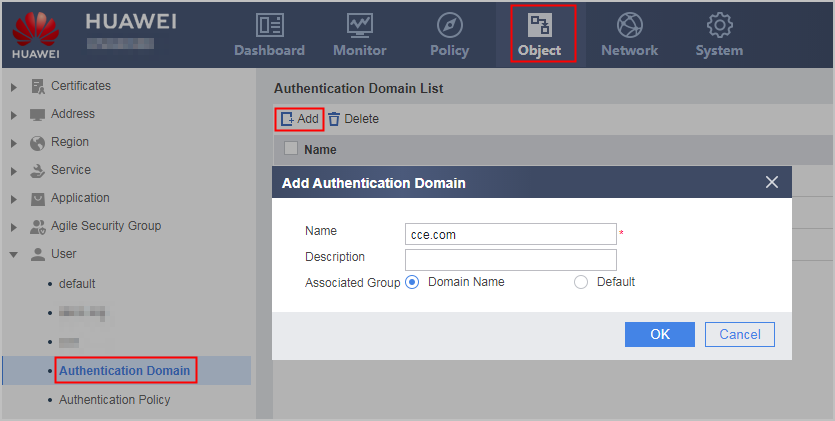
When AD or LDAP authentication is used, the authentication domain name configured on the FW must be the same as that configured on the authentication server. In this example, the domain name on the AD server is cce.com. Therefore, the authentication domain name must be set to cce.com on the FW.
- Choose and click Add to create a policy to import only user group data from the server to the FW.
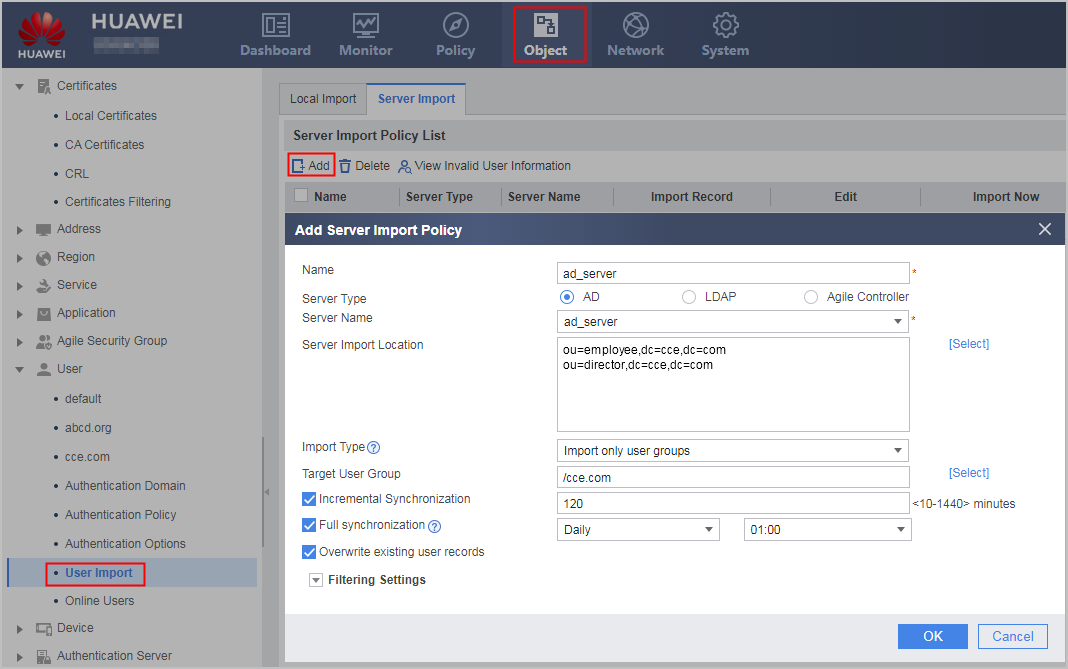
After the policy is created, click
 to import the organizational structures from the authentication server to the FW.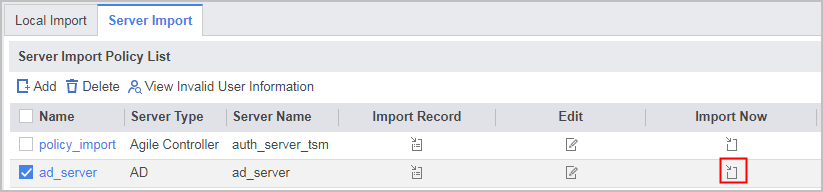
After the import succeeds, choose to view the organizational structure information.
- Choose and select cce.com to configure the cce.com authentication domain.
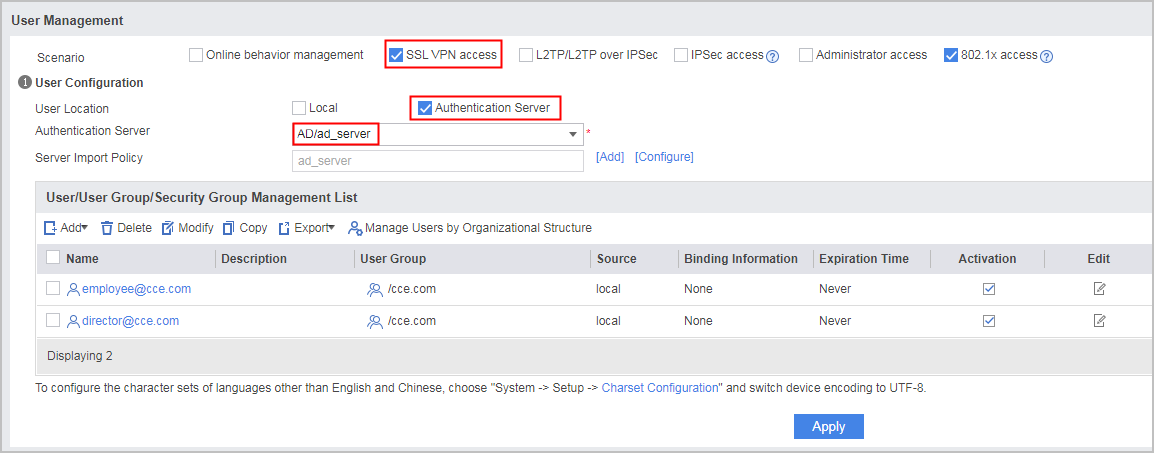
- Select the SSL VPN access scenario and specify the AD server.
- Set the authorization mode to AD server authorization.
The authorization mode cannot be configured on the web UI. You need to log in to the CLI console to configure the authorization mode.
- Click
 on the lower right of the page.
 - Click in the CLI Console (Disconnected) dialog box to connect to the CLI console.
- After the connection succeeds, run the following commands:
<FW> system-view
[FW] aaa
# Create authorization scheme ad and set the authorization mode to AD. [FW-aaa] authorization-scheme ad
[FW-aaa-author-ad] authorization-mode ad
[FW-aaa-author-ad] quit
# Apply the authorization scheme to the authentication domain. [FW-aaa] domain cce.com
[FW-aaa-domain-cce.com] authorization-scheme ad
- Click
- Select the SSL VPN access scenario and specify the AD server.
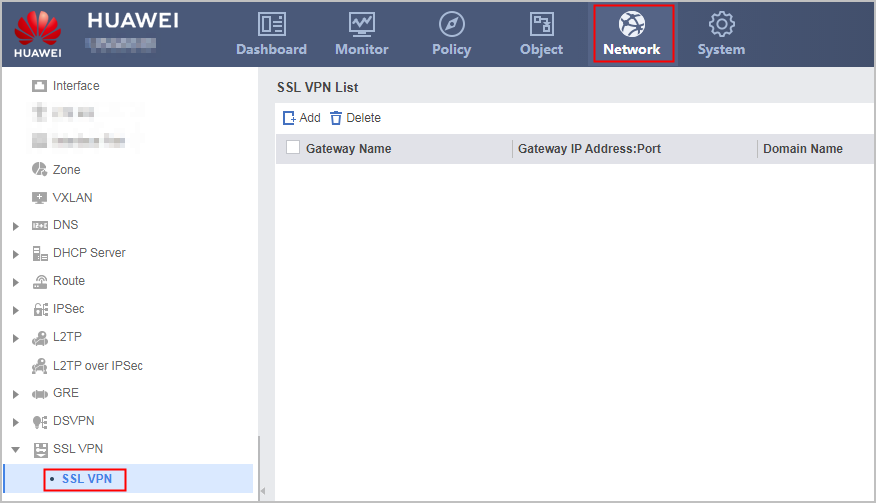
- Configure an SSL VPN gateway, including the gateway address, user authentication, and maximum number of concurrent users.
- Choose .
- Click the Add, configure an SSL VPN gateway and set the parameters as follows.
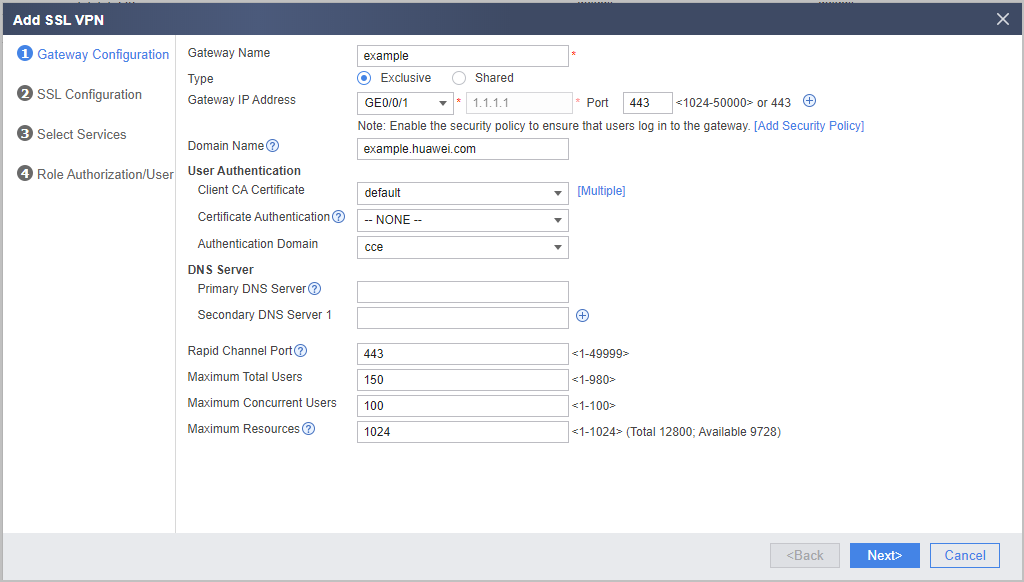
If the virtual gateway is bound to an authentication domain, the user name entered for login must not carry the authentication domain information. If the user name carries an authentication domain name, the gateway considers the at sign (@) and the string following it as a part of the user name, not an authentication domain name. For example, if the virtual gateway has been bound to the authentication domain cce.com, you must enter user_0001, not user_0001@cce.com, as the user name.
- Click Next.
- Set SSL parameters.
- Set SSL parameters. Use the default values.
- Click Next.
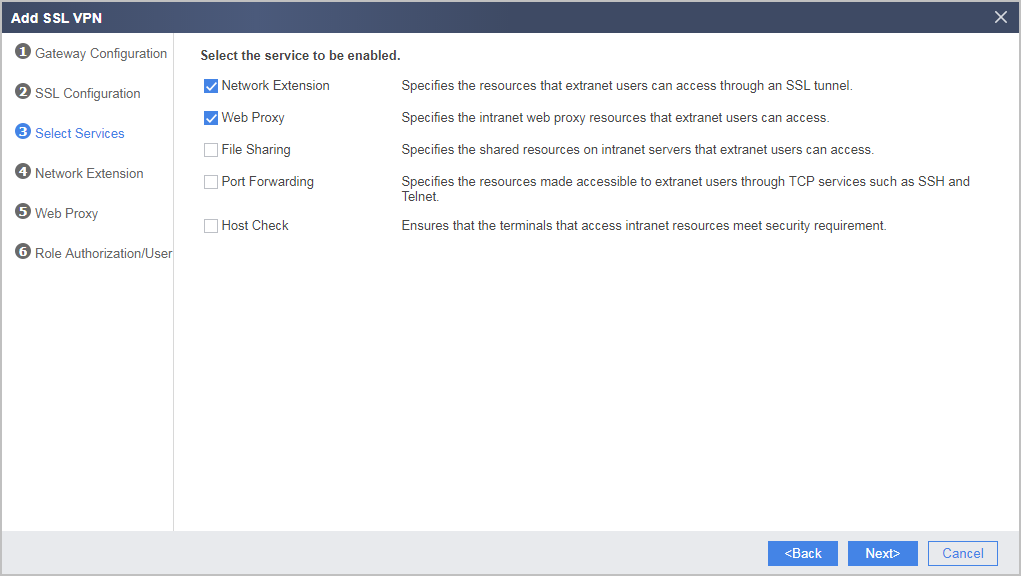
- Select the services to be enabled.
- Select Web Proxy and Network Extension.
- Click Next.
- Select Web Proxy and Network Extension.
- Configure the web proxy function and add resources Webmail and ERP.
- Under Web Proxy Resource List, click Add.
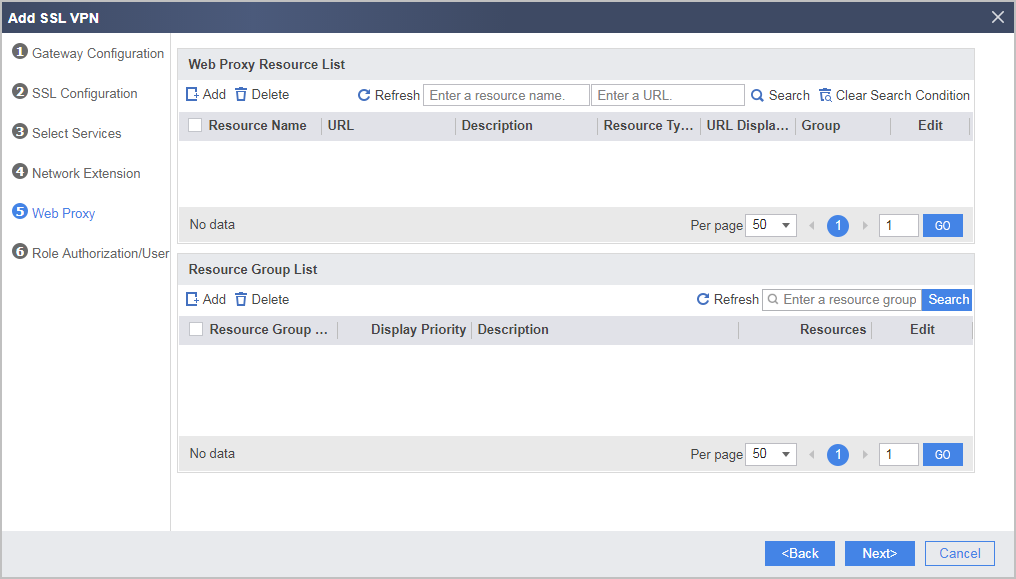
- Add web proxy resource Webmail as follows:
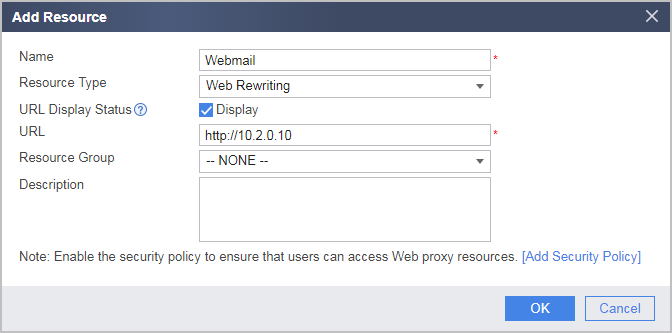
- Click OK.
- Repeat the preceding steps to add web proxy resource ERP as follows:
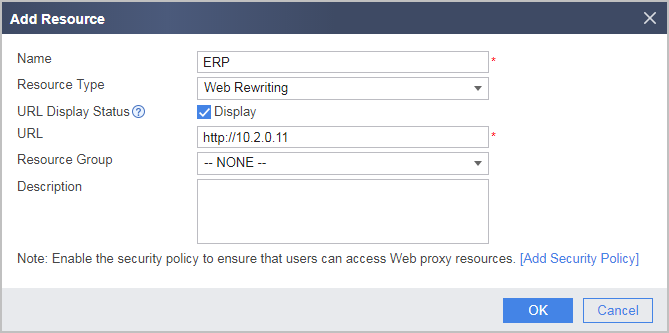
- Click OK.
- Click Next.
- Under Web Proxy Resource List, click Add.
- Configure the network extension function.
- Set the range of IP addresses and accessible intranet subnets as follows.
If the assignable IP address pool and the intranet server are not on the same subnet, you need to configure a route to the IP address pool on the intranet server.
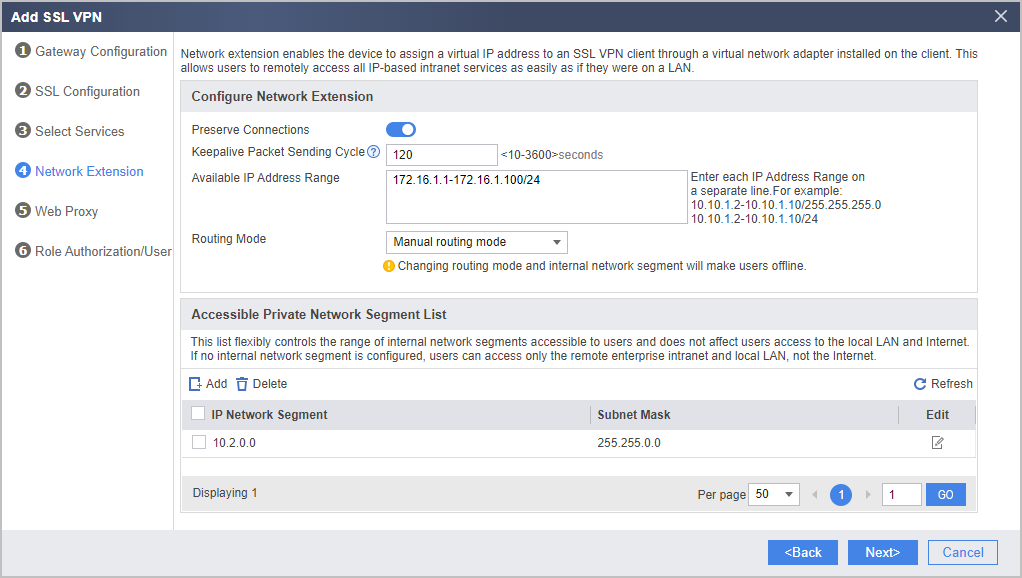
- Click OK.
- Click Next.
- Set the range of IP addresses and accessible intranet subnets as follows.
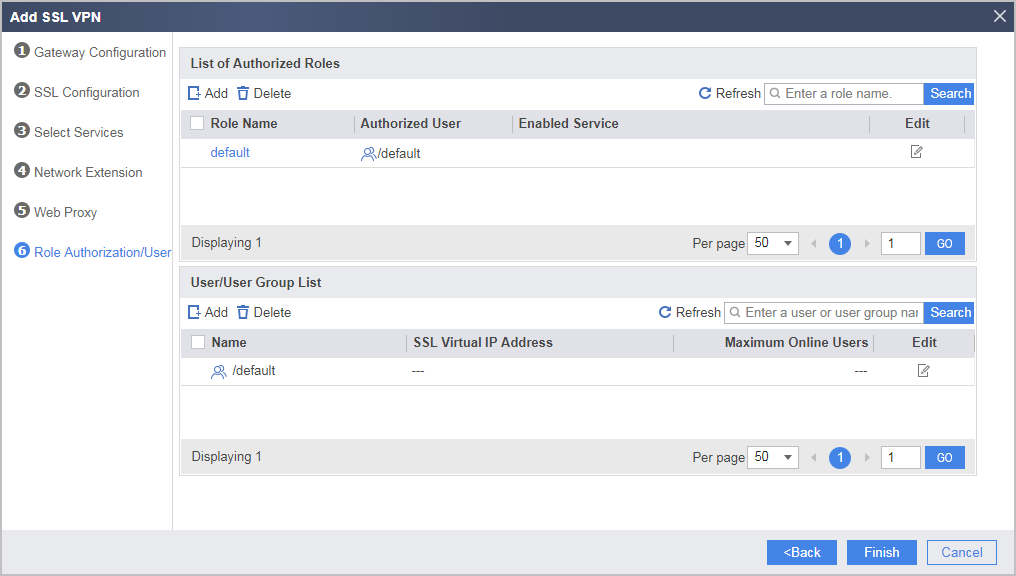
- Configure SSL VPN role authorization/users.
- In List of Authorized Roles, click Add.
- Set the role of the director group and associate it with related permissions.
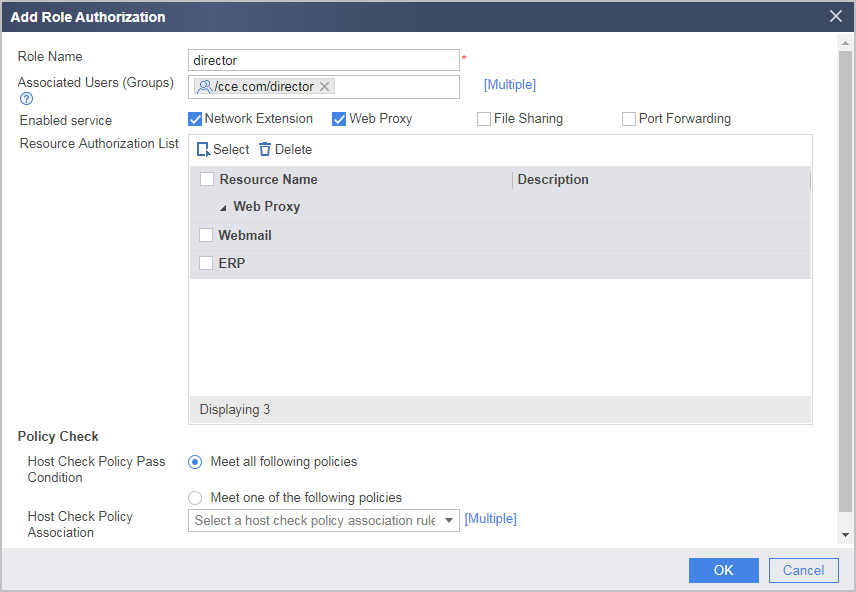
- Click OK.
- Set the role of the employee group and associate it with related permissions.
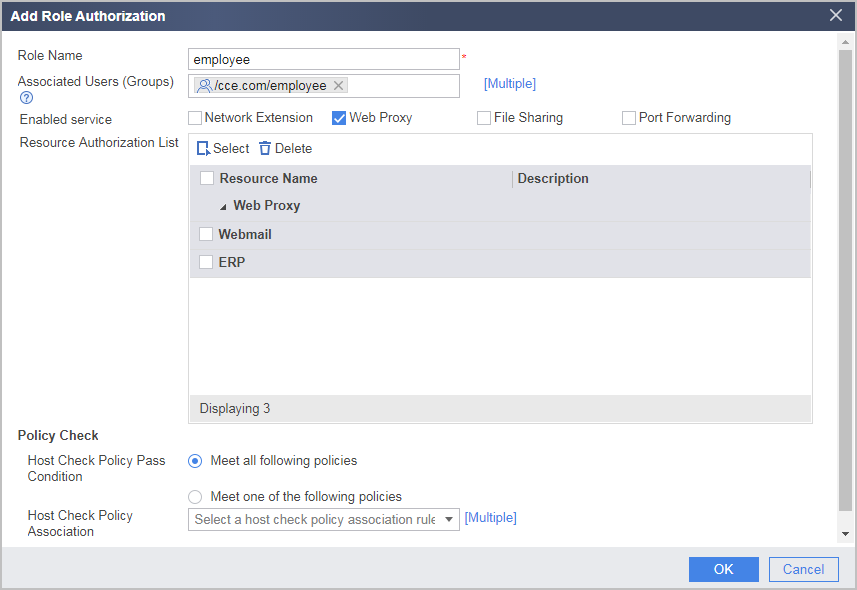
- Click OK.
- Click Finish.
- In List of Authorized Roles, click Add.
Verifying the Configuration
- Enter example.huawei.com or https://1.1.1.1 in the address bar of the browser as a remote user to access the SSL VPN login page. Upon the first access, install the controls as prompted.
The Active control version required on clients depends on the version of the virtual gateway. If you need to change the Active control version, you must uninstall the old version before installing the new one. Otherwise, the browser will be stuck at the control loading page.
If the client is a PC, run the following commands to uninstall the control:
PC> regsvr32 SVNIEAgt.ocx -u -s
PC> del %systemroot%\SVNIEAgt.ocx /q
PC> del %systemroot%\"Downloaded Program Files"\SVNIEAgt.inf /q
PC> cd %appdata%
PC> rmdir svnclient /q /s
- Enter the user name and password on the login page to log in to the SSL VPN gateway.
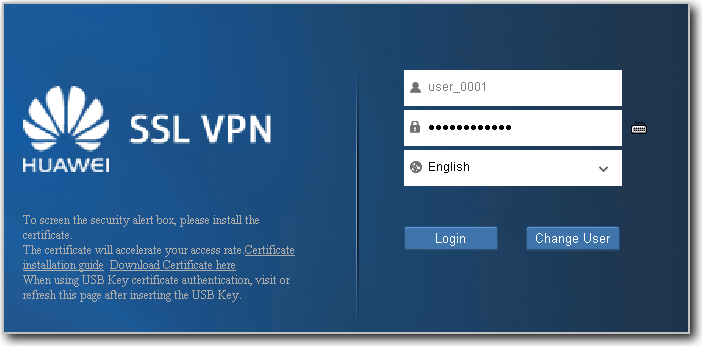
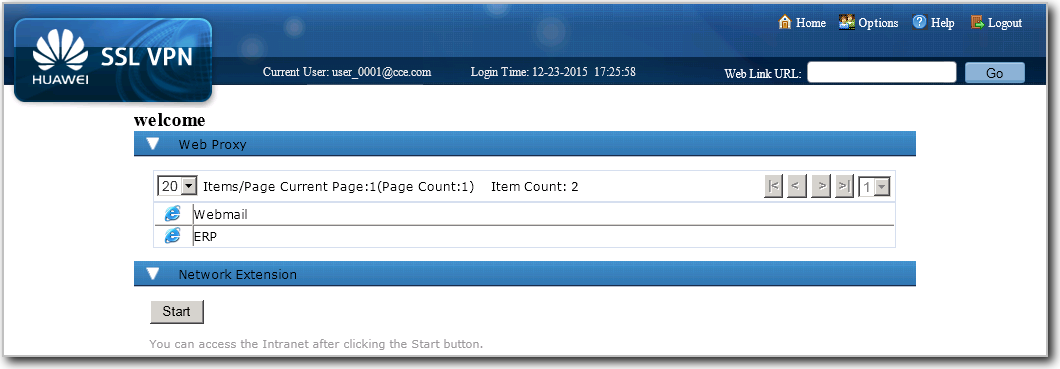
- If you log in to the SSL VPN gateway as senior administrator user_0001, you can use the web proxy and network extension services. Click Webmail and ERP to use the corresponding services. Click Start. The virtual network interface card (NIC) is automatically installed. After the virtual IP address is obtained, you can use services as if you were on a LAN.
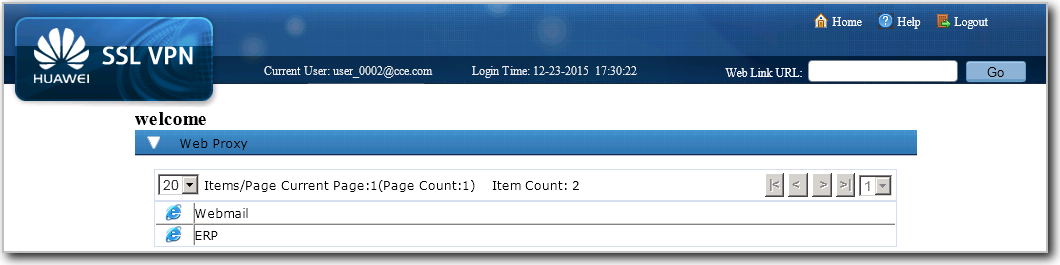
- If you log in to the SSL VPN gateway as common employee user_0002, you can use only the web proxy service. Click Webmail and ERP to use the corresponding services.
Configuration Script
#
ad-server template ad_server
 ad-server authentication 10.2.0.155 88 no-ssl
 ad-server authentication 10.2.0.156 88 secondary no-ssl
 ad-server authentication base-dn dc=cce,dc=com
 ad-server authentication manager cn=administrator,cn=users %$%$M#._~J4QrR[kJu7PUMtHUqh_%$%$
 ad-server authentication host-name info-server2.cce.com secondary
 ad-server authentication host-name info-server.cce.com
 ad-server authentication ldap-port 389
 ad-server user-filter sAMAccountName
 ad-server group-filter ou
 #
interface GigabitEthernet0/0/1
 ip address 1.1.1.1 255.255.255.0
#
interface GigabitEthernet0/0/2
 ip address 10.2.0.1 255.255.0.0
#
firewall zone trust
 set priority 85
 add interface GigabitEthernet0/0/2
#
firewall zone untrust
 set priority 5
 add interface GigabitEthernet0/0/1
#
 user-manage import-policy ad_server from ad
 server template ad_server
 server basedn dc=cce,dc=com
 server searchdn ou=director,dc=cce,dc=com
 server searchdn ou=employee,dc=cce,dc=com
 destination-group /cce.com
 user-attribute sAMAccountName
 user-filter (&(|(objectclass=person)(objectclass=organizationalPerson))(cn=*)(!(objectclass=computer)))
 group-filter (|(objectclass=organizationalUnit)(ou=*))
 import-type group
 import-override enable
 sync-mode incremental schedule interval 120
 sync-mode full schedule daily 01:00
#
aaa
 authentication-scheme ad
  authentication-mode ad
 authorization-scheme ad
  authorization-mode ad
 #
 domain cce.com
  authentication-scheme ad
  authorization-scheme ad
  ad-server ad_server
  service-type ssl-vpn
  reference user current-domain
  #
v-gateway example interface GigabitEthernet0/0/1 private example.huawei.com
v-gateway example authentication-domain cce.com
v-gateway example max-user 150
v-gateway example cur-max-user 100
#
ssl timeout 5
ssl lifecycle 1440
#
v-gateway example
 service
  web-proxy enable
  web-proxy web-link enable
  web-proxy proxy-resource Webmail http://10.2.0.10 show-link
  web-proxy proxy-resource ERP http://10.2.0.11 show-link
  network-extension enable
  network-extension keep-alive enable
  network-extension netpool 172.16.1.1 172.16.1.100 255.255.255.0
  network-extension mode manual
  network-extension manual-route 10.2.0.0 255.255.0.0
 role
  role director condition all
  role director network-extension enable
  role director web-proxy enable
  role director web-proxy resource ERP
  role director web-proxy resource Webmail
  role employee condition all
  role employee web-proxy enable
  role employee web-proxy resource ERP
  role employee web-proxy resource Webmail
#
security-policy
 rule name policy_sslvpn_1
  source-zone untrust
  destination-zone local
  destination-address 1.1.1.1 32
  service https
  action permit
 rule name policy_sslvpn_2
  source-zone local
  destination-zone trust
  destination-address 10.2.0.10 32
  destination-address 10.2.0.11 32
  action permit
 rule name policy_sslvpn_3
  source-address range 172.16.1.1 172.16.1.100
  destination-address 10.2.0.0 16
  action permit
 rule name policy_ad_server
  source-zone local
  destination-zone trust
  destination-address 10.2.0.155 32
  destination-address 10.2.0.156 32
  action permit

# The following configuration takes effect only one time and is not saved into the configuration file.  execute user-manage import-policy ad_server
# The following configurations are saved in the database and are not displayed in the configuration file.  v-gateway example
  vpndb
 group /cce.com/director
 group /cce.com/employee
  role
 role director group /cce.com/director
 role employee group /cce.com/employee