CLI:Example for Configuring the Device as a DHCP Relay
Networking Requirements
The IP address plan of a department on the network shown in Figure 1 is as follows:
- IP addresses are available on network segment 192.168.20.0/24. An FTP server is deployed and assigned 192.168.20.254.
- A DHCP server is on another network segment 10.1.1.0/24.
- The domain name extension of a DHCP client is example.com, and the IP address of a DNS server is 3.3.3.3.
- The address release is 10 days.
A DHCP client resides on a different network segment than the DHCP server. Therefore, a DHCP relay agent needs to be configured on the network segment where the DHCP client resides so that the DHCP client can obtain the configuration such as an IP address and DNS server's IP address from the DHCP server.
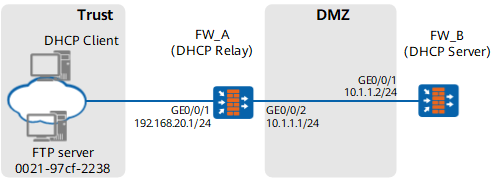
Configuration Roadmap
The configuration roadmap is as follows:
- To enable the DHCP server to assign an IP address and other network parameters to the DHCP client on a different network segment, configure a global address pool on FW_B and specify an egress gateway, a domain name suffix, and a DNS server's IP address for the DHCP client.
- Enable DHCP.
- Configure dynamic IP address allocation and other network parameters assigned to the DHCP client.
- Configure static IP address allocation and other network parameters assigned to the FTP server.
- Configure a route between the DHCP server and the relay interface.
- Enable the DHCP relay function on FW_A to enable communication between the DHCP client and server across different network segments:
- Enable DHCP.
- Specify a DHCP server IP address on the relay interface.
- Set Internet Protocol (TCP/IP) Properties to Obtain an IP address automatically and Obtain DNS server address automatically on the DHCP client, which enables the DHCP client to automatically obtain the IP address and other network parameters allocated by the DHCP server.
Procedure
- Configure the IP addresses for the interface of FW_B and assign the interface to the specified security zone.
<FW> system-view
[FW] sysname FW_B
[FW_B] interface GigabitEthernet 0/0/1
[FW_B-GigabitEthernet0/0/1] ip address 10.1.1.2 255.255.255.0
[FW_B-GigabitEthernet0/0/1] quit
[FW_B] firewall zone dmz
[FW_B-zone-dmz] add interface GigabitEthernet 0/0/1
[FW_B-zone-dmz] quit
- Configure FW_B as a DHCP Server.
- Add a static route between the DHCP server and the DHCP relay interface, enabling the two are routable to each other.

The IP address of the DHCP relay interface and the IP address of the DHCP server reside on different network segments, you need to configure a static route or employ a dynamic route protocol on the DHCP server to route the DHCP relay interface and the DHCP server.
[FW_B] ip route-static 192.168.20.1 255.255.255.0 10.1.1.1
- Add a static route between the DHCP server and the DHCP relay interface, enabling the two are routable to each other.
- Configure the IP addresses for the interfaces of FW_A and assign the interfaces to the specified security zones.
<FW> system-view
[FW] sysname FW_A
[FW_A] interface GigabitEthernet 0/0/1
[FW_A-GigabitEthernet0/0/1] ip address 192.168.20.1 255.255.255.0
[FW_A-GigabitEthernet0/0/1] quit
[FW_A] interface GigabitEthernet 0/0/2
[FW_A-GigabitEthernet0/0/2] ip address 10.1.1.1 255.255.255.0
[FW_A-GigabitEthernet0/0/2] quit
[FW_A] firewall zone trust
[FW_A-zone-trust] add interface GigabitEthernet 0/0/1
[FW_A-zone-trust] quit
[FW_A] firewall zone dmz
[FW_A-zone-dmz] add interface GigabitEthernet 0/0/2
[FW_A-zone-dmz] quit
- Configure FW_A as a DHCP relay.
- Add interfaces to corresponding security zones and configure interzone packet filtering to ensure normal network communication. Details are omitted.
To realize mutual access between the DHCP relay and the DHCP server, you need to configure the packet filtering on the FW for the interzone between the Local zone and the zone where the DHCP client resides to allow packets through. To realize mutual access between the DHCP client and the DHCP relay, as well as between the DHCP relay and the DHCP server, you need to configure the packet filtering on FW_A and FW_B for the interzone between the Local zone and the zone where the interface resides to allow packets through.
- Configure DHCP clients (using a Windows XP-based PC as an example).
- Right-click Network Neighborhood on the desktop, and choose Attributes > Network Connections.
- Right-click Local Area Connection of the connected network adapter, and choose Properties.
- Select Internet Protocol (TCP/IP) and click Properties. The Internet Protocol (TCP/IP) Properties window is displayed. Select Obtain an IP address automatically and Obtain DNS server address automatically.
Configuration Verification
- On any PC in the department, press and enter cmd to display the DOS screen. Run the ipconfig /all command to view the network parameters obtained by the client, such as an IP address, a default gateway address, a WINS server address, and a DNS server address. Also, verify that the FTP server has obtained a fixed IP address 192.168.20.254.
If the DHCP client obtains incomplete information (for example, only the IP address is obtained), run the ipconfig /release command to lease the dynamic IP address, and run the ipconfig /renew command to apply for a new IP address and other network parameters.
C:\Documents and Settings\Administrator> ipconfig /all Ethernet adapter Local Area Connection: Connection-specific DNS Suffix . : example.com Description . . . . . . . . . . . : Realtek RTL8139/810x Family Fast Ethernet NIC Physical Address. . . . . . . . . : 00-50-ba-50-73-25 Dhcp Enabled. . . . . . . . . . . : Yes Autoconfiguration Enabled . . . . : Yes IP Address. . . . . . . . . . . . : 192.168.20.2 Subnet Mask . . . . . . . . . . . : 255.255.255.0 Default Gateway . . . . . . . . . : 192.168.20.1 DHCP Server . . . . . . . . . . . : 10.1.1.2 DNS Servers . . . . . . . . . . . : 3.3.3.3 Primary WINS Server . . . . . . . : Lease Obtained. . . . . . . . . . : Tuesday, December 13, 2011, 17:52:10 PM Lease Expires . . . . . . . . . . : Friday, December 23, 2011, 17:52:10 PM - Check the address lease duration list of the DHCP server to determine whether the DHCP server assigns IP addresses to the PC and FTP server on the LAN.
- Choose .
Verify the client IP address assigned by the DHCP server.
Configuration Scripts
Configuration scripts of FW_A
#
 sysname FW_A
#
dhcp enable
#
interface GigabitEthernet0/0/1
 ip address 192.168.20.1 255.255.255.0
 ip relay address 10.1.1.2
 dhcp select relay
#
interface GigabitEthernet0/0/2
 ip address 10.1.1.1 255.255.255.0
#
firewall zone trust
 set priority 85
 add interface GigabitEthernet0/0/1
#
firewall zone dmz
 set priority 50
 add interface GigabitEthernet0/0/2
#
security-policy
 rule name sec_policy_1
  source zone local
  source zone dmz
  destination zone local
  destination zone dmz
  action permit
#
security-policy
 rule name sec_policy_2
  source zone local
  source zone trust
  destination zone local
  destination zone trust
  action permit
#
return
Configuration scripts of FW_B
#
 sysname FW_B
#
dhcp enable
#
ip pool 1
 gateway-list 192.168.20.1
 network 192.168.20.0 mask 24
 static-bind ip-address 192.168.20.254 mac-address 0021-97cf-2238
 lease day 10 hour 0 minute 0
 dns-list 3.3.3.3
 domain-name example.com
#
interface GigabitEthernet0/0/1
 ip address 10.1.1.2 255.255.255.0
 dhcp select global
#
firewall zone dmz
 set priority 50
 add interface GigabitEthernet0/0/1
#
 ip route-static 192.168.20.0 255.255.255.0 10.1.1.1
#
security-policy
 rule name sec_policy
  source zone local
  source zone dmz
  destination zone local
  destination zone dmz
  action permit
#
return