CLI: Example for Switching the Device to the Cloud Management Mode Through USB-based Upgrade
Networking Requirements
As shown in Figure 1, the FW has been connected to the network. The device now needs to be managed by the cloud management platform, which will fulfill the function of delivering the device service configuration. To quickly switch the device to the cloud management mode, you can use the USB-based upgrade function to switch the device running mode.
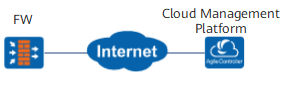
Configuration Roadmap
- Prepare the device configuration script and an index file for the USB flash drive.
- Import the device configuration script and index file to the USB flash drive.
- Insert the USB flash drive into the device. The device automatically restarts and switches to the cloud management mode.
Procedure
- Prepare a configuration file system-config.zip that will be used in cloud management mode. The name of the configuration file must be the same as that of the FILENAME1 in the index file for the USB flash drive. Write the FW configuration used in cloud management mode to the configuration file. You need to configure the access network, DNS server, security policy, and cloud management platform URL. For details, see Configuring Cloud Management Using the CLI.
- Prepare an index file for the USB flash drive. As shown below, RUNMODE is CLOUD-MANAGE, TYPE1 is SYSTEM-CONFIG, and FILENAME1 is system-config.zip. For details about the planning of other parameters, see "Upgrade Through USB." If the system software of the device needs to be upgraded while you switch the device to the cloud management mode, you also need to set the target version.
BEGIN [USB CONFIG] SN=time [UPGRADE INFO] OPTION=AUTO DEVICENUM=1 RUNMODE=CLOUD-MANAGE [DEVICE1 DESCRIPTION] OPTION=OK ESN=DEFAULT MAC=DEFAULT VERSION=Version DIRECTORY=DEFAULT FILENUM=1 TYPE1=SYSTEM-CONFIG FILENAME1=system-config.zip END - Log in to the FW as the administrator.
- Check the initial running mode of the device and ensure that the device runs in traditional mode.
<FW> display firewall run-mode Firewall Run Mode: Traditional Mode. - Optional: Configure USB-based automatic upgrade. This step is required when the device starts without a configuration file.

If the HMAC check function is enabled (hmac enable), the user ID for USB-based upgrade must be the same as the HMAC key.
If the index file does not contain the HMAC of the upgrade file, do not enable HMAC check on the FW; otherwise, the upgrade fails.
<FW> system-view
[FW] usb autoupdate userid userid
[FW] hmac enable
[FW] usb autoupdate config-userid config-userid
[FW] autoupdate enable
- Save the index file and configuration file to the root directory of the USB flash drive, and then insert the USB flash drive into the FW.
- The device automatically restarts and switches to the cloud management mode.
Verifying the Configuration
- You can run the display firewall run-mode command to view the running mode of the FW.
<FW> display firewall run-mode Firewall Run Mode: Cloud Managemeng Mode. - You can run the display api call-home connection status command to view the connection status of the call-home host. If the value of Connect-state is succeeded, the FW is successfully connected to the cloud platform.
<FW> display api call-home connection status
--------------------------------------------------
Host Name      : Host-name
Domain         : xxxx.com
Connect-state  : succeeded
--------------------------------------------------