Scanning Assets
This section describes how to obtain asset information by scanning assets.
Context
- To improve the speed and accuracy of asset identification, you can use the asset identification signature database to supplement and correct proactive scan and the associated result parsing. You need to manually load the asset identification signature database. For details, see "Update Center > Local Update" in Configuration Guide-System Management.
- The proactive scan mode can be quick, normal, or deep, which is determined by the user configuration (scan-level command) and idle memory of the device. The device automatically selects a proper scan mode based on the idle memory and user configuration.
- To simplify configuration, the FW automatically generates a security policy named top_netscan_rule whose source security zone is local, destination security zone is any, and action is permit when asset scanning is started. After the scanning is finished, the security policy is automatically deleted.
- If scanning tasks are performed multiple times and information about an asset (with the same IP address) changes, the asset information will be updated. If information about an asset is manually modified by the administrator, the manual modification takes priority by default. That is, the manually modified asset information will not be updated by subsequent scanning. If you want the manually modified asset information to be updated by subsequent scanning, enable the automatic update function in the asset list.
Procedure
- Choose .
- Set scanning parameters and click Apply.
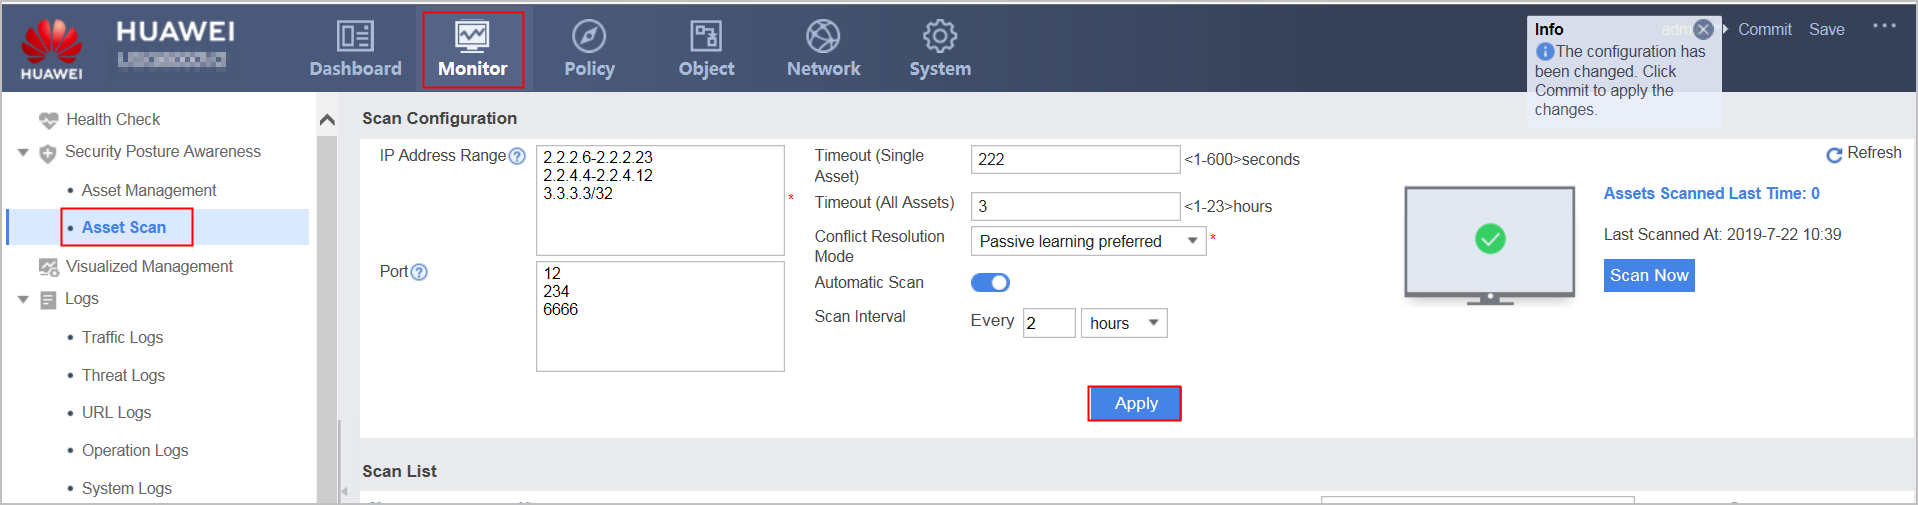
Parameter
Description
IP Address Range
IP address or IP address range of the target network segment for asset scanning. The FW sends detection packets to the target network segment to proactively obtain asset information.
For a network segment address range, the most significant 24-bit prefix of the start IP address must be the same as that of the end IP address. For example, if the start IP address is 10.10.1.1, the end IP address must be 10.10.1.*.
Set this parameter based on the IP address segment where the assets are located. Otherwise, the processing performance of the device may be affected.
Port
The port number for asset scanning.
The value is an integer ranging from 1 to 65535.
You can specify multiple port numbers. A maximum of 80 port numbers can be configured, and each port number must be unique.
You can click the text box to directly select a built-in scanning port or customize a scanning port.
NOTE:By default, the device scans the following ports: UDP 137, TCP 23, TCP 80, TCP 443, TCP 631, TCP 7080, TCP 8080, TCP 8443, TCP 8088, TCP 5800, TCP 3872, TCP 8180, TCP 8000, TCP 139, TCP 445, TCP 3389, and TCP 554.
Timeout (Single Asset)
To prevent long-time asset scanning due to network status or asset faults, set an asset scanning timeout period. If scanning times out, the system stops scanning.
- If the scanning of a single asset exceeds Timeout (Single Asset), the system stops scanning this asset, but directly uses the scanned information as the scanning result of the asset and continues to scan the next asset.
- If the scanning of all assets exceeds Timeout (All Assets), the scanning task ends, and subsequent assets are not scanned.
The scanning time is affected by many factors, including the size of the IP address segment to be scanned, number of online hosts, type and number of services enabled on each host, and network status. Generally, retain the default value.
Timeout (All Assets)
Conflict Resolution Mode
Solution to the conflict between the asset information obtained by proactive scanning and the asset information obtained by passive traffic learning:
- Overwrite: The new asset information overwrites the previous asset information.
- Passive learning preferred: The asset information obtained by passive traffic learning takes precedence over the asset information obtained by proactive scanning.
- Active scanning preferred: The asset information obtained by proactive scanning takes precedence over the asset information obtain by passive traffic learning.
In addition to proactive scanning, if the FW is used in the camera security management solution, it can obtain asset information by passive traffic learning. When camera traffic passes through the FW, the FW obtains camera asset information through in-depth traffic learning. Therefore, when the same asset information obtained in two modes is inconsistent, this parameter determines the priority.
Conflict Resolution Mode determines the priority of proactive scanning and passive traffic learning. If the asset information automatically obtained using either of the two methods is manually modified by the administrator, the manual modification takes priority by default. That is, the manually modified asset information cannot be updated by subsequent scanning or passive traffic learning. If you want the manually modified asset information to be updated by subsequent scanning or traffic learning, enable the automatic update function in the asset list.
Automatic Scan
Enable automatic scanning.
Scan Interval
Scheduled scanning interval, including weekly, daily, and intervals of several hours.

Modifying canning parameter settings during asset scanning is not allowed.
In the scanning result of operating system and asset types, others and pending are defined as follows:
- others: a type beyond the scanning scope supported by the FW
- pending: an undefined type that is not identified by the FW
- Click Scan Now to start asset scanning.
- Permit assets in the scanning list.
The scanned assets are listed in the scanning list. After the administrator checks the assets, the admitted assets are added to the Asset Management menu for management.
Single admission, batch admission, and all admission are supported:
- Admit Single: During admission, you can select the asset group to which an asset belongs and modify the scanned asset information.
- Admit in Batches and Admit All: You can only select the asset group to which assets belong.
After the scanning task is executed again, the previously admitted assets are not displayed in the scanning list. If the information changes, the information in the asset management list is updated.
Assets Scanned Last Time in the upper right corner of the page indicates the total number of assets scanned by the latest scan task. The number of assets displayed here may be different from the number of assets in the scan list. As the assets that have been admitted are not displayed in the scan list, or assets exceeding the device specifications are not displayed in the scan list.
- Optional: After configuring the asset information, click Generate Intrusion Prevention Profile under Asset List. You can select the application and operating system as required.
View the generated intrusion prevention profile in and apply the profile in a specified security policy.