Configuring OSPFv3 Using the Web UI
This section describes how to use the Web user interface (UI) to configure OSPFv3.
Enabling IPv6
Choose and enable IPv6 globally to allow the FW to forward IPv6 packets.
Adding an OSPFv3 Process
- Choose .
- Click Add.
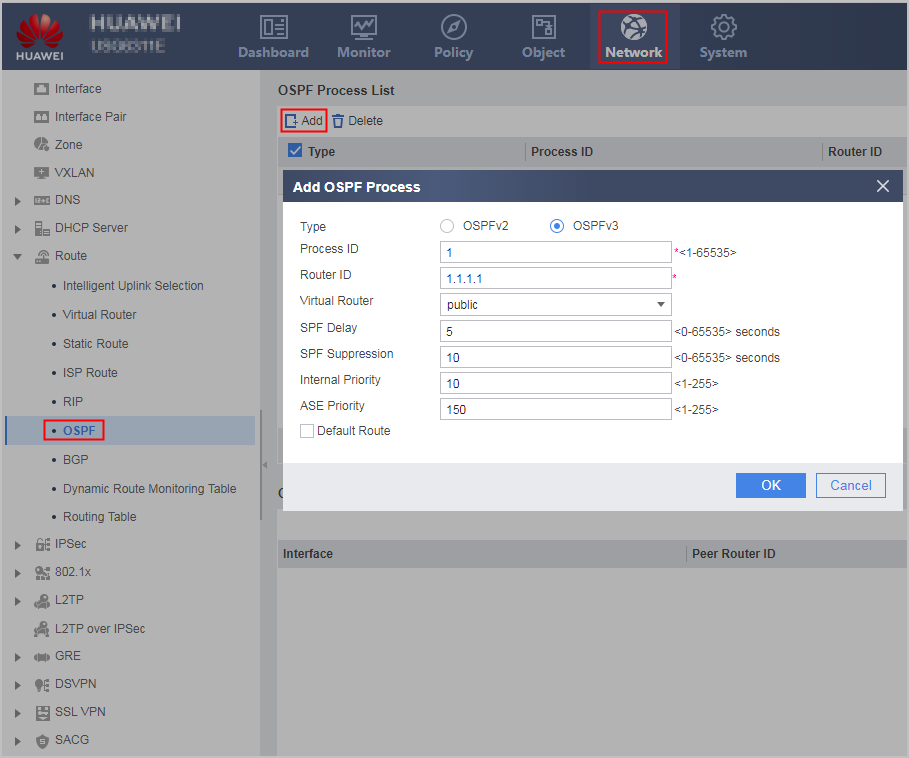
- Set the following parameters.
Table 1 OSPF parameters Parameter
Description
Type
OSPF version:- OSPF v2: IPv4 OSPF.
- OSPF v3: IPv6 OSPF.
In this example, OSPF v3 is selected.
Process ID
ID of an OSPF process. A device supports the OSPFv3 multi-process. Each OSPFv3 process has a specific ID on a single device. An OSPFv3 process ID is a local concept. Devices with different process IDs can exchange packets.
Router ID
Router ID for the OSPF process. A router ID is a 32-bit integer without symbols in the format of an IPv4 address.
The OSPFv3 router ID is manually specified. If no ID is specified, OSPFv3 cannot run.
The ID of each router in an AS must be unique. If multiple OSPFv3 processes run on the same router, set a unique router ID for each process. To ensure OSPFv3 stability, properly plan and manually set router IDs when planning the network.
Virtual Router
Specifies the public or VPN instance name. The VPN instance name indicates a common VPN or the VPN created for a virtual system.
When you configure an OSPFv3 route for a virtual system, the virtual router must be set to the VPN instance with the same name as the virtual system.
SPF Delay Time
Delay time after which SPF calculation is performed even though OSPFv3 receives network change notifications.
Each time the OSPFv3 link state database (LSDB) changes, a router re-calculates the shortest path, which consumes many network resources and adversely affects router efficiency. To address the problems, set the SPF calculation and suppression time.
SPF Suppression Time
Interval between two consecutive SPF calculations.
Internal Priority
OSPFv3 route preference value.
ASE Priority
AS external route preference value.
Default Route
Advertise default routes in an OSPFv3 area. Active default routes for other OSPFv3 processes must exist in the routing table of the device.
Specify this parameter before importing default routes to an OSPFv3 area.
Always
Generate and advertise the default route, regardless of whether active default routes of other OSPFv3 processes exist in the routing table of the device.
Configure this parameter only when Default Route is selected.
- Click OK.
If the new OSPFv3 process is displayed, the operation succeeds.
Configuring an OSPFv3 Area
This section describes how to configure an OSPFv3 area. An OSPFv3 area is determined in the same way as an OSPF area. You can configure a non-backbone area on the edge of an AS as a stub area to reduce the number of LSAs transmitted over the network and improve OSPFv3 scalability.
Some OSPFv3 areas are located on the border of an AS and connect to a backbone area. These OSPFv3 areas use ABRs to exchange routing information with the backbone area. Configuring the area as a stub area prevents Type 4 and Type 5 routing information from spreading in the area, which reduces LSDB sizes in the area and improves OSPFv3 network performance.
- Choose .
- Click
 for the OSPFv3 progress to be modified.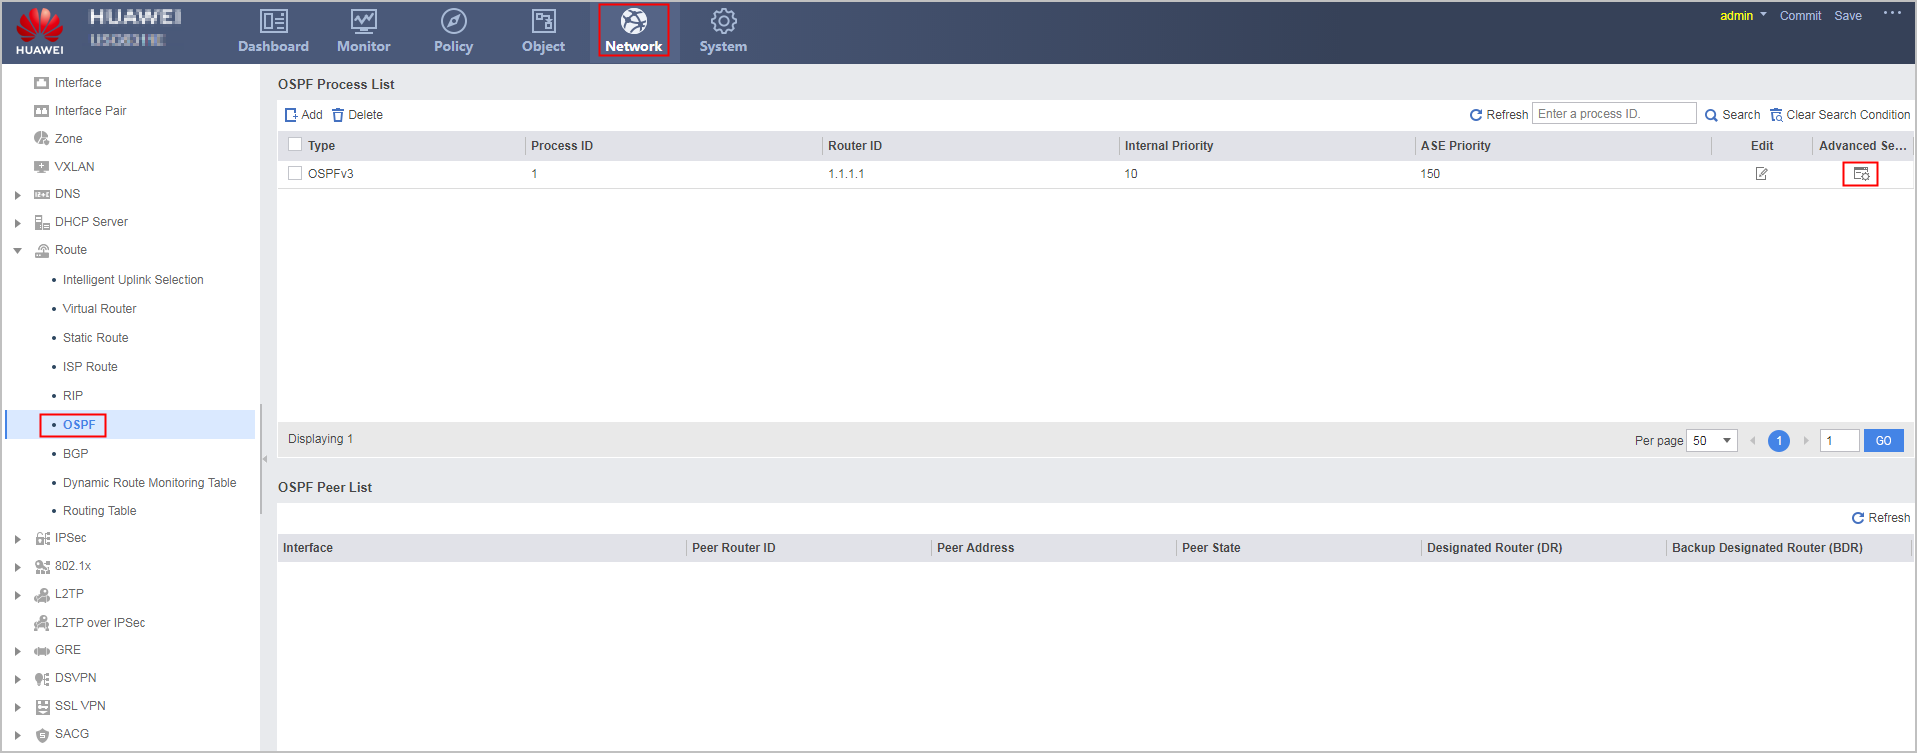
- In the OSPFv3 Process ID:ID navigation tree, choose .
- Click Add.
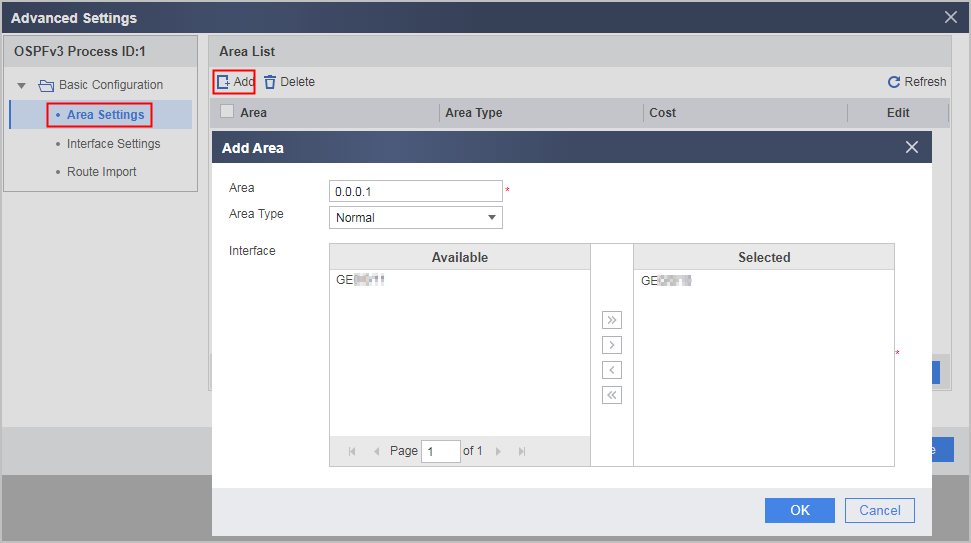
- Set the following parameters.
Table 2 OSPFv3 process parameters Parameter
Description
Area
OSPF area identifier.
Area Type
OSPF area type:
- Normal: An OSPFv3 area is a common area. Attributes are not set.
Stub: An OSPFv3 area is a stub area. The ABR in as stub area does not advertise ASE routes after receiving them, which reduces the routing table size and routing information to be forwarded.
If Area is set to 0.0.0.0, Area Type is set to NONE, but cannot be set to Stub.
Default Cost
Cost of the default routes sent to a stub area using OSPFv3.
This parameter is set when you set Area Type to Stub.
Stub Area Configuration
Enable a stub area to be a totally stub area and deny Type 3 LSAs from entering the stub area that connects to the ABR, which reduces the number of LSAs sent to the stub area.
Configure this parameter when you set Area Type to Stub.
Interface
Name of an interface that is enabled with OSPFv3.
OSPFv3 can only be enabled on an IPv6-enabled interface.
- Click Confirm.
Configuring an OSPFv3 Interface

Web configuration of OSPFv3 on interfaces has the following restrictions:
Before you run the ipv6 enable command on the interface that needs to run OSPFv3, you must ensure that an OSPFv3 process has been created in the system view.
If you need to create an OSPFv3 process and enable OSPFv3 on an interface on which the ipv6 enable command has been executed and no OSPFv3 process has been created in the system view, you need to run the undo ipv6 enable and ipv6 enable commands in sequence for OSPFv3 to run properly.
- Choose .
- Click for the OSPFv3 progress to be modified.
- In the OSPFv3 Process ID:ID navigation tree, choose .
- Click Add.
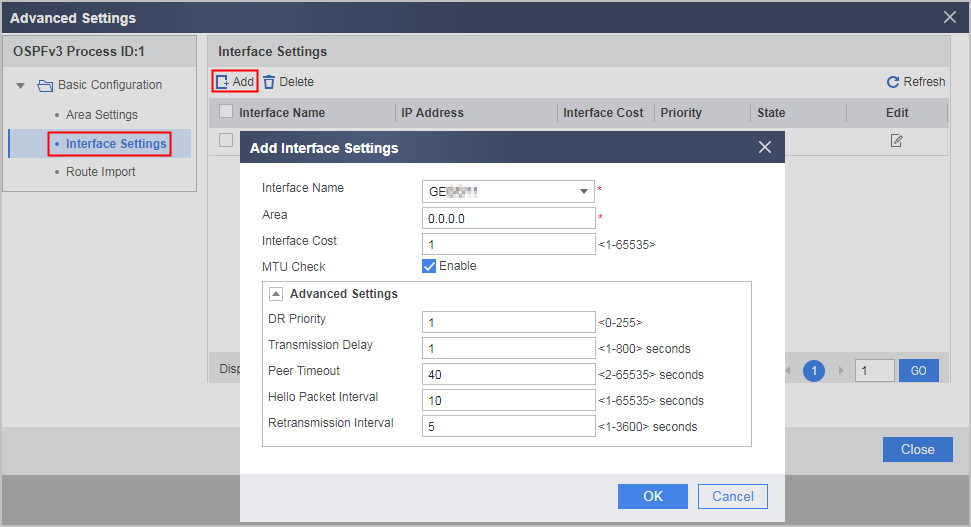
- Set the following parameters.
Table 3 OSPFv3 parameters Parameter
Description
Interface Name
Name of an OSPFv3 interface.
Area
ID of an OSPFv3 area.
Cost
OSPFv3 cost on the interface.
MTU Check
Clear the check box to disable the MTU check for DD packets.
If there are a few LSAs, the MTU value is unnecessary to check; therefore, you can configure to ignore the MTU check for DD packets to improve performance.
If the MTU values on both ends of a link are different, configure this parameter to help correctly establish an OSPFv3 neighbor relationship.
Advanced Settings
DR Priority
DR priority for the OSPFv3 interface. When the network type is broadcast or NBMA, set the interface DR priority to affect the DR/BDR selection on the network.
A larger value allows for a higher DR priority. If the priority value is set to 0, the interface does not participate in DR selection.
Transmission Delay
Delay time for transmitting LSAs on the interface.
An LSA in the local router LSDB is aging with time (its value is increased by 1 every second); however, the network transmission process does not age with time; therefore, you are advised to add the latency to the LSA aging period before sending the LSA. This is especially important for a low-speed network.
Peer Timeout
Neighbor timeout period.
An OSPF neighbor becomes invalid if a local device does not receive Hello packets from its neighbor after the specified period of time elapses.
Interfaces on the same network segment must have the same neighbor timeout period and the same interval at which Hello packets are sent.
The poll interval or the neighbor timeout interval on a single interface is at least four times as long as the interval at which Hello packets are sent.
Hello Packet Interval
Interval at which Hello packets are sent.
A shorter interval results in a faster speed in detecting network topology changes and larger system resource costs.
Retransmission Interval
Interval at which an LSA is resent.
If a router sends an LSA to its neighbor router and receives no confirmation packet after the retransmission interval elapses, the router resends the LSA.
The interval must be longer than the round-trip time of a packet between two routers, which prevents unnecessary retransmissions.
- Click Confirm.
Configuring Route Importing for an OSPFv3 Process
If OSPFv3 and other routing protocols run on the router, you can configure OSPFv3 to import the routes generated by other protocols, and advertise the routing information through LSAs.
- Choose .
- Click corresponding to the OSPFv3 progress to be modified.
- In the OSPFv3 Process ID:ID navigation tree, choose .
- Click Add.
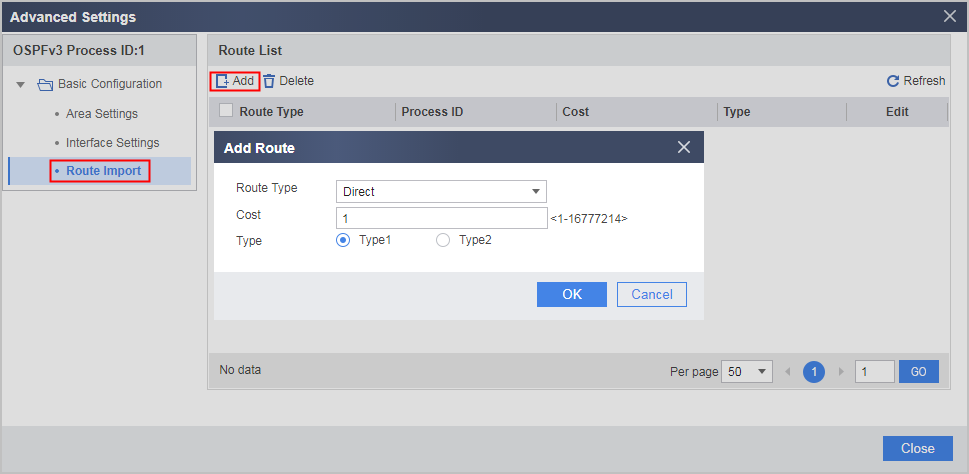
- Enter or select the parameters.
Parameter
Description
Route Type
Indicates the imported source routing protocol.
Process ID
The routing protocol process number needs to be specified when the Route Type is set to OSPF v3, RIPng, or ISIS.
Cost
Indicates the cost of an imported route.
Type
Indicates the type of an imported route.
- Click Confirm.