Web: Example for Enabling Remote Users to Access the Headquarters through SSL VPN (RADIUS Authentication + Local Authorization)
Networking Requirements
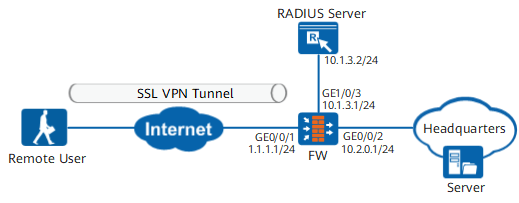
As shown in Figure 1, remote users access resources at the Headquarters through the network extension service of SSL VPN. The Headquarters uses a RADIUS server to authenticate users.
The enterprise needs to allocate different subnets to remote users of different departments to facilitate user management.
Data Planning
Item |
Data |
|---|---|
Interface |
Interface number: GigabitEthernet 0/0/1 IP address: 1.1.1.1/24 Security zone: untrust |
Interface number: GigabitEthernet 0/0/2 IP address: 10.2.0.1/24 Security zone: trust |
|
Interface number: GigabitEthernet 0/0/3 IP address: 10.1.3.1/24 Security zone: trust |
|
Remote user account |
User name: user0001 Password: Admin@123 User group: /default/group1 |
User name: user0002 Password: Admin@123 User group: /default/group2 |
|
Virtual gateway |
Name: gateway Gateway IP address: 1.1.1.1 Network extension address pool 1: 172.16.1.1 to 172.16.1.100 The address pool is used to assign IP addresses to users in /default/group1. Network extension address pool 2: 172.16.2.1 to 172.16.2.100. The address pool is used to assign IP addresses to users in /default/group2. |
RADIUS server |
IP address: 10.1.3.2/24 Port number: 1812 Pre-shared key: Admin@1234 NOTE:
The pre-shared keys configured on the FW and that on the RADIUS server must be the same. |
Procedure
- Configure interfaces.
- Choose .
- Click
 of GE0/0/1 and set the parameters as follows.
Zone
untrust
IPv4
IP address
1.1.1.1/24
- Click OK.
- Repeat the preceding steps to set the parameters for GE0/0/2 and GE0/0/3.
Zone
trust
IPv4
IP address
10.2.0.1/24
Zone
trust
IPv4
IP address
10.1.3.1/24
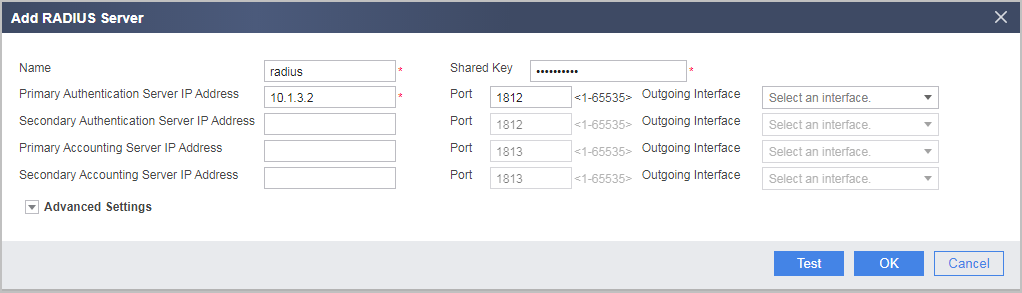
- Set parameters for the FW to interwork with the RADIUS server.
- Choose .
- Click Add and configure the RADIUS server. The pre-shared key is Admin@1234.
- Click OK.
- Configure user groups and user authentication method.
- Choose and set the parameters as follows:
Under User/User Group/Security Group Management List, click Add, and select Add User Group. Creating user groups group1 and group2. User information is stored on the RADIUS server. Therefore, you only need to create user groups and do not need to configure user information.
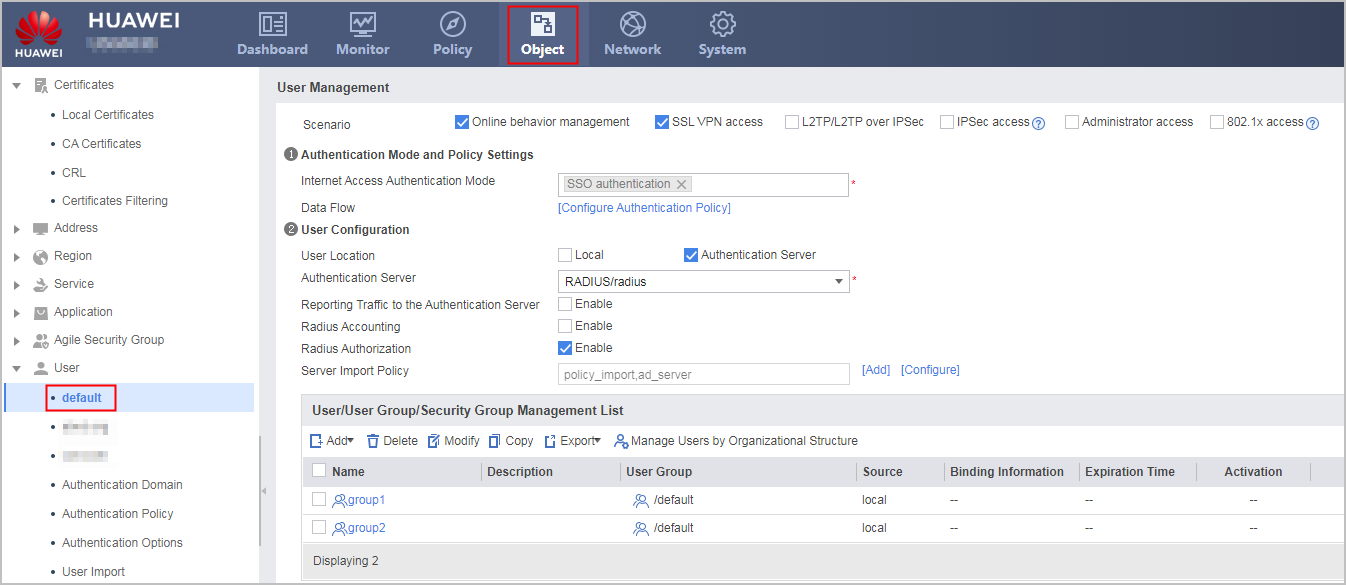
- Click Apply.
- Choose and set the parameters as follows:
- Configure the SSL VPN gateway.
- Choose .
- Click Add and set the parameters as follows:
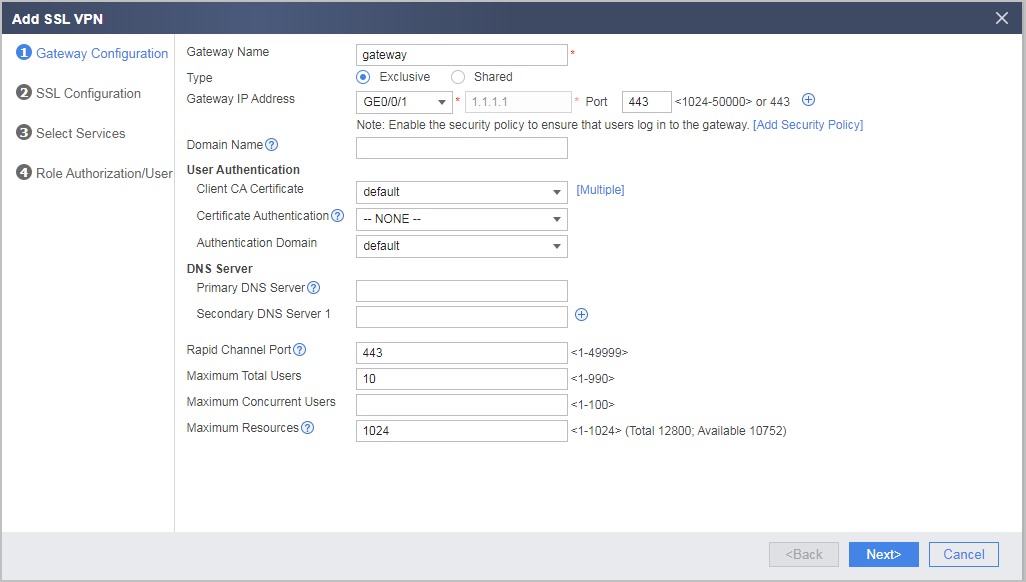
- Click Next.
- Configure the SSL version, cipher suite, session timeout duration, and session lifecycle. You can use the default values and click Next.
- Select Network Extension and click Next.
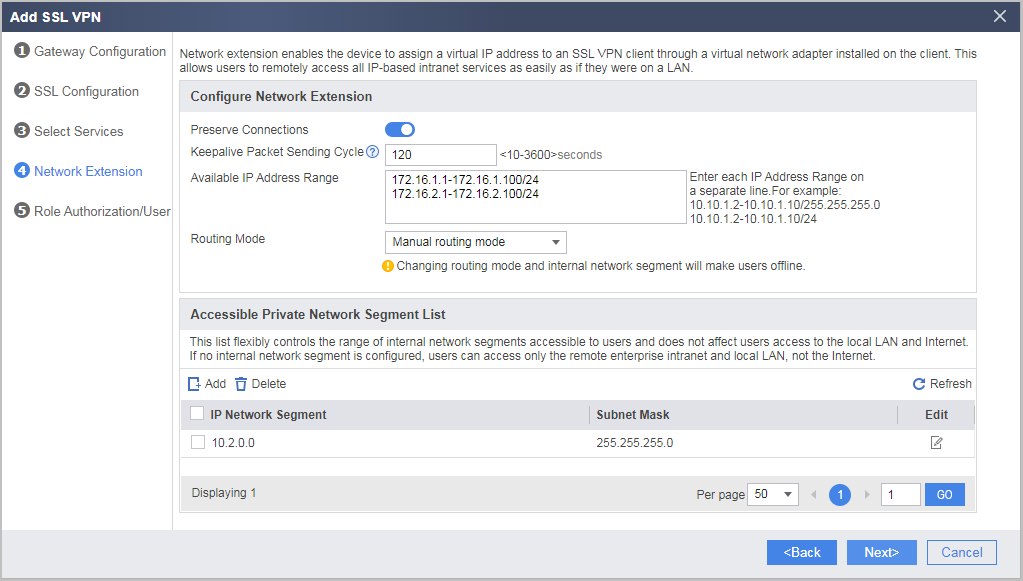
- Configure the network extension function.
- In Available IP Address Range, enter the IP address segment to be assigned. Under Accessible Private Network Segment List, click Add and configure the accessible intranet subnets.
- Click Next.
- In Available IP Address Range, enter the IP address segment to be assigned. Under Accessible Private Network Segment List, click Add and configure the accessible intranet subnets.
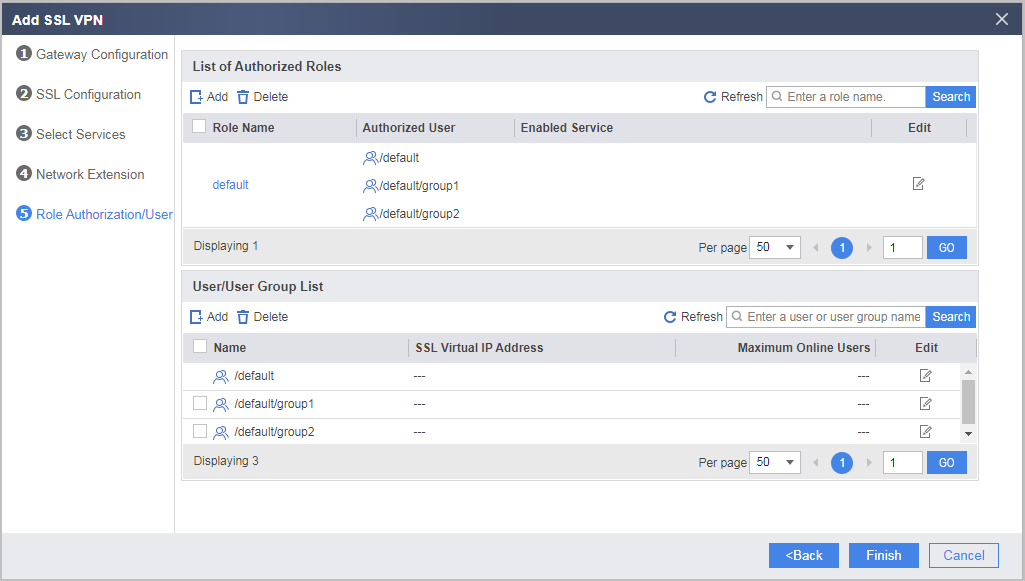
- Configure SSL VPN role authorization/users.
- Under User/User Group List, click Add. Add /default/group1 and /default/group2 to the user group list.
- Under List of Authorized Roles, click
 corresponding to default to bind the network extension service right to the role. After the configuration is complete, click OK.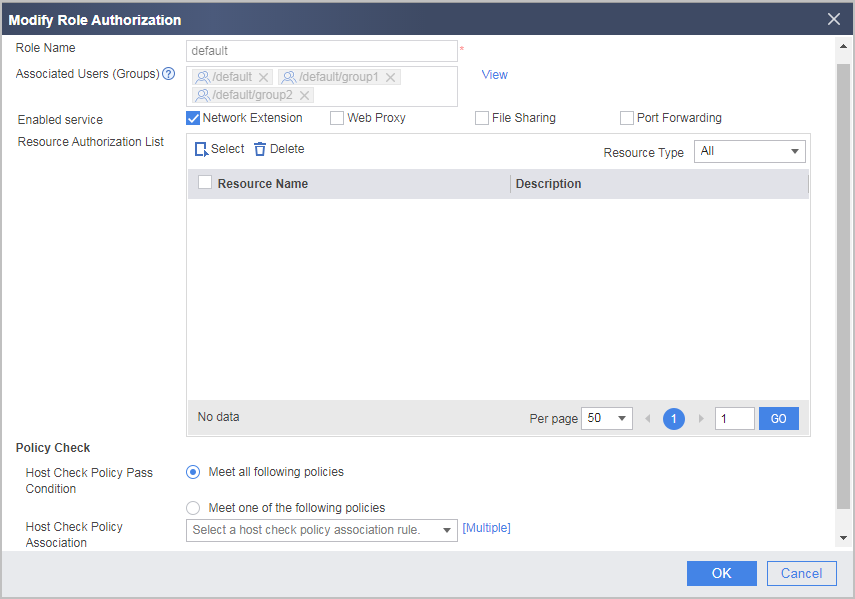
- Return to the Role Authorization/User configuration page, and click Finish.
- Under User/User Group List, click Add. Add /default/group1 and /default/group2 to the user group list.
- Bind an IP address pool to the user group.
- Click
 on the lower right of the page.
 - Click in the CLI Console (Disconnected) dialog box to connect to the CLI console.
- After the connection succeeds, run the following commands:
The addresses in the 172.16.1.1–172.16.1.100 address segment are assigned to users in /default/group1, and the addresses in the 172.16.2.1–172.16.2.100 address segment are assigned to users in /default/group2.
<sysname> sysname FW
[FW] v-gateway gateway
[FW-gateway] vpndb
[FW-gateway-vpndb] group /default/group1 network-extension netpool 172.16.1.1
[FW-gateway-vpndb] group /default/group2 network-extension netpool 172.16.2.1
[FW-gateway-vpndb] quit
[FW-gateway] quit
- Click
- Configure a route to the Internet. In the example, the next-hop IP address from the FW to the Internet is 1.1.1.2.
- Choose .
- Click Add and set the parameters as follows.
Destination Address/Mask
0.0.0.0/0.0.0.0
Next Hop
1.1.1.2
- Click OK.
- Configure security policies to allow remote users to access the resources at the Headquarters.
- Configure an Internet-to-FW interzone security policy to allow remote users to log in to the SSL VPN gateway.
- Choose .
- Click Add and configure security policy policy01 as follows.
Name
policy01
Source Zone
untrust
Destination Zone
local
Destination Address/Region
1.1.1.1/24
Service
https
Action
Permit
- Click OK.
- Configure security policies for remote users to access intranet resources.
- Choose .
- Click Add and configure security policy policy02 and policy03 as follows.
Name
policy02
Source Zone
untrust
Destination Zone
trust
Source Address/Region
172.16.1.0/24,172.16.2.0/24
Destination Address/Region
10.2.0.0/24
Action
Permit
Name
policy03
Source Zone
trust
Destination Zone
untrust
Source Address/Region
10.2.0.0/24
Destination Address/Region
172.16.1.0/24,172.16.2.0/24
Action
Permit
- Click OK.
- Configure an Internet-to-FW interzone security policy to allow remote users to log in to the SSL VPN gateway.
- Configure the RADIUS server. For details about how to configure the RADIUS server, see the related documents.
Verifying the Configuration
- Remote users user0001 and user0002 log in to the SSL VPN virtual gateway using browsers and enable the network extension service.
- The network administrator logs in to the FW and chooses , and can see that user0001 and user0002 have logged in and obtained IP addresses from their respective subnets.
- Remote users can access the resources on the enterprise intranet.
Configuration Script
#
radius-server template radius
 radius-server shared-key cipher %^%#w^'{5q[IZ9B5l.Oxwf;Om+|]6x$VN(2L;$PHvRK'%^%#
 radius-server authentication 10.1.3.2 1812 weight 100
 radius-server group-filter class
#
aaa
 authentication-scheme radius
  authentication-mode radius
 authorization-scheme radius
  authorization-mode radius
 domain default
  authentication-scheme radius
  authorization-scheme radius
  radius-server radius
  service-type internetaccess ssl-vpn
  internet-access mode password
  reference user current-domain
#
interface GigabitEthernet 0/0/1
 ip address 1.1.1.1 255.255.255.0
#
interface GigabitEthernet 0/0/2
 ip address 10.2.0.1 255.255.0.0
#
interface GigabitEthernet 0/0/3
 ip address 10.1.3.1 255.255.0.0
#
firewall zone trust
 set priority 85
 add interface GigabitEthernet 0/0/2
 add interface GigabitEthernet 0/0/3
#
firewall zone untrust
 set priority 5
 add interface GigabitEthernet 0/0/1
#
ip route-static 0.0.0.0 0.0.0.0 1.1.1.2
#
 v-gateway public ssl version tlsv11 tlsv12
 v-gateway public ssl ciphersuit custom aes256-sha aes128-sha
 v-gateway gateway interface GigabitEthernet 0/0/1 private
 v-gateway gateway alias gateway
#
v-gateway gateway
 basic
  ssl version tlsv10 tlsv11 tlsv12
  ssl timeout 5
  ssl lifecycle 1440
  ssl ciphersuit custom aes256-sha aes128-sha
 service
  web-proxy enable
  web-proxy web-link enable
  network-extension enable
  network-extension keep-alive enable
  network-extension keep-alive interval 120
  network-extension netpool 172.16.1.1 172.16.1.100 255.255.255.0
  network-extension netpool 172.16.2.1 172.16.2.100 255.255.255.0
  netpool 172.16.1.1 default
  network-extension mode manual
  network-extension manual-route 10.2.0.0 255.255.255.0
 security
  policy-default-action permit vt-src-ip
  certification cert-anonymous cert-field user-filter subject cn group-filter subject cn
  certification cert-anonymous filter-policy permit-all
  certification cert-challenge cert-field user-filter subject cn
  certification user-cert-filter key-usage any
  undo public-user enable
 hostchecker
 cachecleaner
 role
 role default
  role default condition all
  role default network-extension enable
#
security-policy
 rule name policy01
  source-zone untrust
  destination-zone local
  destination-address 1.1.1.1 32
  service https
  action permit
 rule name policy02
  source-zone untrust
  destination-zone trust
  source-address 172.16.1.0 24
  source-address 172.16.2.0 24
  destination-address 10.2.0.0 24
  action permit
 rule name policy03
  source-zone trust
  destination-zone untrust
  source-address 10.2.0.0 24
  destination-address 172.16.1.0 24
  destination-address 172.16.2.0 24
  action permit
# The following configurations are saved in the database and are not displayed in the configuration file.  v-gateway gateway
  vpndb
 group /default/group1 network-extension netpool 172.16.1.1
 group /default/group2 network-extension netpool 172.16.2.1