Web: Example for Configuring a RADIUS Server to Implement Authentication on Internet Access Users
This section provides an example for configuring RADIUS server authentication on Internet access users when a FW works as an egress gateway.
Networking Requirements
An enterprise has deployed a FW as the egress gateway to connect the intranet to the Internet, as shown in Figure 1. Details are as follows:
- The RADIUS authentication mechanism is enabled for the enterprise, and information about users and user groups are saved on a RADIUS server.
- Internet access users on the intranet include R&D employees and marketing employees.
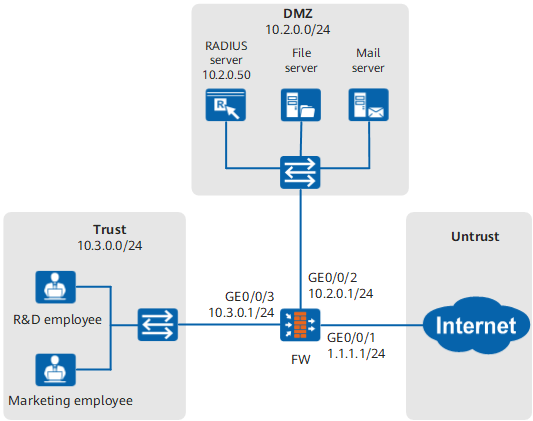
The user management and authentication mechanisms of the FW must identify IP addresses on the intranet as users to implement user-specific behavior control and permission assignment. Requirements are as follows:
- Information about users and departments is saved on the FW and can be referenced by policies.
- A RADIUS server implements authentication on Internet access users.
- Before accessing network resources, R&D employees and marketing employees must be authenticated by the Portal of FW.
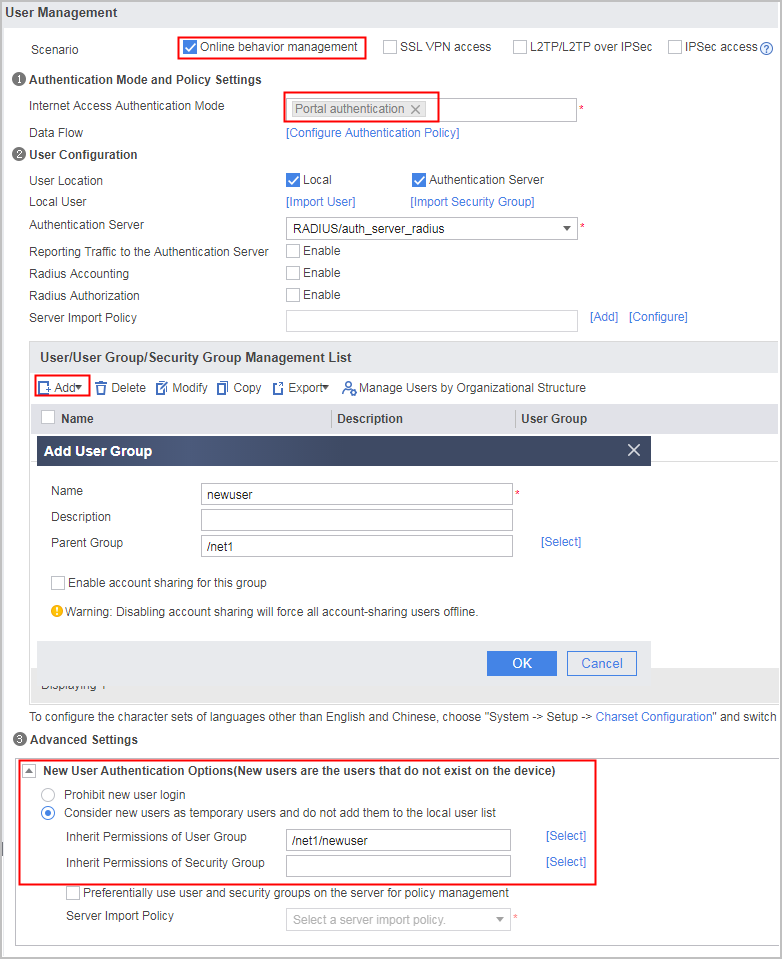
- If accounts of new employees are created on a RADIUS server but not stored on a FW, after being authenticated, the employees go online as temporary users and use the rights of the specified user group.
Configuration Roadmap

This example describes only how to configure user management and authentication.
- Set parameters for the FW to communicate with the RADIUS server and configure the FW to work as a client of the RADIUS server by sending user names and passwords to the RADIUS server for authentication.
- Configure an authentication policy to authenticate users before they access the Internet.
- Configure a net1 authentication domain on the FW, reference the RADIUS server and configure new user authentication option.
- Export user information on a RADIUS server into a CSV file in the specified format and import the CSV file into a FW to create users and user groups in a batch.
- Configure security policies on the FW to allow Internet access users to access authentication web pages to trigger user-initiated authentication and the FW to communicate with the RADIUS server.
- Configure the RADIUS server.
Data Planning
Item |
Data |
Description |
|---|---|---|
R&D employee |
Group User |
Add the R&D employee to group research. You can repeat the operations in this example to configure multiple user accounts. |
Marketing employee |
Group User |
Add the marketing employee to group marketing. You can repeat the operations in this example to configure multiple user accounts. |
Parent group of new users |
After being authenticated, the users go online as temporary users and use the rights of the specified user group. |
|
RADIUS server |
On the FW, set the parameters for communicating with a RADIUS server. The parameters on the FW must be consistent with those on the RADIUS server. |
|
Authentication domain |
The net1 authentication domain is used during authentication. |
|
Authentication policy |
The R&D employee and marketing employee can access network resources only after being authenticated by a FW. |
Procedure
- Choose , set IP addresses for interfaces and assign the interfaces to security zones.
The following example describes how to configure interface GigabitEthernet 0/0/3. You can configure other interfaces based on the networking diagram.
Zone
trust
IP Address
10.3.0.1/24
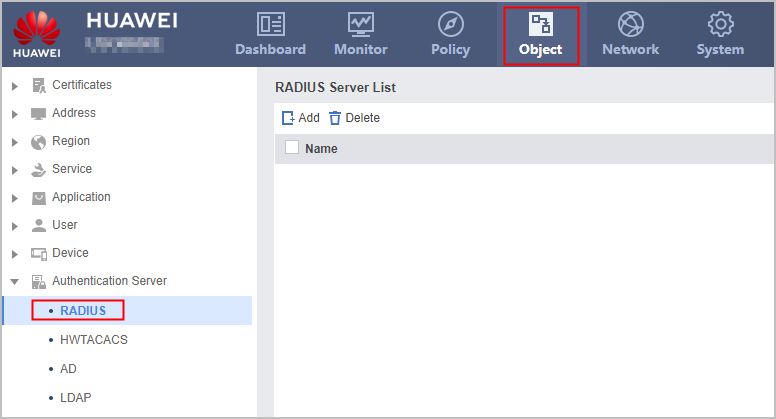
- Choose , click Add to set the parameters for communication with a RADIUS server.
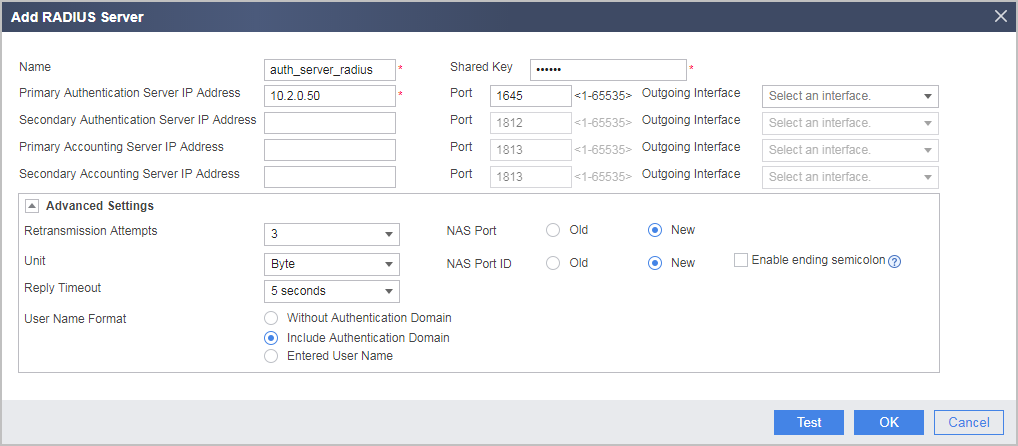
>Click Detect. In the dialog box that is displayed, click OK and enter the user name and password that are configured on the RADIUS server. Click Start Checking to check the connectivity to the RADIUS server.
The parameters on the FW must be consistent with those on the RADIUS server.
In this example, because the user name on the RADIUS server contains @, Include Authentication Domain must be selected so that the user name sent by the FW to the RADIUS server contains the name of the authentication domain.
- Choose , click Add to configure authentication policies.
Name
auth_policy_service
Source Zone
trust
Source Address/Region
10.3.0.0/24
Action
Portal authentication
Portal Authentication Template
Disable
- Choose , click Add to create an authentication domain.
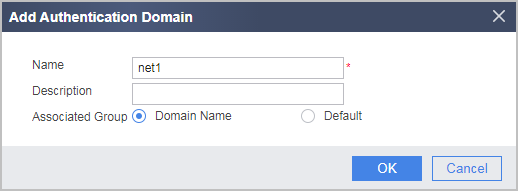
The authentication domain must be the same as the string following the at sign (@) in the user name on the RADIUS server.
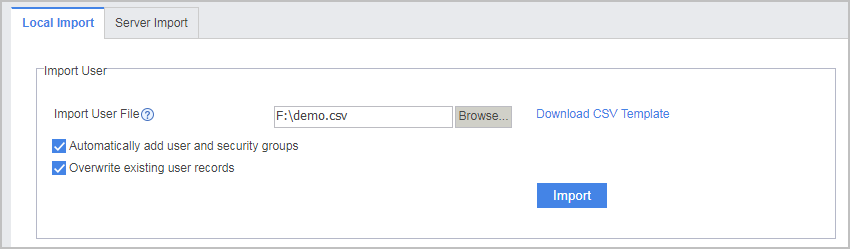
- Choose , import users and user groups from a CSV file.
- Write user information on the RADIUS server into a CSV file according to the template.
Read the instructions on the CSV template and fill in user information. The following figure shows a complete CSV file.

The first level of the "group path" in the CSV file is the authentication domain name. Therefore, the "login name" does not contain "@domain-name." In this example, the user name on the RADIUS server is user_0002@net1. Therefore, the group path is /net1 and the login name is user_0002 in the CSV file.
- Click Import to import the CSV file.
- Write user information on the RADIUS server into a CSV file according to the template.
- Choose , configure RADIUS server authentication and click Apply.
The user groups and users in the net1 authentication domain are imported through the CSV file on the previous step. The newuser user group accommodates new users.
- Choose , click Add to configure security policies.
- Configure a security policy to allow users to access the Internet.
Name
policy_sec_02
Source Zone
trust
Destination Zone
untrust
Source Address
10.3.0.0/24
Action
Permit
Enable the DNS service for the Trust -> Untrust interzone to allow HTTP domain name resolution packets through.
- Configure a security policy to allow users to access the Internet.
- After the configuration is complete, you can configure security policies, PBR policies, bandwidth policies, quota control policies, proxy policies, and audit policies that reference the user and user group objects.
- Configure the RADIUS server. For the configuration methods of the RADIUS server you use, refer to related documents.
Verification
- The R&D employee uses the Internet Explorer to access www.example.org and is redirected to an authentication page. The R&D employee then enters user name and password for authentication. After the R&D employee is authenticated, R&D employee can access network resources.
- The marketing employee uses the Internet Explorer to access www.example.org and is redirected to an authentication page. The marketing employee then enters user name and password for authentication. After the marketing employee is authenticated, marketing employee can access network resources.
- The new employee uses the Internet Explorer to access www.example.org and is redirected to an authentication page. The new employee then enters user name and password for authentication. After the new employee is authenticated, new employee can access network resources.
- Before accessing non-HTTP servers, such as FTP servers, employees need to access the authentication page at https://10.3.0.1:8887 for authentication. The IP address of the authentication page must be that of the interface on the FW and must be reachable to users.
- On the FW, choose to see information about online users.
Configuration Scripts
#
 sysname FW
#
radius-server template auth_server_radius
 radius-server shared-key cipher %$%$73pu<+^]XV9mn=*qd}_,r3*!%$%$
 radius-server authentication 10.2.0.50 1645
 radius-server user-name domain-included
#
interface GigabitEthernet0/0/1
 ip address 1.1.1.1 255.255.255.0
#
interface GigabitEthernet0/0/2
 ip address 10.2.0.1 255.255.255.0
#
interface GigabitEthernet0/0/3
 ip address 10.3.0.1 255.255.255.0
#
firewall zone trust
 add interface GigabitEthernet0/0/3
#
firewall zone untrust
 add interface GigabitEthernet0/0/1
#
firewall zone dmz
 add interface GigabitEthernet0/0/2
#
aaa
 authentication-scheme radius
  authentication-mode radius
 #
 domain net1
  authentication-scheme radius
  radius-server auth_server_radius
  service-type internetaccess
  internet-access mode password
  new-user add-temporary group /net1/newuser
#
auth-policy
 rule name auth_policy_service
  source-zone trust
  source-address 10.3.0.0 24
  action auth
#
security-policy
 rule name policy_local_01
  source-zone trust
  destination-zone local
  source-address 10.3.0.0 24
  service protocol tcp destination-port 8887
  action permit
 rule name policy_local_02
  source-zone local
  destination-zone dmz
  destination-address 10.2.0.50 32
  action permit
 rule name policy_sec_02
  source-zone trust
  source-address 10.3.0.0 24
  destination-zone untrust
  action permit
 rule name policy_sec_03
  source-zone trust
  source-address 10.3.0.0 24
  destination-zone dmz
  action permit

# The following configuration is used to perform a one-time operation and not stored in the configuration profile.
 user-manage user-import demo.csv auto-create-group override
 user-manage group /default/newuser
 test-aaa testname testpassword radius-template auth_server_radius