Configuring Antivirus
This section describes how to configure antivirus.
Context
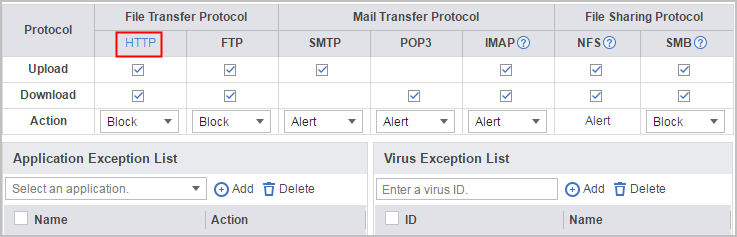
The FW has a default antivirus profile named default, which defines the default action in the upload or download direction of each protocol, as shown in the following figure. You cannot modify or delete the default profile.

When you reference a profile in a security policy, you can view the name of the default profile in the drop-down list. To view the configuration result, choose . In Current Configuration, you can view that the security policy references the default profile, but the configuration information about the default profile is not displayed.
Name |
Protocol |
Virus Detection in the Upload Direction |
Virus Detection in the Download Direction |
Default Action |
|---|---|---|---|---|
default |
HTTP |
Enable |
Enable |
Block |
FTP |
Enable |
Enable |
Block |
|
SMTP |
Enable |
- |
Alert |
|
POP3 |
- |
Enable |
Alert |
|
IMAP |
Enable |
Enable |
Alert |
|
NFS |
Enable |
Enable |
Alert |
|
SMB |
Enable |
Enable |
Block |
|
Attack Evidence Collection: disabled Application Exception List: not configured Virus Exception List: not configured |
||||
The FW supports user-defined profiles. You can specify the action for each protocol.
Procedure
- Configure the antivirus scan mode.Antivirus supports two virus scan modes:
Full-text scanning: After this mode is enabled, in-depth content detection is performed on files. This mode features a high detection rate of virus files but a low detection speed and high performance consumption.
Quick scanning: After this mode is enabled, fast content detection is performed on files. This mode features a high detection speed and low performance consumption but a relatively low detection rate of virus files.
By default, the antivirus scan mode is full-text scanning. If you want to switch to the quick scanning mode, choose and disable the full-text scanning mode above Antivirus Profile List.
- Configure the antivirus profile list.
- Configure attack evidence collection function.
Select Enable to enable attack evidence collection.
After attack evidence collection is enabled, the FW collects a maximum of 1600 bytes of virus-infected packets. You can use the auditor account to log in to the FW. Choose , select the entry whose Threat Type is virus to view and download the virus-infected packets. You can also click
 of the entry to download the virus-infected packets. Only auditor accounts can be used to view or download virus-infected packets.
 The attack evidence collection function relies on hard disks and available only when the hard disks are installed.
- When the TCP proxy function is enabled on a device, the attack evidence collection function is unavailable.
- By default, attack evidence collection has the following restrictions:
- A maximum of five attack evidence collection sessions are supported for a single threat ID on a single CPU.
- When the system memory space is less than 200 MB, the device does not collect attack evidence. When the system memory space is restored to 400 MB, the device restores attack evidence collection.
- A single CPU allows a maximum of 512 MB buffered attack evidence collection data. The maximum data volume of attack evidence that can be cached in a single session is as follows:
- Versions earlier than V600R007C20SPC500: 100 KB. If the size of the file whose data needs to be collected exceeds 100 KB, the device does not perform attack evidence collection on the session.
- V600R007C20SPC500 to V600R007C20SPC601 versions: 30 KB. If the size of the file whose data needs to be collected exceeds 30 KB, the device does not perform attack evidence collection on the session.
- V600R007C20SPC602 and later versions: 10 KB. If the size of the file whose data needs to be collected exceeds 10 KB, the device does not perform attack evidence collection on the session.
Attack evidence collection is for troubleshooting only. Because attack evidence collection compromises system performance, you must enable it only when necessary and disable it immediately after you finish attack evidence collection.
- Configure application exception.
Applications use protocols for transmission. To configure a different response action for a certain application using the protocol, configure it in application exception.
You can select either of the following two methods to add an application. The latest configured response action takes effect if you configure the application repeatedly using the two methods.- Select an application in the drop-down list of Application Exception List, and click Add.
- In the Protocol interface, click the link of the protocol, and select the action for the application in the dialog box that is displayed.
All the currently supported applications use HTTP. Therefore, only HTTP has a link.
- Configure virus exception.
If you believe that false positive is reported on a certain virus, obtain the virus ID from the log, enter the virus ID in the text box of Virus Exception List, and click Add to configure virus exception for the virus. Then the system permits files infected by the virus once detected.
Choose , select the entries whose Threat Type is virus, the value of Threat ID is the virus ID.
In antivirus quick scanning mode, if the name of the configured virus exception signature is -, the virus signature is invalid, and the corresponding configuration item can be deleted.
In antivirus full-text scanning mode, you are advised to obtain the ID of the configured virus exception signature using the preceding method. Otherwise, the configured virus exception signature may not display the signature name and may not take effect.
You can also choose and add a virus ID to virus exception. For details, see Verification and Check.
- Configure attack evidence collection function.
- Reference the antivirus profile in the security policy.
For details on how to configure the security policy, see Configuring a Security Policy-Web Using the Web UI.
- Click Commit on the upper right of the web page to commit the antivirus profile.
The created or modified antivirus profile does not take effect immediately. You need to click Commit on the upper right of the web page to activate the configuration. To save time, commit the configuration after you complete all operations on the antivirus profile.