Configuring Signatures
This section describes how to configure intrusion prevention signatures. A signature contains the features of a network intrusion. The device compares the received data flow with intrusion prevention signatures. If the data flow content matches a signature, the data flow contains threats.
Viewing a Predefined Signature
Predefined signatures cannot be modified. However, you can extract the detected intrusion features by viewing the signature content to facilitate follow-up configurations.
- Choose .
- Click the names of the predefined signatures to be viewed.
- View details on predefined signatures in Pre-defined Signature Detail.
Configuring the State of Predefined Signatures
The state of a predefined signature can be enabled, disabled, and deprecated. For enabled or disabled predefined signatures, you can change their state in batches or individually. Deprecated predefined signatures are ineffective and their state cannot be changed. They are displayed in the IPS signature database for only for checking signature history.

Only the public system supports configuration for the state of predefined signatures.
- Choose .
- In Intrusion Prevention Signature List, click the following buttons to change the state of all predefined signatures.
Parameters
Description
Enable All
Sets the state of all predefined signatures to Enable.
Disable All
Sets the state of all predefined signatures to Disable.
Restore Default Settings/Restore Default Status
Restores the original state of all predefined signatures in the IPS signature database.
- To change the state of a predefined signature:
- Click Commit on the upper right of the web page.
State changes do not take effect until you commit them by clicking Commit on the upper right of the web interface. To save time, you can commit the changes after all changes are made.
Configuring the Actions of Predefined Signatures
Each predefined signature has a default action, namely, allow, alert, or block. To change the action of a single predefined signature or the actions of all predefined signatures, perform the following operations:
You can configure actions for predefined signatures only on the root system.
- Choose .
- In Intrusion Prevention Signature List, click the following buttons to change the actions of all predefined signatures in a batch.
Parameter
Description
Alert All
Sets the actions of all predefined signatures to alert.
Restore Default Settings/Restore Default Action
Restores the default action of all predefined signatures in the intrusion prevention signature database.
- To change the action of a predefined signature, perform the following operations:
In the column of Intrusion Prevention Signature List, you can set the action of a predefined signature to allow, alert, or block.
- Click Commit on the upper right of the page.
The action changes do not take effect until you commit them by clicking Commit on the upper right of the web UI. To save time, you can commit the changes after all changes are made.
Modifying the Predefined Associated Signature
By default, the FW provides predefined associated signatures. If the check items of a predefined associated signature cannot meet requirements, you can modify the check items.
You can modify predefined associated signatures only on the root system.
- Click the name or
 of a predefined associated signature you attempt to edit.
 - Set parameters of the predefined associated signature.
Parameters
Description
Association Mode
Association mode, which can be:
- Source IP Address
- Destination IP Address
- Source and Destination IP Addresses
Interval
Statistical period, within which the user-defined associated signature is matched if the number of times the signature is detected exceeds the Matching Number
Matching Number
Threshold on the number of times the associated signature is detected
Block
Block time, namely, the time at which a blocked IP address is added to the blacklist
- Click OK.
- Click Commit on the upper right of the web page.
The created or modified predefined associated signature does not take effect immediately. You need to click Commit on the upper right of the web page to activate the configuration. To save time, commit the configuration after you complete all operations on predefined associated signature.
Configuring a User-Defined Signature
Each user-defined signature contains a maximum of four rules. Each rule can be configured with only one signature rule. When a packet matches the signature rule in a rule, the rule is matched. In addition, multiple rules do not affect each other. As long as a packet matches at least one rule in a signature, the packet matches the signature, regardless of the sequence.
Traffic Processing Flow shows how the device processes matched packets.
- Choose .
- Click Add.
- Enter the ID, name, and description of the user-defined signature.
Parameters
Description
ID
ID of the user-defined signature
Name
Name of the user-defined signature
Description
Description of the user-defined signature, for example, describing the intrusions that can be detected by the signature.
- Click the Basic tab to configure basic features of the user-defined signature.
Basic features describe signatures, but do not define signatures. These features are used by a signature filter to filter signatures in batches. During signature matching, data flows match signature rules, but not basic features.
- Click the Rule tab to configure rules of the user-defined signature.
- Click Add.
- Specify the name.
Parameters
Description
Name
Name of the signature rule
- Configure signature rule.
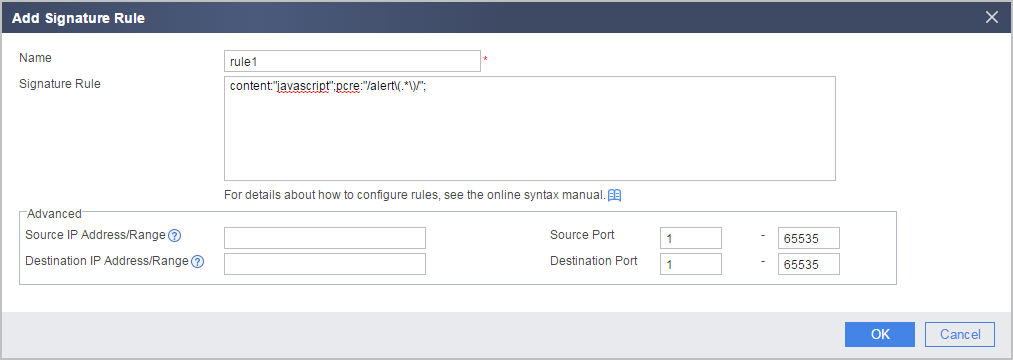
The IPS third-generation engine syntax is used to configure the signature rules of user-defined signatures. The IPS third-generation engine syntax greatly improves the processing efficiency while maintaining the detection accuracy of existing syntax. It is also compatible with common signature rules in the industry for better openness. For details about the IPS third-generation engine syntax, see IPS Third-Generation Engine Syntax.
- Optional: Configure advanced options in Advanced.
Setting the source/destination IP address and source/destination port narrows the detection scope of signatures for more accurate matching. If multiple IP addresses and ports match the conditions, the device detects only the data flows of the specified IP addresses and ports.
Parameters
Description
Source IP Address/Range
Source IP address that matches the user-defined signature, which can be either an IPv4 address or an IPv6 address.
You can configure a single IP address or IP address segment. If you do not specify the parameter, any source IP address can be matched.
Source Port
Source port range matched by a user-defined signature.
If you do not specify the parameter, any source port can be matched.
The end port cannot be smaller than the start port. If the two ports are the same, only one port is detected.
Destination IP Address/Range
Destination IP address that matches the user-defined signature, which can be either an IPv4 address or an IPv6 address.
You can configure a single IP address or IP address segment. If you do not specify the parameter, any source IP address can be matched.
Destination Port
Destination port range matched by a user-defined signature.
If you do not specify the parameter, any destination port can be matched.
The end port cannot be smaller than the start port. If the two ports are the same, only one port is detected.
- Click OK to complete the rule settings.
- Click OK to complete the settings of user-defined signatures.
- Click Commit on the upper right of the web page.
The created or modified user-defined signature does not take effect immediately. You need to click Commit on the upper right of the web page to activate the configuration. To save time, commit the configuration after you complete all operations on user-defined signature.
Configuring a User-Defined Associated Signature
If a user-defined signature is configured as an associated signature, you must remove the association relationship of the signature before deleting the user-defined signature. Only enabled predefined signatures can be configured as associated signatures.
- Choose .
- Click Add.
You can also select the ID of the associated signature first and then click User-defined Associated Signature.
- Enter the ID, name, and description of the user-defined associated signature.
Parameters
Description
ID
ID of the user-defined associated signature
Name
Name of the user-defined associated signature
Description
Description of the user-defined associated signature, for example, describing the intrusions that can be detected by the signature.
- Click Enable for Associated Signature.
- Set parameters of the user-defined associated signature.
Parameters
Description
Rule Name
Name of the associated signature rule, which is displayed only when you attempt to edit an existing associated signature
Signature ID
ID of the associated predefined or user-defined signature
The predefined signatures before and after the IPS signature database update may be different. If the associated ID of a configured user-defined associated signature does not exist in the IPS signature database after the upgrade, the associated signature becomes invalid and is set to gray in the signature list.
Association Mode
Association mode, which can be:
- Source IP Address
- Destination IP Address
- Source and Destination IP Addresses
Interval
Statistical period, within which the user-defined associated signature is matched if the number of times the signature is detected exceeds the Matching Number
Matching Number
Threshold on the number of times the associated signature is detected
Block
Block time, namely, the time at which a blocked IP address is added to the blacklist
- Configure basic features of the user-defined associated signature.
As for basic features of the user-defined associated signature, you can configure only Severity and Action but not Target or Protocol.
Parameters
Description
Severity
Severity of the user-defined associated signature
The higher the severity, the more severe the consequences caused by attacks matching the signature. Available severity levels from the most severe to the least severe are High, Medium, Low, and Informational.
Action
Action for the user-defined signature
- Alert: The device permits the packets matching the signature and generates a log.
- Block: The device discards the packets matching the signature and generates a log.
- Allow: The device permits the packets matching the signature.
- Click OK to complete the settings of user-defined associated signature.
- Click Commit on the upper right of the web page.
The created or modified user-defined associated signature does not take effect immediately. You need to click Commit on the upper right of the web page to activate the configuration. To save time, commit the configuration after you complete all operations on user-defined associated signature.
IPS Third-Generation Engine Syntax
-
The flow field can be used to specify the detection direction and scope.
For example, flow: from_server, session; indicates that the request from the server is detected and the detection scope is session.
-
The content field is used to specify the feature string to be detected.
For example, content: "helloworld"; nocase; offset: 100; depth: 20; indicates that a maximum of 20 bytes can be matched from the 100th byte of the TCP/UDP payload. In this range, the helloworld feature string is matched in case-insensitive mode.
-
The pcre field uses the regular expression to detect the feature string of a packet. The format is pcre:"/<regex>/[options][extend]";, where <regex> indicates the regular expression string, [options] indicates the additional item, and [extend] indicates the extended syntax.
For example, pcre: "/alert\(.*\)/iAG"; indicates matching a character string that starts with alert( and ends with ) from the beginning of the data in case-insensitive mode and that the greedy mode is used. (i indicates case-insensitive, A indicates matching the character string from the beginning of the data, and G indicates that the greedy mode is used.)
The following is an example of the syntax rule of the IPS third-generation engine: flow: from_client, message; pkt_data; content:"/index.html"; http_uri; fast_pattern; content:"test"; nocase; http_user_agent; urilen:>512; pcre:" /id=[0-9]{5,10}/Ui";. It can be interpreted as follows:
- flow: from_client, message; indicates that the request sent from the client is detected and the detection scope is message.
- pkt_data; indicates that the detected content is traffic.
- content:"/index.html"; http_uri; fast_pattern; indicates that the URI field in the HTTP header matches the /index.html feature string. fast_pattern is used to modify a content feature string, indicating that the feature string has the most obvious threat characteristics and is preferentially matched during pre-filtering.
- content:"test"; nocase; http_user_agent; indicates that the User-Agent content in the HTTP header matches the test feature string in case-insensitive mode.
urilen:>512; indicates that the signature rule can be matched only when the length of the URI is greater than 512 bytes.
pcre:" /id=[0-9]{5,10}/Ui"; checks whether the URI field matches the pcre rule using regular expression matching in case-insensitive mode. U indicates the URI field and i indicates case-insensitive.
If all the preceding conditions are met, the packet matches the signature rule.
The preceding describes only the basic content of the IPS third-generation engine syntax and gives simple examples. For details about the syntax description, supported syntax, fields, and the meaning of each field, see the Online Syntax Manual.