Updating the Artificial Intelligence Engine Database Using the Web UI
This section describes how to update the artificial intelligence engine database on the web UI.
Preparation
Before updating the artificial intelligence engine database, do as follows:
-
Before updating the artificial intelligence engine database, ensure that the artificial intelligence engine license has been purchased and activated.
To check the license status, perform the following operation:
- Choose .
In License Resource, search for the flow probe license. Check whether the license is activated or expired in Status.
- If Status is Disable, activate the license. For operations, see License Management.
- If Status indicates that the service has expired, renew the corresponding license.
Checking the Free Space of the CF Card and Memory
Before updating the artificial intelligence engine database, check whether the free space in the device CF card and memory is sufficient. The following table lists the CF card and memory space required for updating the artificial intelligence engine database.
Item
CF Card Space
Memory Space
artificial intelligence engine database
100 MB or higher
50 MB or higher
Perform the following operation:
- Select Dashboard.
- In Device Information, check the available space of the CF card and memory.
Checking the Artificial Intelligence Engine Database Version
Check the artificial intelligence engine database version to determine whether the artificial intelligence engine database needs to be updated.
Details are as follows:
- Choose .
- In Signature Database Update, view Current Version of the artificial intelligence engine database to be updated and determine whether it requires an update.
Context
The artificial intelligence engine database can be updated in either of the following modes:
-
If the FW can communicate with the update center directly over the Internet or through a proxy server, you can update the artificial intelligence engine database in online mode.
-
When the FW is physically isolated from the Internet and no proxy server is deployed on the intranet, you can update artificial intelligence engine database locally.
Online Update
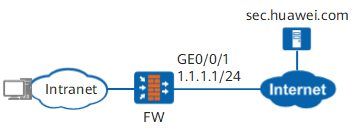
The FW is deployed at the border of the internal network as the security gateway. The FW can communicate with sec.huawei.com through the Internet. Through immediate update or scheduled update, the FW can automatically download the artificial intelligence engine database and update the local artificial intelligence engine database.
- Set the IP address and security zone of the interface.
- Choose .
- Click GE0/0/1 and set the parameters as follows:
Zone
untrust
IPv4
IP Address
1.1.1.1/24
- Click OK.
- Configure the update center address.
- Choose .
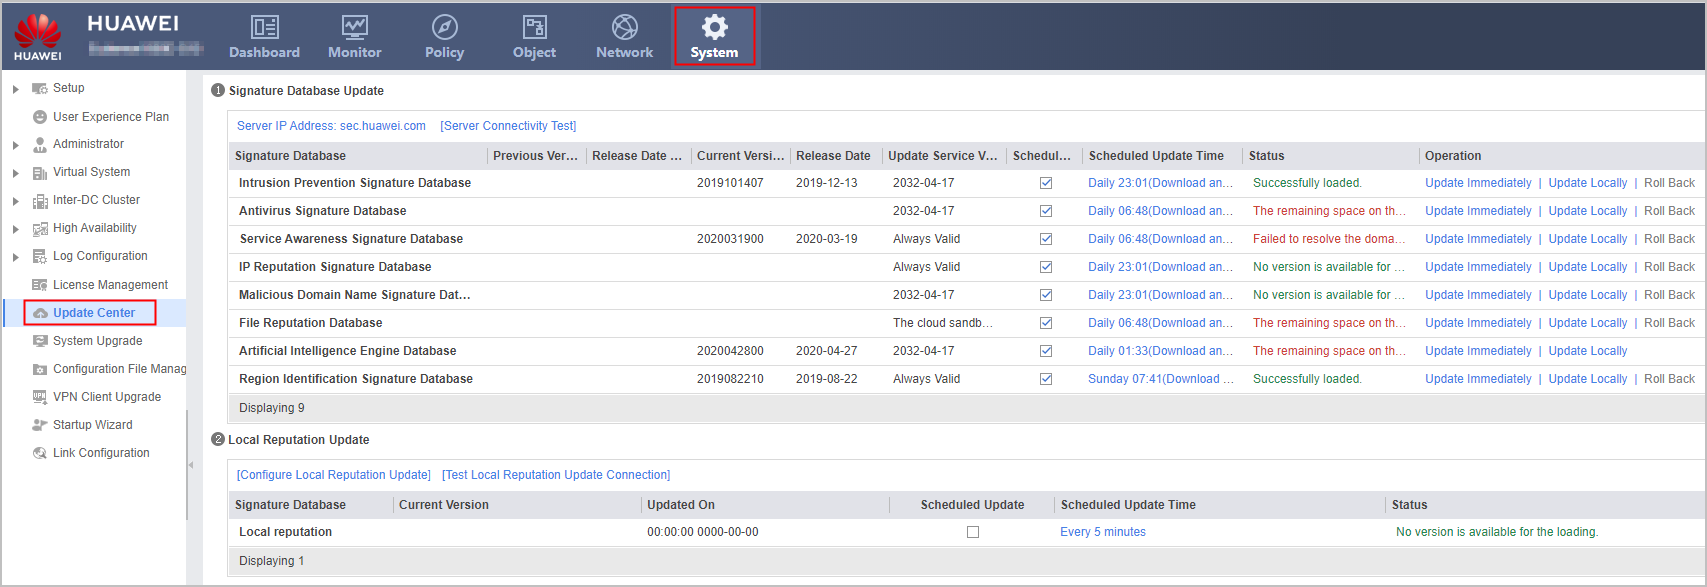
- Click Server IP Address.
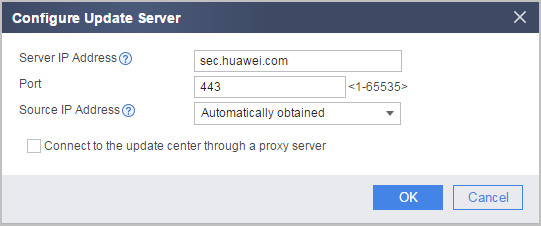
- In the Configure Update Server dialog box that is displayed, set the IP address of the update server. This example uses the default configuration. To adjust parameter settings, see the following table.
- Choose .
- Configure the DNS server and ensure that the FW can correctly resolve domain name sec.huawei.com.
- Choose .
- In DNS Server List, click Add.
- Configure the DNS server as follows:
DNS server address
2.2.2.2
- Click OK.
When the FW connects to the Internet through a VPN instance, you must run the dns server vpn-instance vpn-instance-name command on the CLI Console to bind the VPN instance to the DNS server.
- Configure a security policy to allow the FW to access sec.huawei.com and DNS server.
- Choose .
- Click Add Security Policy.
- Configure a security policy to allow the FW to access sec.huawei.com.
Name
policy_sec_huawei_com
Source Zone
local
Destination Zone
untrust
Service
HTTPS
NOTE:HTTPS is used by default for the update. You can run the update online-mode command to change the update mode to HTTP. However, HTTPS is more secure than HTTP, so HTTPS is recommended. To use the HTTP update mode, strictly specify the matching conditions of the security policy as follows:The update through a proxy server only using HTTP. If the FW accesses the update center through a proxy server, set this parameter to HTTP.
Action
Permit
- Configure a security policy to allow the FW to access DNS server.
Name
policy_dns_server
Source Zone
local
Destination Address
2.2.2.2/32
Service
DNS
Action
Permit
- Configure online update.

During online update, if normal services of the FW are interrupted, you can abort the update process. Wait for the network environment to improve before retrying the update.
- Configure scheduled update.
- Select Scheduled Update on the line of the artificial intelligence engine database to be updated to enable scheduled update.
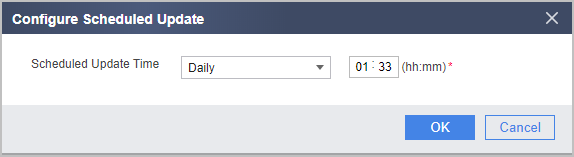
- Click Scheduled Update time on the line of the artificial intelligence engine database to be updated to set the time for scheduled update.
Parameter
Description
Scheduled Update Time
Set the update interval and time point. You need to set the time for scheduled update based on your network settings, but ensure that the update does not take up the network resources of normal services.
- Configure immediate update: Click Update Immediately for artificial intelligence engine database.
- Configure scheduled update.
- Verify the update result.After the update is completed, check whether the update succeeds in the Status column.
- After the update is complete, you can view that Status is The online update succeeded.. Current Version is the target version, and Previous Version is the source version.
When Status displays an update failure, click Server Connectivity Test to locate the cause for the update failure.
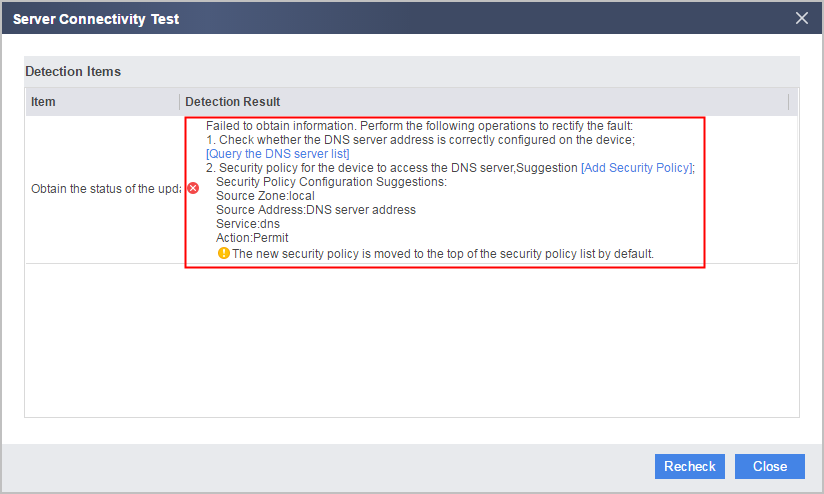
After you click Server Connectivity Test, the system automatically checks the connectivity between the FW and security center. A window is displayed on the web UI to show the detection procedure and provide the cause and handling suggestion in case of a connection failure.
For example, when you obtain the upgrade server information, the system displays "Failed to obtain information" and provides handling suggestions, as shown in the following figure. In this case, you can modify the configuration according to the handling suggestions, and then click Recheck to verify the connection.
Local Update
You must obtain the update package before the local update.
- Download the update package.
- Log in to Huawei security center (isecurity.huawei.com) and choose .
- Select the product type, series, name, and version.
- Click the tab of the artificial intelligence engine database to be updated.
- Download the artificial intelligence engine database file.
Click download icon on the right side. The Detail dialog box is displayed. Download the artificial intelligence engine database file in .zip format and directly upload it to the FW.
- Choose .
- Click Update Locally for the artificial intelligence engine database.
- Click Browse... and select the desired update package.
- Click Update.
- After the update is complete, Status is The local update succeeded. Current Version is the target version, and Previous Version is the source version.