CLI: Configuring the Google Account Control Function
Networking Requirements
As shown in Figure 1, the FW is deployed as a gateway on the network edge of an enterprise. Some enterprises attempt to allow employees to log in to Google services only with specified enterprise accounts but not their personal accounts. To achieve this, configure the Google account control function on the FW.
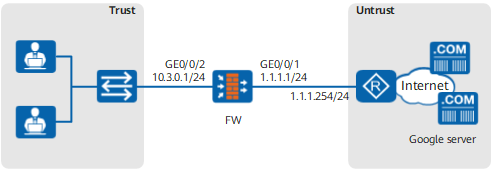
Configuration Roadmap
- Set IP addresses for interfaces and assign the interfaces to security zones.
- Create the URL filtering profile google account and Configure the google account control function.
- Configure the security policy and reference the URL filtering profile google account.
- Configure SSL-encrypted traffic detection to decrypt HTTPS traffic.
- Configure the SSL decryption certificate and import and install the SSL decryption certificate to the intranet PC.
- Optional: Import the CA certificate of the certificate authority trusted by the enterprise and specify the imported CA certificate as the server CA certificate. The FW checks whether the server certificate is trusted based on the server CA certificate.
Note that over 100 common server CA certificates have been preset on the FW by default, which can be used to verify most server certificates. Generally, these default CA certificates are enough and you do not need to import other CA certificates. In some cases, however, if the preset CA certificates cannot verify the peer server certificates, you need to import other CA certificates. This section describes how to import a CA certificate as a configuration step.
- Configure the detection profile and SSL-encrypted traffic detection policy.
Procedure
- Configure IP addresses for interfaces and assign interfaces to security zones.
Set an IP address for GE0/0/1 and assign the interface to the Untrust zone.
<FW> system-view
[FW] interface GigabitEthernet 0/0/1
[FW-GigabitEthernet0/0/1] ip address 1.1.1.1 24
[FW-GigabitEthernet0/0/1] quit
[FW] firewall zone untrust
[FW-zone-untrust] add interface GigabitEthernet 0/0/1
[FW-zone-untrust] quit
Set an IP address for GE0/0/2 and assign the interface to the Trust zone.
[FW] interface GigabitEthernet 0/0/2
[FW-GigabitEthernet0/0/2] ip address 10.3.0.1 24
[FW-GigabitEthernet0/0/2] quit
[FW] firewall zone trust
[FW-zone-trust] add interface GigabitEthernet 0/0/2
[FW-zone-trust] quit
- Create the URL filtering profile google account and Configure the google account control function.
[FW] web-apps-control type restrict-google-account name google
[FW-restrict-google-account-google] add header content huawei.com
[FW-restrict-google-account-google] quit
[FW] profile type url-filter name google_account
[FW-profile-url-filter-google_account] restrict-google-account name google
[FW-profile-url-filter-google_account] quit
- Configure the security policy and reference the URL filtering profile google account.
[FW] security-policy
[FW-policy-security] rule name secpolicy-trust2untrust
[FW-policy-security-rule-secpolicy-trust2untrust] source-zone trust
[FW-policy-security-rule-secpolicy-trust2untrust] destination-zone untrust
[FW-policy-security-rule-secpolicy-trust2untrust] source-address 10.3.0.1 mask 255.255.255.0
[FW-policy-security-rule-secpolicy-trust2untrust] service https
[FW-policy-security-rule-secpolicy-trust2untrust] profile url-filter google_account
[FW-policy-security-rule-secpolicy-trust2untrust] action permit
[FW-policy-security-rule-secpolicy-trust2untrust] quit
[FW-policy-security] quit
- Configure an SSL decryption certificate and import and install the SSL decryption certificates on an intranet PC.
- Export the trusted certificate and key pair.
[FW] pki export built-in-ca rsa-key-pair ssl-server-ca and-certificate ssl-server-ca.cer pem ssl-server-ca.pem password Mypassword@123
[FW] quit

The password specified here is used to protect the key file in the certificate. You are required to enter this password when you install the certificate later.
- Export the trusted certificate and key pair.
- Optional: Import the CA certificates of the certificate authorities that the enterprise trusts and specify them for server certificate verification.
- Configure an SSL-encrypted traffic detection profile.
[FW] profile type decryption name proxy
[FW-profile-decryption-profile-proxy] detect type outbound
[FW-profile-decryption-profile-proxy] quit
- Configure an SSL-encrypted traffic detection policy.
[FW] decryption-policy
[FW-policy-decryption] rule name proxy
[FW-policy-decryption-rule-proxy] source-zone trust
[FW-policy-decryption-rule-proxy] destination-zone untrust
[FW-policy-decryption-rule-proxy] source-address 10.3.0.1 mask 255.255.255.0
[FW-policy-decryption-rule-proxy] service https
[FW-policy-decryption-rule-proxy] action decrypt profile proxy
[FW-policy-decryption-rule-proxy] quit
[FW-policy-decryption] quit
- Commit the configuration.
[FW] engine configuration commit
Info: The operation may last for several minutes, please wait.
Info: URL submitted configurations successfully.
Info: Finish committing engine compiling.
Verification
- Enterprise users use their individual accounts for login. A message is displayed, indicating that the service is inaccessible. If they use accounts ending with huawei.com for login, the login succeeds.
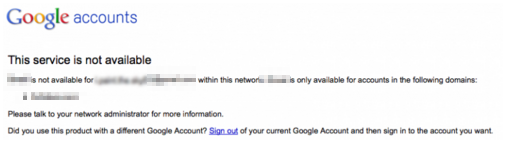
- Check URL logs URL/4/FILTER. You can find logs whose type field is Restrict google account.
Configuration Scripts
#
sysname FW
#
 app-proxy built-in-ca trust filename ssl-server-ca
 app-proxy ca trust filename server_ca.cer
#
pki entity ssl-server-ca
 common-name ssl-server-ca
 fqdn www.example.com
 locality Trust Network
 country CN
#
interface GigabitEthernet0/0/1
 undo shutdown
 ip address 1.1.1.1 255.255.255.0
#
interface GigabitEthernet0/0/2
 undo shutdown
 ip address 10.3.0.1 255.255.255.0
#
firewall zone trust
 set priority 85
 add interface GigabitEthernet0/0/2
#
firewall zone untrust
 set priority 5
 add interface GigabitEthernet0/0/1
#
web-apps-control type restrict-google-account name google
 add header content huawei.com
#
profile type url-filter name google_account
 restrict-google-account name google
#
security-policy
 rule name secpolicy-trust2untrust
  source-zone trust
  destination-zone untrust
  source-address 10.3.0.1 mask 255.255.255.0
  service https
  profile url-filter google_account
  action permit
#
profile type decryption name proxy
  detect type outbound
#
decryption-policy
 rule name proxy
  source-zone trust
  destination-zone untrust
  source-address 10.3.0.1 mask 255.255.255.0
  service https
  action decrypt profile proxy
#
return