Configuring User-defined URL Categories
This section describes how to configure, import, and export user-defined URL categories.
Context
User-defined URL categories include manually created user-defined categories and user-defined categories that are manually added to predefined categories. Both types of user-defined categories can be imported and exported in batches. For example:
Some employees on an enterprise access non-work-related websites, such as www.example1.com and www.example2.com during working hours, which adversely affects work efficiency and brings intangible assets loss to enterprises. Therefore, the enterprise wants to control the websites that employees can access and allows employees to access only work-related websites.
After querying the category database on the FW, the administrator of the enterprise can find that:
www.example1.com does not belong to any predefined URL category.
www.example2.com belongs to predefined URL category Blogs/Community.
Create the user-defined URL category forbidden website, add www.example1.com to the user-defined URL category, add www.example2.com to the predefined category Blogs/Community, and set the response action to Block. In this way, the problem faced by the enterprise can be solved. The specific configuration method is as follows.
Configuration on the Web UI
- Create a user-defined category or add a user-defined category to a predefined category.
- Choose , Click Add to create a user-defined category.

You can also create a user-defined category in the URL filtering profile. Choose . In the URL filtering level in the URL filtering profile, click Add URL Category next to the User-defined Category.
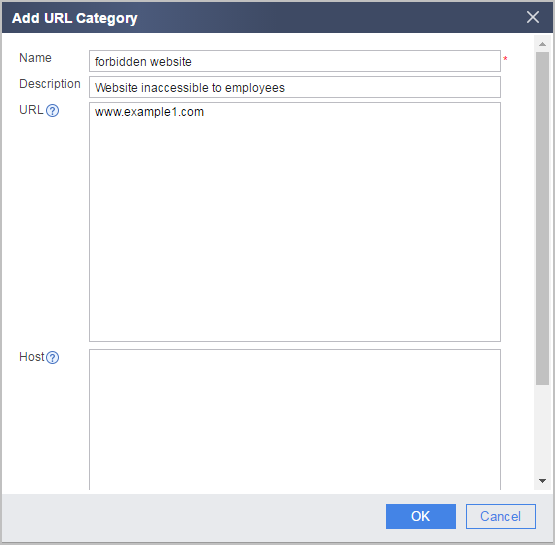
- Click OK.
- In URL Category, click
 on the right of the predefined category Blogs/Community to which the URL category is to be added or select the Social Network category and click the name of the Blogs/Community category, and then add www.example2.com to the predefined category.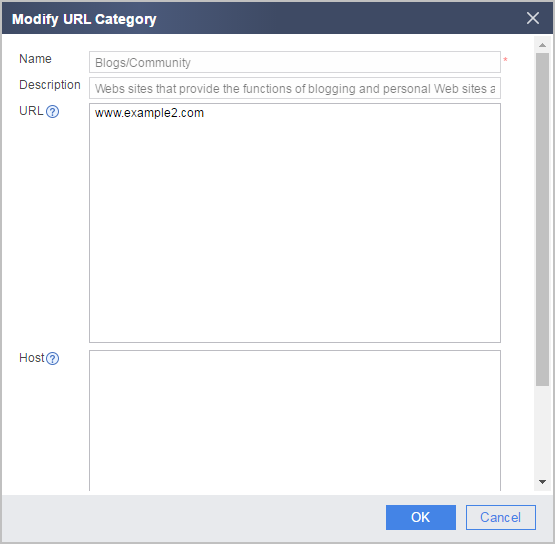
- Click OK.
- Choose , Click Add to create a user-defined category.
- Configure the URL filtering profile.
- Choose . In URL Filtering Profile List, click Add.
Name
url_profile_01
Default Action
Block
URL Filtering Level
Set the action for user-defined category forbidden website to Block.
Set the action of the predefined category Blogs/Community to Block.
- Click OK.
- Choose . In URL Filtering Profile List, click Add.
- Reference the profile on security policies. For details on how to configure security policies, see Configuring a Security Policy Using the Web UI.
- Click Commit.
The configuration does not take effect immediately after you create or modify the profile. You must click Commit on the upper right of the interface to apply the configuration. To save time, you can commit the configuration after all operations on the profile are complete.
Configuration on the CLI
- Create a user-defined category or add a user-defined category to a predefined category.
- Create a user-defined URL category in the system view and enter the view of the user-defined URL category.
url-filter category user-defined name category-name
- Configure the description of the user-defined URL category.
description description
- Add a URL rule or domain name rule to the user-defined URL category.
add { url url-text &<1-2> | host host-text &<1-2> }
- Return to the system view.
- Enter the predefined URL category view.
url-filter category pre-defined subcategory-id subcategory-id
- Add the URL rule or domain name rule to the predefined URL category.
add { url url-text &<1-2> | host host-text &<1-2> }
- Create a user-defined URL category in the system view and enter the view of the user-defined URL category.
- Create a URL filtering profile.
- Create a URL filtering profile.
profile type url-filter name name
- Set an action in the URL category.
category { pre-defined [ category-id category-id | subcategory-id subcategory-id ] | user-defined [ name category-name ] } action { allow | alert | block | qos remark dscp dscp-value }
- Create a URL filtering profile.
- Reference the profile on security policies. For details on how to configure security policies, see Configuring a Security Policy Using the CLI.
- Return to the system view and commit the configuration.
The new or modified security profile does not take effect until you run the engine configuration commit command to commit the configuration. To save time, you can submit the configuration after all operations on the profile are complete.
Configuration Example
<sysname> system-view
[sysname] url-filter category user-defined name "forbidden website"
[sysname-cate-user-defined-forbidden website] description for forbidden website
[sysname-cate-user-defined-forbidden website] add url www.example1.com
[sysname-cate-user-defined-forbidden website] quit
[sysname] url-filter category pre-defined subcategory-id 108
[sysname-cate-pre-defined-108] add url www.example2.com
[sysname-cate-pre-defined-108] quit
[sysname] profile type url-filter name url_profile_01
[sysname-profile-url-filter-url_profile_01] category user-defined action block
[sysname-profile-url-filter-url_profile_01] category pre-defined subcategory-id 108 action block
Importing and Exporting User-Defined URL Categories in Batches
- Creating User-defined Categories in Batches or Adding URLs/Hosts to Predefined Categories
- Choose .
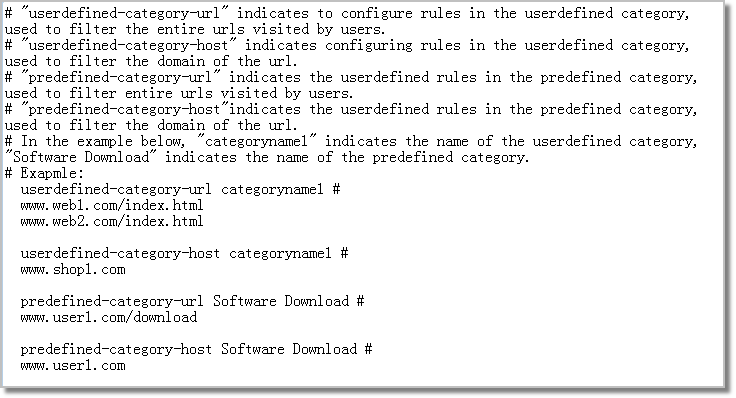
- Click Import. In Import, click Download CSV Template or Download TXT Template to download a template to the local device. Fill in the CSV template based on the format shown in Figure 1, and fill in the TXT template based on the format shown in Figure 2.
- When you create user-defined categories or add URLs/hosts to user-defined categories, the import template name column is mandatory, and the template ID column is optional.
- When you add URLs/hosts to predefined categories, the import template ID column is mandatory, and the template name column. The ID refers to a URL subcategory ID. You can run the display url-filter category pre-defined command to view URL subcategory IDs.
- For details on the usage of import templates, see the template description.
When the matching mode of URL/Host rules is set to exact matching mode and the string length of the rules ranges from 256 to 511 characters, the rules can be added to predefined categories only through the TXT template.
- Set import parameters.
Parameter
Description
Select a .csv or .txt file to upload.
Click Browse, select the edited CSV file or TXT file, and click Open.
Overwrite existing URLs
When a user-defined URL category already exists, you can:
- Select this check box to enable the FW to overwrite the existing URL category.
- Clear this check box to enable the FW to add up URLs in the category to the existing URLs.
- Click Import.
After the import is complete, you can view all imported user-defined URL categories in User-defined.
- In the dialog box that is displayed, click OK to commit and activate the configuration.
URL category changes do not take effect immediately. You need to click Commit on the upper right of the web page to activate them. To save time, you can commit changes after all changes are made.
- Export URL user-defined categories.
You can export user-defined URL categories into a CSV file or TXT file, and save the file on an external storage drive for backup. Then you can import the CSV file or TXT file into a FW to create user-defined URL categories in a batch.
- Choose .
- Click Export.
- Export user-defined URL categories into a CSV file or TXT file, and save the file on an external storage drive (for example, your PC).