Configuring Headquarters
This section describes how to configure the device when it functions as a Hub on the DSVPN network.
Background
Procedure
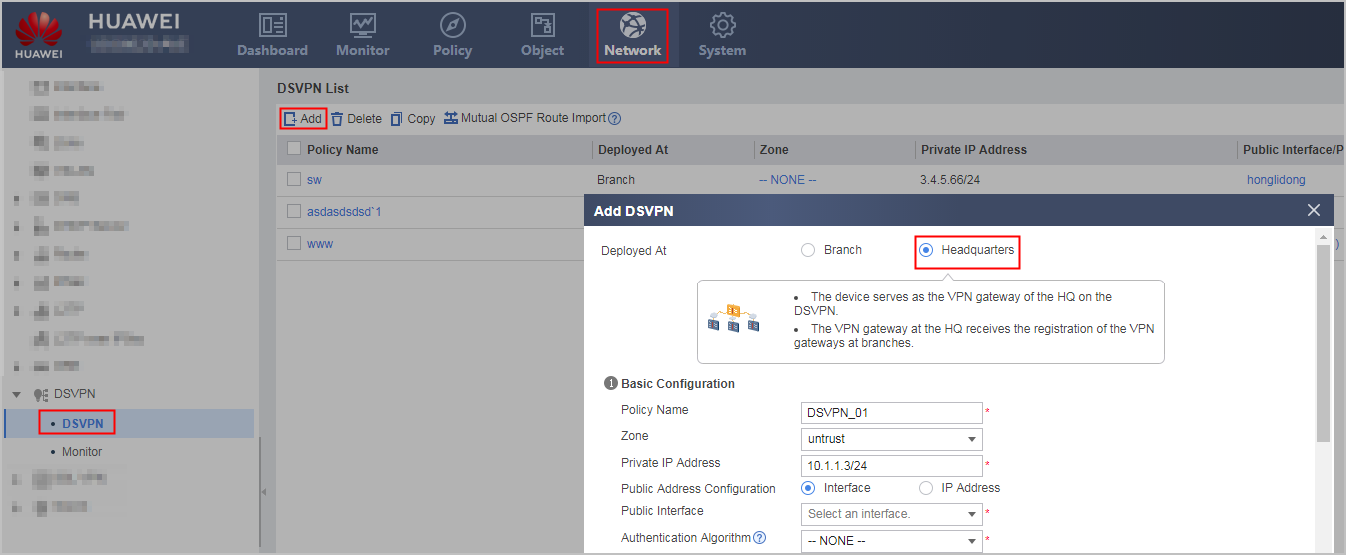
- Choose .
To use a certain Hub as a cascading headquarters, select this device and Spoke under it and click Mutual OSPF Route Import. After that, this device becomes the cascading headquarters.
- Click Add in DSVPN List.
- Select Headquarters in Deployed At.
- Set basic information about the headquarters (Hub).
Parameter Description Policy Name
Name of the mGRE tunnel interface on the Hub. mGRE tunnel interfaces on the same Hub must have different names.
Zone
Security zone of the mGRE tunnel interface.
Private IP Address
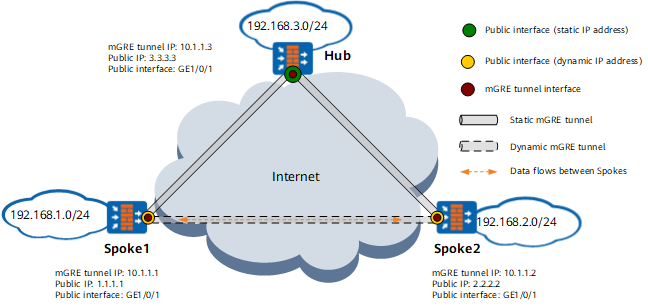
IP address of the mGRE tunnel interface on the Hub. 10.1.1.3/24 in Figure 1 is example value.
NOTE:The link to [Add Security Policy] is provided on the web UI. You can click the link to access the Add Security Policy page and rapidly create a security policy based on the configured data flows to permit the traffic. In addition, the Add Security Policy page support Switch Source and Destination and OK and Copy for configuring security policies for forward and return traffic. For details, see Switching the Source and Destination.Public Address Configuration
- Interface: Configure a WAN interface of the tunnel to specify the public IP address of tunnel-encrypted packets.
- IP address: Specify a public IP address of tunnel-encrypted packets.
Public Interface
Number of the public interface on the Hub.
This parameter is available when Public Address Configuration is set to Interface.
NOTE:The link to [Add Security Policy] is provided on the web UI. You can click the link to access the Add Security Policy page and rapidly create a security policy based on the configured data flows to permit the traffic. In addition, the Add Security Policy page support Switch Source and Destination and OK and Copy for configuring security policies for forward and return traffic. For details, see Switching the Source and Destination.Public IP Address
IP address of the public interface on the Hub, for example, 3.3.3.3 in Figure 1.
This parameter is available when Public Address Configuration is set to IP Address.
Authentication Algorithm
- NONE: Indicates that the authentication string is not used.
- plain: Transmits the authentication string in simple text.
- MD5: Indicates the MD5 algorithm used for encryption during the transmission of the authentication string.
- SHA1: Indicates the SHA1 algorithm used for encryption during the transmission of the authentication string.
- SHA-256: Indicates the SHA-256 algorithm used for encryption during the transmission of the authentication string.
- SHA-384: Indicates the SHA-384 algorithm used for encryption during the transmission of the authentication string.
- SHA-512: Indicates the SHA-512 algorithm used for encryption during the transmission of the authentication string.
SHA1 is recommended for security reasons.
Authentication Key
Character string the Hub uses to authenticate a Spoke.
When a Spoke registers with the Hub, the Hub uses the authentication key to authenticate the Spoke. To ensure that the Spoke can be authenticated by the Hub, set the same authentication key on the Spoke and Hub.
- Configure routing information for the headquarters.
Parameter Description Route Advertisement Mode
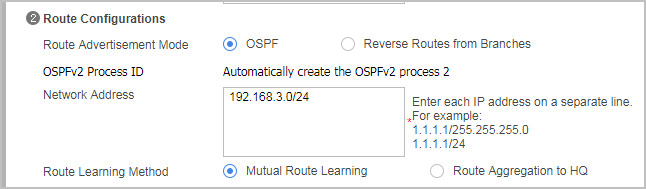
- OSPF: The headquarters learns branch private routes and advertises its own private routes through OSPF.
- HG learning reverse routes from branches: The branches send their private network addresses in NHRP messages to the headquarters. The headquarters analyzes the NHRP messages to obtain the branch private network addresses and adds a static route to each branch. The destination address of each route is the private network address in an NHRP message, and the next hop is the tunnel IP address of each branch.
NOTE:On a DSVPN network, the route advertisement modes of all Spokes and Hubs must be the same. Otherwise, the tunnels fail to be established.Network Address
Specify the subnet IP addresses to be added to the OSPF area. You need to set this parameter only when you select OSPF for Route Advertisement Mode.
The headquarters needs to advertise its private subnet IP address to all branches. Therefore, enter the private subnet of the headquarters here, 192.168.3.0/24 in Figure 1 is an example value.
Route Learning Method
Specify the route learning mode on the DSVPN network. You need to set this parameter only when you select OSPF for Route Advertisement Mode.
The DSVPN network supports two route learning schemes:- Route Learning from Each Other
If this scheme is used, Spokes establish dynamic mGRE tunnels in Non-Shortcut mode.
- Route Aggregation to the Headquarters
If this scheme is used, Spokes establish dynamic mGRE tunnels in Shortcut mode.
NOTE:On a DSVPN network, all Spokes and Hubs must use the same route learning scheme. Otherwise, tunnels cannot be established. - Optional: Configure IPSec.
The mGRE tunnels do not provide the encryption function and therefore cannot ensure communication security. To protect the data transmitted between the headquarters and branches or between branches, deploy IPSec on the DSVPN.
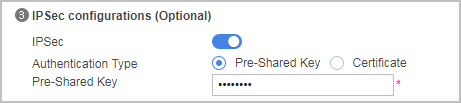
- Enable IPSec and set IPSec authentication parameters.
Parameter Description IPSec
Enable IPSec.
Authentication Type
The two ends of an IPSec tunnel need to authenticate each other. On a DSVPN network, IPSec supports authentication using a pre-shared key or a certificate.
Pre-Shared Key
If Authentication Type is set to Pre-Shared Key, you need to set this parameter. Enter the pre-agreed key.
Certificate
If Authentication Type is set to Certificate, you need to set this parameter. Select the public key certificate of the local end. Some information in the certificate will be sent to the peer end to authenticate the local end during tunnel establishment. The local end also requests for certificate information of the peer.
For details on how to upload a certificate, see Local Certificate.
- Complete advanced IPSec configuration.
IPSec has some default advanced settings. You can use the default settings or change them as required.
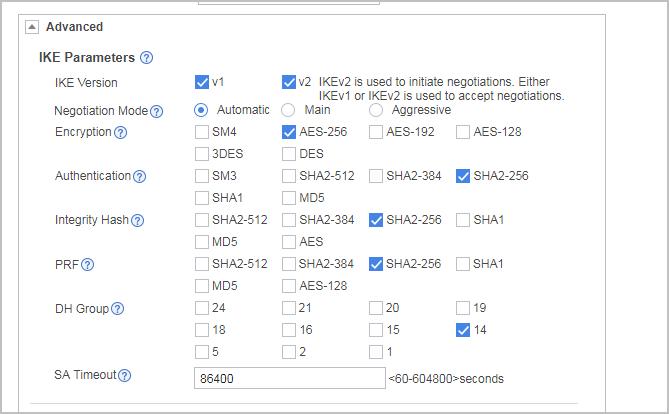
- Set IKE proposal negotiation parameters.
Parameter Description IKE Version
Select v1 or v2 to specify the protocol version for IKE negotiation with the peer end. The protocol versions on the two ends must be the same.
If you select both v1 and v2, the tunnel end can process IKEv1 and IKEv2 requests, but only IKEv2 can be used to initiate requests.
Negotiation Mode
Select an IKE negotiation mode.
- Automatic: Both the main mode and aggressive mode can be used to respond to negotiation requests, but only the main mode can be used to initiate negotiation requests.
- Main: Only the main mode is allowed. This mode is more secure than the aggressive mode.
- Aggressive: Only the aggressive mode is allowed. This mode is quicker than the main mode.
Encryption
Select an encryption algorithm.
Authentication
Select an authentication algorithm.
Integrity Hash
If IKE Version is set to v2, you need to set this parameter.
Select an integrity verification algorithm.
PRF
If IKE Version is set to v2, you need to set this parameter.
Select the PRF authentication algorithm.
DH Group
Select a key exchange method.
SA Timeout
Set the IKE SA lifetime. When the lifetime is about to expire, the FW negotiates a new SA. The new SA will immediately replace the old SA once it is established.
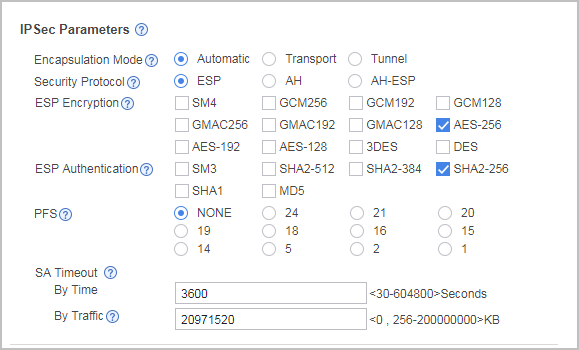
- Set IPSec proposal negotiation parameters.
Parameter Description Encapsulation Mode
Select an IPSec encapsulation mode.
- Automatic: Both the transport mode and tunnel mode can be used to respond to negotiation requests, but only the tunnel mode can be used to initiate negotiation requests.
- Tunnel: It is usually used in establishing tunnels between the VPN gateways.
- Transport: It is used in establishing tunnels between mobile devices and the VPN gateway.
Security Protocol
Select an IPSec protocol.
- AH: authenticates an entire packet but does not encrypt it.
- ESP: authenticates and encrypts the payload of a packet.
- AH-ESP: authenticates and encrypts an entire packet.
ESP Encryption
If Security Protocol is set to ESP or AH-ESP, you need to set this parameter.
Select an encryption algorithm.
ESP Authentication
If Security Protocol is set to ESP or AH-ESP, you need to set this parameter.
Select an authentication algorithm.
AH Authentication
If Security Protocol is set to AH or AH-ESP, you need to set this parameter.
Select an authentication algorithm.
PFS
Select a key exchange method.
The DH key with a larger group number is longer and more secure. If you select NONE, no extra key exchange is performed.
SA Timeout
IPSec tunnels will be renegotiated when the renegotiation interval or traffic volume reaches the threshold.
Enter a value in Based on Time to specify the renegotiation interval. Enter a traffic threshold in Based on Traffic. After an IPSec tunnel is established, the IPSec SA will start renegotiation if one of the preceding conditions is met. Renegotiation does not interrupt the existing tunnel.
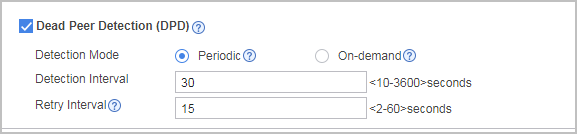
- Configure dead peer detection (DPD).
Parameter Description Detection Mode
After DPD is enabled, the device automatically sends DPD packets to check whether the remote end is alive to ensure timely removal of invalid tunnels.
Two detection modes are available:
- Periodic: The device sends a DPD packet if it does not receive any reply from the remote end within the Detection Interval.
- On-Demand: If the device does not receive any reply from the remote end within the Detection Interval and the device needs to communicate with the remote end, the device sends a DPD packet.
If a tunnel uses IKEv1, you must enable or disable DPD on both ends of the tunnel. If the device does not receive any reply from the remote end within the Detection Interval after sending a DPD packet, the device considers the event as a failure. After five consecutive failures, the device will regard the remote end as invalid and removes the tunnel between itself and the remote end.
In a tunnel uses IKEv2, you can enable DPD on either end of the tunnel. The interval for sending DPD packets is not the Detection Interval. Instead, it increases exponentially (after sending DPD packet 1, the device sends packet 2 after an interval of one second, packet 3 after an interval of two seconds, packet 4 after an interval of four seconds, packet 5 after an interval of eight seconds, and so on) until packet 8 is sent at the interval of 64 seconds. If the device still does not receive any reply packet in the 128 seconds after forwarding packet 8, the device automatically removes the tunnel. The entire process lasts for about half an hour.
Detection Interval
Enter a value in Detection Interval. The unit is seconds.
Retry Interval
Enter a value in Retry Interval. The unit is seconds. The setting takes effect only for IKEv1.
- Set IKE proposal negotiation parameters.
- Enable IPSec and set IPSec authentication parameters.
- Click OK.