Configuring Anonymous Email Check
Anonymous email has an empty sender address and may contain illegitimate information. The anonymous mail check function determines whether users are allowed to send and receive anonymous mails.
Context
Anonymous email checks can be implemented in sending and receiving directions.
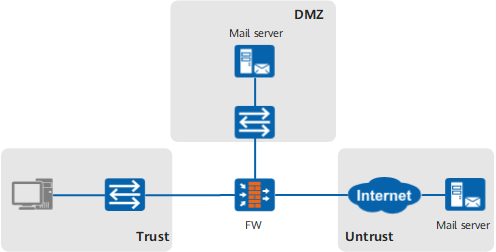
If the email is encapsulated in SMTP messages, the FW performs anonymous mail checks in the sending direction. As shown in Figure 1, if you enable anonymous mail checks in the sending direction between the untrust zone and the trust zone, the FW prevents the mail server from being attacked by anonymous email.
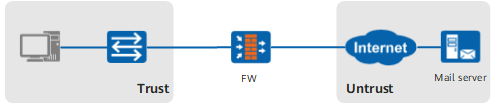
If the email is encapsulated in POP3 or IMAP messages, the FW performs the check in the receiving direction. As shown in Figure 2, if you enable anonymous mail checks in the receiving direction between the trust zone and the untrust zone, the FW prevents the PC from downloading anonymous email.
Procedure
- Choose .
- Choose Email Content Filtering tab.
- Click Add.
- Set the name and description of the mail content filtering profile.
Parameter
Description
Name
Name of the mail content filtering profile. The name, which must be unique, is displayed in the parameter list of mail filtering during the configuration of security policies.
Description
Description of the mail content filtering profile. The description must clearly indicate the function of the profile to make profiles easy to find and maintain. Example of the profile description: The mail filtering policies for the trust -> dmz interzone.
- Configure the anonymous mail check function in the sending direction.
Select the filtering action in Send Anonymous Email.
Parameter
Description
Permit
Allows email through.
Alarm
Allows email through but generates an alarm.
Deny
Blocks email.
- Configure the anonymous mail check function in the receiving direction.
Select the filtering action in Receive Anonymous Email.
Parameter
Description
Permit
Allows email through.
Alarm
Allows email through but generates an alarm.
Deny
Blocks email.
- Click OK to apply the mail filtering profile.

For additional help with these configurations, see Configuring Email Address Checks and Configuring Email Attachment Control. Then save the mail filtering profile and reference it in the security policy.
- Reference the mail filtering profile in the security policy. For details on how to configure security policies, see Configuring a Security Policy Using the Web UI.
- Click Submit.
The configuration does not take effect immediately after you create or modify the configuration file. You must click Submit on the upper right corner of the current page to activate the configuration. To save time, you can submit the configuration after all the operations on the profile are complete.